Content Search Web Part
The Content Search Web Part (CSWP) is a new web part since SharePoint 2013. The CSWP is a very powerful tool which uses search queries to display dynamic content from the SharePoint search index. Instead of using XSLT to style and format the results, CSWP uses display templates. A major advantage of the CSWP is the ability to query content from the whole farm, the biggest downside is the dependence on the search crawl. In this post I will go over the basic structure of the CSWP and how to create custom Display Templates.
CSWP vs CQWP
Both the CSWP and the CQWP have pro’s and con’s, depending on the situation one will be the best.
| Pro’s | ||
| CSWP | CQWP | |
| Farm wide results | Major and minor versions | |
| HTML and JavaScript | Near to instant results | |
| Build in paging | Build in grouping | |
| Con’s | ||
| CSWP | CQWP | |
| Crawl dependent | Site collection wide results | |
| Only major versions | XSLT 1.0 | |
| No build in grouping | No build in paging | |
Display template
Display Templates are used for the CSWP and for the search results in search. With the Display Templates we can control which content (managed properties) are shown and how they are displayed, with the use of JavaScript we can even add advanced logic. Every CSWP uses two Display Templates, one Control Template and one Item Template. Remember always edit the HTML files not the JS files.
The Control Template will only be rendered once and will provide the overall structure for the results, the structure contains the heading and footer of the result set. The Item Template will be rendered once for each result and provide the structure for all the shown result.

More information about the display templates can be found on MSDN Display Templates and MSDN Content Search Web Part.
Files and location
The display templates are located in a folder within the master page gallery.
/_catalogs/masterpage/Display Templates/Content Web Parts
The files follow a naming convention, files start with Control or Item. Based of the name of the file we can determine which type of display template it is.
- Files starting with Control are Control templates
- Files starting with Item are Item templates.
For every display template there are two file types a HTML and a JS. When editing the display templates we only edit the HTML files, never the JS files. SharePoint will automatically update the JS files based on the changed we make to the HTML.
Customize Control Templates
When customizing display template I always copy an existing template as a start point, editing SharePoint standard files is not a best practice. After copying the file use the UI to set the properties content type, title, description, hidden template and control type. Setting the properties through the UI lowers the change of setting the references incorrectly.
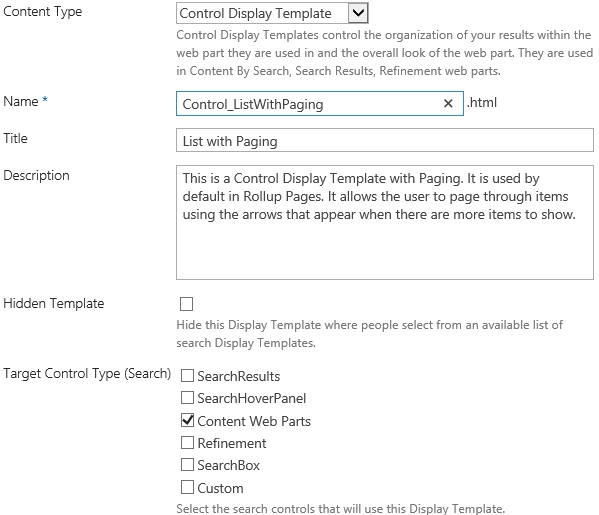
The settings are located in the header tag of the HTML file, you can change the settings here too.
<head>
<title>Lijst met paginering</title>

<!--[if gte mso 9]><xml>
<mso:CustomDocumentProperties>
<mso:TemplateHidden msdt:dt="string">0</mso:TemplateHidden>
<mso:MasterPageDescription msdt:dt="string">This is the description</mso:MasterPageDescription>
<mso:ContentTypeId msdt:dt="string">0x0101002039C03B61C64EC4A04F5361F385106601</mso:ContentTypeId>
<mso:TargetControlType msdt:dt="string">;#Content Web Parts;#</mso:TargetControlType>
<mso:HtmlDesignAssociated msdt:dt="string">1</mso:HtmlDesignAssociated>
</mso:CustomDocumentProperties>
</xml><![endif]-->
</head>
With display templates we often need to include JavaScripts, scripts can be added within the script block. The script block is located just below the first body tag.
<script>
   $includeLanguageScript(this.url, "~sitecollection/_catalogs/masterpage/Display Templates/Language Files/{Locale}/CustomStrings.js");
</script>
After the script block the main div starts, by default the id tag matches the control template name. The template needs to have this main div, even though it will not be rendered on the page.
<div id="Control_ListWithPaging_Custom">
Within this div we need to create all the logic, variables and HTML. JavaScript will be located within the special command tags and the HTML will be located outside of the tags. The tags are required for the SharePoint engine to be able and convert the HTML correctly to JavaScript.
<!--#_ _#-->
It is also possible to add the JavaScript within the HTML, simply add the following tags around the variable.
_#= =#_
The header of the Control Template is defined within the UL tag, this tag also contains the reference to the actual search results which are rendered by the Item Template.
_#= ctx.RenderGroups(ctx) =#_
After the UL tag we can add code to show in the footer. For example a hyperlink to a information page.
<div>
   <a href="/info.aspx">More info</a>
</div>
The Control Template also renders the HTML when there are no item. Within this if statement we can change what happens when there are no results. By default SharePoint shows the noResults variable.
<!--#_
if (ctx.ClientControl.get_shouldShowNoResultMessage())
{
_#-->
        <div class="_#= noResultsClassName =#_">_#= $noResults =#_</div>
<!--#_
}
_#-->
Customize Item Templates
Customizing Item Templates is similar to customizing Control Templates. This will result in some duplicate explanations. When customizing Item Template I always copy an existing template as a start point, editing SharePoint standard files is not a best practice. After copying the file use the UI to set the properties, content type, title, description, hidden template and control type. Do not set the ManagedPropertiesMapping through the UI, in my experience this does not always work correct. Setting the properties through the UI lowers the change of setting the references incorrectly.

The settings are located in the header tag of the HTML file. The ManagedPropertyMapping is used to map all the Search Managed Properties to the Item Template. We will need to add all the required properties to the header.
<head>
<title>Two lines</title>

<!--[if gte mso 9]><xml>
<mso:CustomDocumentProperties>
<mso:TemplateHidden msdt:dt="string">0</mso:TemplateHidden>
<mso:ManagedPropertyMapping msdt:dt="string">'Link URL'{Link URL}:'Path','Line 1'{Line 1}:'Title','Line 2'{Line 2}:'','FileExtension','SecondaryFileExtension'</mso:ManagedPropertyMapping>
<mso:MasterPageDescription msdt:dt="string">This Item Display Template will show a small thumbnail icon next to a hyperlink of the item title, with an additional line that is available for a custom managed property.</mso:MasterPageDescription>
<mso:ContentTypeId msdt:dt="string">0x0101002039C03B61C64EC4A04F5361F385106603</mso:ContentTypeId>
<mso:TargetControlType msdt:dt="string">;#Content Web Parts;#</mso:TargetControlType>
<mso:HtmlDesignAssociated msdt:dt="string">1</mso:HtmlDesignAssociated>
</mso:CustomDocumentProperties>
</xml><![endif]-->
</head>
The syntax for adding properties is as follows. Personally I find it very helpful to keep the property name equal to the managed property name. For more information about adding properties go to SteveMann’s Path blog post about this subject.
'[property name for us in template]':'[managed property from search]'
After adding all the managed properties we need to make JavaScript variables to make the actual result values available within the Item Template. The variables are added within the JavaScript tags inside the main div. This is also the location where we can create the JavaScript logic, in later blogs I will go further into this. In this example I added the property ArticleStartDate.
var ArticleStartDate = ctx.CurrentItem.ArticleStartDateOWSDATE;
With display templates we often need to include JavaScripts, scripts can be added within the script block. The script block is located just below the first body tag.
<script>
   $includeLanguageScript(this.url, "~sitecollection/_catalogs/masterpage/Display Templates/Language Files/{Locale}/CustomStrings.js");
</script>
Finally we need to show the search results values in a proper layout with styling. Within the main div we can add and change the HTML to display the results in anyway.
<div class="Container" id="_#= dataContainerId =#_">
   <a class="ms-displayBlock" href=" _#= linkURL =#_ " title="_#= $htmlEncode(Titel.defaultValueRenderer(Titel)) =#_" id="_#= TitelLinkId =#_">_#= Title =#_</a>
<div class="Date">_#= localArticleDate.format("dd-MM-yyyy") =#_ - _#= Location =#_ </div>
<div class="ItemSubLineLight">_#= PublishingPageContent=#_</div>
Tips
- Us the UI to set properties
- Never edit the JavaScript generated by SharePoint
- Enable continues crawl
- When reusing code or templates check all the references
- Follow the file naming convention
Links

Reblogged this on SharePoint Solutions.
Nice article, makes it very clear!
I have used display templates with the ‘save site as template’ feature without any issues. This should work just fine. The display templates are stored within the site collection root and not the template, i am not sure why the display templates are “lost”. Can you explain to me what you mean by lost?
Are you storing the display templates in the SharePoint default location?
Sorry for the late responce, I was ill.
That is indeed the proper place. I am not sure what is going on here. It might be a bug. What you can try to do is export the webparts and set the display template in the code instead of in the UI. This might help otherwise I do not know what to do.
Hi just some feedback on Grouping CSWP. Just letting you know Grouping is Available on second tab when you click Change Query button. Its hidden under the refiner Tab > Show More link.
Hope this helps