SharePoint Teams: Link web part

A new Link web part has been added to the Team sites. With this web part you can add a link (website) to  a page to create a link that displays information about the linked page.
The web part will create a clickabe tile that contains a title, description and a picture if possible of the linked page. The look and feel is the same as linking a web page in Slack or WhatsApp.

Solution

  1. Open the home page of a teamsite
  2. Set the page in the edit mode
  3. Click on the plus icon and click on the Link web part
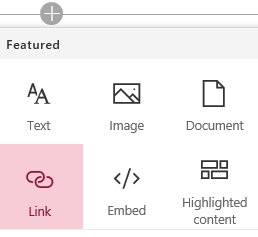
  4. Provide the web part with a hyperlink and press enter. The web part will resolve the hyperlink and show some information of the website.
  5. Click on the X next to the hyperlink to hide the hyperlink and save the changes

SharePoint 2013 Workflow: Check if list item exists

For a customer we are building a complex approval process on Office 365 with SharePoint 2013 workflows. During the process we need to check if an list item (in an other list) existed. There is no default action that lets you do this. You can however us the set variable and if statement action to figure out if the item you are looking for exists or not. This is a useful trick to know when working with SharePoint 2013 workflows.

Solution

  1. Create a SharePoint 2013 workflow.
  2. Create a  variable called ContractItemID, here we will try to store the ID of the list item we are trying to find.
  3. Set the variable to 0 (zero).
  4. Then we need to try and set the ContractItemID variable with the ContractID of the item we are searching. This can be from the same list or a different list.
  5. I am trying to find the ID of a list item with a specific Contract Number.
  6. If the workflow finds an ID the ID will be stored in the variable, if no item is found then the ContractItemID value will remain 0 (zero)
  7. Use an if statement to determine if the list item exists.


JavaScript / jQuery: Hide/show fields

With SharePoint we use a lot of lists and libraries to store and share information, we add and change this information with the help of forms. In most cases we create one form with all the information required for the content. Even if not all the information is required for all types of content or if it depends on a phase or status. With the help of jQuery and JavaScript we can create a more dynamic form that will hide/show fields based on selected values of fields. Make sure to disable the quick option, otherwise user will be able to edit the field outside of the provided solution.

SharePoint 2013/Online: Disable Quick edit

  1. Open the list or library settings
  2. Open the Advanced settings
  3. Set Quick Edit to No

SharePoint 2010: Disable Datasheet editing

  1. Open the list or library settings
  2. Open the Advanced settings
  3. Set Datasheet to No

JavaScript: New Form

  1. Open your favorite JavaScript Editor.
  2. Create a new JavaScript file called NewFormHideShow.js
  3. Add the following base code to the JavaScript file.

    $( document ).ready(function() {
       
    }
    );
  4. The first step is to hide the columns. Find the display names of the field that need to be hidden. Note that you need the name located in the HTML nobr tag.
  5. You can use a DOM explorer to find the correct names.
  6. For each field add the following code.
    $('nobr:contains("[Field Name]")').closest('tr').hide(); 
    
  7. In my example I hide two fields, Finalized Date and Finalized By. My example code for the document ready function is shown below.
    $(document).ready(function()
       {
          $('nobr:contains("Finalized Date")').closest('tr').hide(); 
          $('nobr:contains("Finalized By")').closest('tr').hide();
       });
    
  8. The second step is to make the function that hides or shows the fields depended on the selected value.
  9. Add the following code to the JavaScript.
    (function($){
       function showHideRegionLocation() 
       {
          var FeedbackMatchingValue = 'Final';
    
          var thisDiv = $("select[title='Status']"); 
          var mmFieldValue = thisDiv.find("option:selected").text();
    		
          $('nobr:contains("Finalized Date")').closest('tr').hide(); 
          $('nobr:contains("Finalized By")').closest('tr').hide();
    			
          if (mmFieldValue.indexOf(FeedbackMatchingValue) > -1) 
          {
             $('nobr:contains("Finalized Date")').closest('tr').show(); 
             $('nobr:contains("Finalized By")').closest('tr').show();
          } 					
       }
    
  10. Set the var FeedbackMatchingValue to the value which will show the hidden fields.
  11. Set the var thisDiv to the name of the Field that is used to show/hide the fields. Note that different types are just for different columns example Select or Input.
  12. Add the hide and Show codes. The code hides or show the table row (tr).
  13. Add the final function to the code. This part makes sure the functions runs when a users selects and/or reselects the option.
    $(document).ready(function() {
       $("select[id^='Status'").on('blur', showHideRegionLocation).on('change', showHideRegionLocation);
       });
    })(window.jQuery);
  14. Change the value after id^ to the field that contains the value on which field are being shown/hidden.
  15. The final code looks like this.
    $(document).ready(function()
       {
          $('nobr:contains("Finalized Date")').closest('tr').hide(); 
          $('nobr:contains("Finalized By")').closest('tr').hide();
    });
    
    (function($){
       function showHideRegionLocation() 
       {
       var FeedbackMatchingValue = 'Final';
       
       var thisDiv = $("select[title='Status']"); 
       var mmFieldValue = thisDiv.find("option:selected").text();
    		
       $('nobr:contains("Finalized Date")').closest('tr').hide(); 
       $('nobr:contains("Finalized By")').closest('tr').hide();
    			
       if (mmFieldValue.indexOf(FeedbackMatchingValue) > -1) 
       {
          $('nobr:contains("Finalized Date")').closest('tr').show(); 
          $('nobr:contains("Finalized By")').closest('tr').show();
       } 	
    }
    
    $(document).ready(function() {
       $("select[id^='Status'").on('blur', showHideRegionLocation).on('change', showHideRegionLocation);
       });	
    })(window.jQuery);
    

JavaScript: Edit Form

  1. The edit form is almost completely the same, only the last function is different.
  2. Open your favorite JavaScript Editor.
  3. Create a new JavaScript file called EditFormHideShow.js
  4. Follow the steps 3 – 12 from the chapter JavaScript: New Form.
  5. Add the final function to the code. This part makes sure the functions runs when a users selects and/or reselects the option.
    $(document).ready(function() {
       setTimeout(function() {
          showHideRegionLocation();
       }, 1000);
       $("select[id^='Status'").on('blur', showHideRegionLocation).on('change', showHideRegionLocation);
       });	
    })(window.jQuery);
    
  6. Change the value after id^ to the field that contains the value on which field are being shown/hidden.
  7. The final code looks like this.
    $(document).ready(function()
       {
          $('nobr:contains("Finalized Date")').closest('tr').hide(); 
          $('nobr:contains("Finalized By")').closest('tr').hide();
    });
    
    (function($){
       function showHideRegionLocation() 
       {
       var FeedbackMatchingValue = 'Final';
       
       var thisDiv = $("select[title='Status']"); 
       var mmFieldValue = thisDiv.find("option:selected").text();
    		
       $('nobr:contains("Finalized Date")').closest('tr').hide(); 
       $('nobr:contains("Finalized By")').closest('tr').hide();
    			
       if (mmFieldValue.indexOf(FeedbackMatchingValue) > -1) 
       {
          $('nobr:contains("Finalized Date")').closest('tr').show(); 
          $('nobr:contains("Finalized By")').closest('tr').show();
       } 	
    }
    $(document).ready(function() {
       setTimeout(function() {
          showHideRegionLocation();
       }, 1000);
       $("select[id^='Status'").on('blur', showHideRegionLocation).on('change', showHideRegionLocation);
       });	
    })(window.jQuery);

Adding JavaScript to a form

  1. Open the edit and/or new form of the list.
  2. Set the form in edit mode
  3. Add the Script Editor Web Part to the page
  4. Edit the SNIPPET and add the following code.

    <script src="../../SiteAssets/System/jquery-3.1.1.min.js" type="text/javascript"></script> 
    <script src="../../SiteAssets/System/EditFormHideShow.js" type="text/javascript"></script>
    
  5. Insert the code en Stop editing the form.
  6. Save the custom JavaScript HideColumns and the jQuery script in the correct location.
  7. The JavaScript will now run and hide or shows the field based on the selected value of the field Status.


JavaScript / jQuery: Set fields to read only

With SharePoint we use a lot of lists and libraries to store and share information. But not every bit of information needs to be managed/changed by users. Sometimes a workflow or code is responsible for the information. With default SharePoint it is not possible to set field to read only,  but with the help of jQuery and JavaScript we can. We can add JavaScript to the new and or edit form and disable (read only) any field we want. Make sure to disable the quick option, otherwise user will be able to edit the read only field using this feature.

SharePoint 2013/Online: Disable Quick edit

  1. Open the list or library settings
  2. Open the Advanced settings
  3. Set Quick Edit to No

SharePoint 2010: Disable Datasheet editing

  1. Open the list or library settings
  2. Open the Advanced settings
  3. Set Datasheet to No

Creating the JavaScript

  1. Open your favorite JavaScript Editor
  2. Create a new JavaScript file called HideColumns.js
  3. Add the following base code to the JavaScript file
    // A $( document ).ready() block.
    $( document ).ready(function() {
       
    }
    );
    
  4. Now you need to get the display names of the fields you need to set to read only (disable). Note that you need the correct name of the input, select, text area etc fields. Make sure you do not select the label of the field.
  5. You can use a DOM explorer to find the correct type of fields and the corresponding name. Note that different types are just for different columns
  6. In this example I selected the Multiple Lines of text field
  7. The selected code is
  8. In this code you are able to find the name: Multiple Lines
  9. And the type of field: textarea
  10. Do this for all the fields you need disable
  11. In my example I will disable the following fields
    Name Column Type Input field type
    Multiple Lines Multiple lines of text Textarea
    Title Single line of text Input
    Date Date and time Input
    Choice Choice Select
  12. Depended on the type of field different code is required.
  13. For Input and textarea use
    .attr("disabled", "disabled"); 
    
  14. For select we use
    .prop("disabled", true);
    
  15. The final code will look as follows
    // A $( document ).ready() block.
    $( document ).ready(function() {
        jQuery("input[title='Title']").attr("disabled", "disabled"); 
        jQuery("textarea[title='Multiple Lines']").attr("disabled", "disabled");
        jQuery("input[title='Date']").attr("disabled", "disabled"); 	
        jQuery("select[title='Choice']").prop("disabled", true);
        }
    );
    

Adding JavaScript to a form

  1. Open the edit (or new) form of the list.
  2. Set the edit form in edit mode
  3. Add the Script Editor Web Part to the page
  4. Edit the SNIPPET and add the following code

    <script src="../../SiteAssets/System/jquery-3.1.1.min.js" type="text/javascript"></script> 
    <script src="../../SiteAssets/System/HideColumns.js" type="text/javascript"></script> 
    
  5. Insert the code en Stop editing the form.
  6. Save the custom JavaScript HideColumns and the jQuery script in the correct location
  7. The JavaScript will now run and set the required field on read only when the edit form is opened

SharePoint 2010 Workflow: Capture document set versions

When a user changes a document set the version is not automatically capture, the user can capture the version by manually . Capturing a version manually is down with the Capture Version button located in the Document Set Tab in the ribbon. This is not the a secure way to make sure all versions are captured. With a SharePoint 2010 workflow (not workflow 2013) you can capture all the versions automatically. The solution has been tested on SharePoint 2013 On Premise and SharePoint Online (Office 365).

Solution

There is a small bug with the action Capture a version of the Document Set, the action runs multiple time (equal to the number of columns) and captures multiple versions. To prevent this from happening add a wait action to the workflow, this will make sure that only one version will be captured.

  1. Create a SharePoint 2010 workflow
  2. Configure the workflow to Start Workflow automatically when an item is Changed
  3. Add the action Wait for Field Change in Current Item
  4. Set the action to: Wait for Modified by (column) to equal Current Item: Modified By (column)
  5. Add the action Capture a version of the Document Set, with comment: Version Captured by Workflow.
  6. The full workflow looks like this

SharePoint: Get the Role ID

SharePoint uses role ID’s to create the permissions levels for SharePoint Groups. These role ID’s are a set of numbers that define the precise permissions level details.
The most used role ID are for Visitors (Read), Members (Contribute) and Owners (Full control). When you need other permission levels, creating the correct numbers can be difficult. With the help of the following steps it will be easy to create/find the role ID’s you need. This solution works for SharePoint Online and SharePoint 2013. The role ID’s are used when setting permissions using a rest call, see the blog post SharePoint 2013 Workflow: Changing Permissions with REST Calls for the details.

Permissions level  Role ID
Full Control 1073741829
Contribute 1073741827
Read 1073741826

Solution

  1. Open the SharePoint 2013 or Online site.
  2. Create the required Permission level on the Site Collection
  3. Go Site Settings – Site Permissions
  4. Open the Permission Levels
  5. Create a custom permission level, in this example I created a permission level called Custom Contribute.
  6. Now we need to find the corresponding role ID
  7. Create the following URL for your farm / site
    https://contoso.sharepoint.com/sites/dev/_api/web/roledefinitions
    
  8. This will open a page which looks like an RSS feed.
  9. Right click on the page to View Source, this will open the Source in Notepad.
  10. Now copy the code into your favorite XML editor.
  11. Search the XLM for the correct entry
  12. The Role ID is located in the link tag. The Role ID for my custom permission level is 1073741927
  13. The Role ID can now be used in web services, see the blog post SharePoint 2013 Workflow: Changing Permissions with REST Calls for the details.