Flow: Start a flow with another flow

A flow was becoming very big and slow and this generated an undesirable situation, it also interfed with the overall duration of the process. The original flow looped through all the items of a SharePoint list and preformed several actions and manipulations, this look more than a hour. The solution was to created a flow that looped through all the items and a second flow that preformed all the actions and manipulations if required.

During the writing of this blog post there is no default action that can start another flow. But we can start a flow by using the action called HTTP (web service).
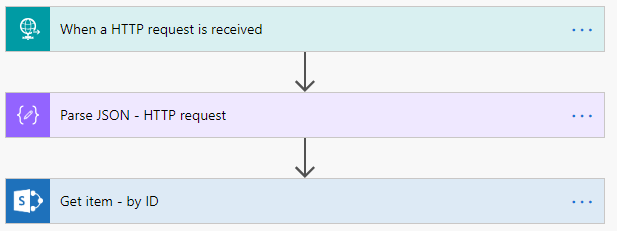
Flow being started

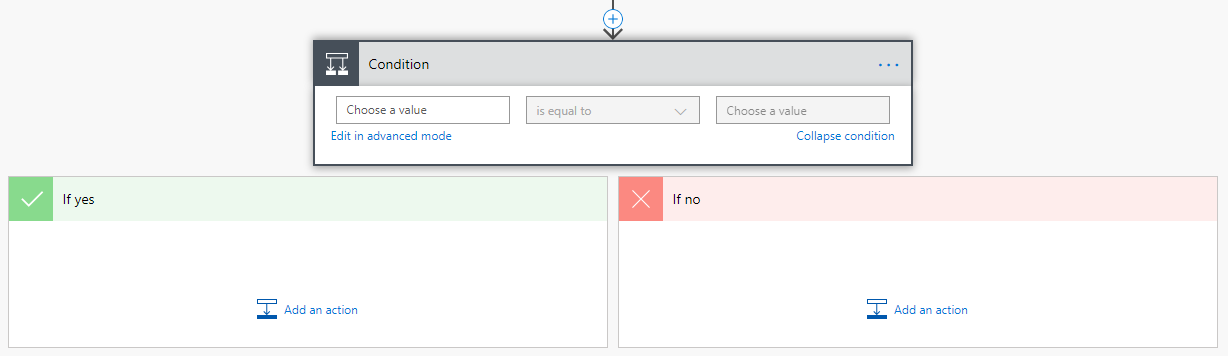
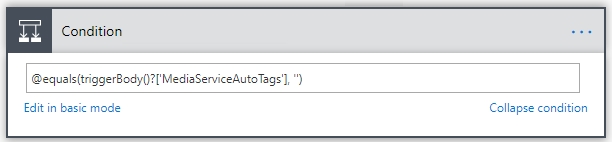
First we will need to create the flow that is being started. This is required because we will need the HTTP POST URL of this flow in the flow that starts a Flow. This flow will receive an id and then start on that item.

  • Create a flow with the trigger: When a HTTP request is recieved.
  • Add the action Parse JSON.
  • Add the Get Item (by ID).
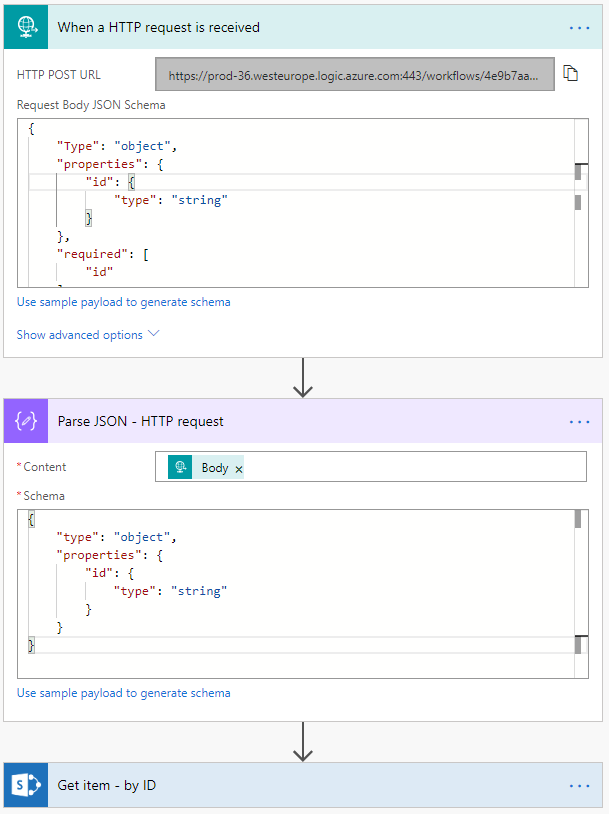
  • Open the trigger action, the generated HTTP POST URL will be used in the other flow.
  • Set the Request Body JSON Schema to be able to receive an id value.
    {     "Type": "object",     "properties": {         "id": {             "type": "string"         }     },     "required": [         "id"     ] } 
  • Set the output of the trigger called body as the content (input) for the Parse JSON action.
  • Set the following schema
    {     "type": "object",     "properties": {         "id": {             "type": "string"         }     } } 
  • Set the action Get Item (by ID) to use the ID generated in the parse JSON action.
  • Now you can add all the required actions and manipulations you need to do on the item.

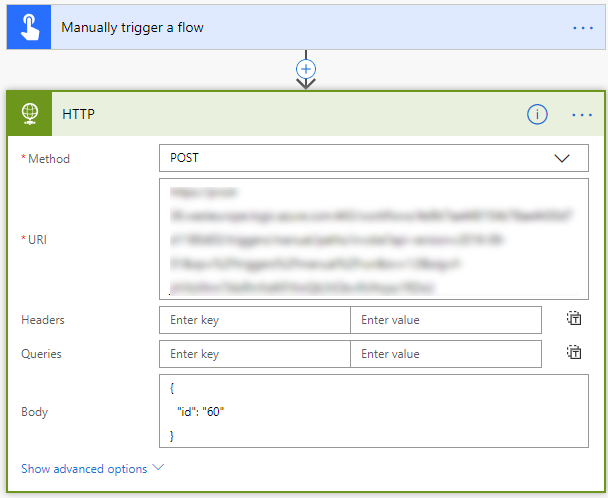
Flow that start a flow

When you start a flow on a item you will need to tell the flow on which item to start. In my example I am using a fixed id. In most cases you will need to created a more dynamic solution.

  • Create a flow that starts with your preferred trigger, in my example I used the manual trigger.
  • Add the HTTP action to the flow.
  • Set the method to POST.
  • Set the URI, copy it from the trigger of the flow that is being started.
  • Set the Body .
    {   "id": "60" } 

Flow: Working around the lookup column threshold limit

Microsoft Flow is a very powerful and useful tool. Flow provides reliable solutions for automating processes and supporting business solutions. Flow can synchronize, collect and create data and much more. When creating a Flow that is connected to a SharePoint List you might encounter one of the limits of Flow. In this blog post I will explain how to work with the lookup column threshold limit.

What is the lookup column threshold limit?

The lookup column threshold limit it the maximum number (12) of lookup columns you can collect using an action or trigger in Flow. When you go over this limit you will receive the following error.

“The query cannot be completed because the number of lookup columns it contains exceeds the lookup column threshold enforced by the administrator.”

The threshold limit is set by Microsoft and cannot be changed. The reason this limit exists is to make sure the performance of the Flow is up to standards. You can also encounter this limit in PowerBI, but this post only focus on Flow.

The Lookup columns are

  • Lookup
  • Managed metadata (single and multi-value)
  • People and group (single and multi-value)
  • Workflow status
  • Created by (people and group)
  • Modified by (people and group)

Working around the limit

When using an action to collect data from a SharePoint list you can limit the gathered columns by selecting a view in the action.

  • Add the Get Items action.
  • Click on Show advanced options.
  • Select the view with the required columns (less than 12 lookup columns).
  • For certain SharePoint triggers you can also do this.

Microsoft Flow: Advanced Conditions

The interface for building Microsoft Flow is great and an incredible amount of configuration can be done through the interface without coding. If the required configuration is not available through the interface you can always try the advanced mode. For a flow solution I needed to create a few advanced conditions, I was able to create them using the advanced mode. In this blog post I will explain how to create custom conditions and show where you can find all the available functions.

  • Check if a field is empty.
  • Check if multiple fields are not empty.
  • Check if multiple fields are equal to Yes and a field is not empty.

More information about the functions can be found here and here.

Check if field is empty

  • Create a Flow that is connected to a SharePoint list.
  • Add the condition action.
  • Rename the condition to Condition – If Field name is empty.
  • Select the field and click on Edit in advanced mode.
  • The code for the selected condition is now visible.
  • Change the equals function empty and remove  the ‘ and ” at the end.
  • The condition should now look as follows.
    @empty(triggerBody()?['MediaServiceAutoTags'])

Check if fields are not empty

It’s also possible to compare multiple fields, for example if multiple fields are not empty. For my solution I needed to make sure all the required formation was provided by the user before sending an email notification. In this example the condition checks if SupplierName and VendorNumber are not empty.

  • Create a Flow that is connected to a SharePoint list.
  • Add the condition action.
  • Rename the condition to Condition – If Field name is not empty.
  • Select the field and click on Edit in advanced mode.
  • The code for the selected condition is now visible.
  • Copy the code to your favorite editor.
  • We will use the functions not and empty to find out if the fields contains data.
    @not(empty(triggerBody()?['SupplierName']))
    
  • Then combine the code for both fields with the and function.
    @and(not(empty(triggerBody()?['SupplierName'])),not(empty(triggerBody()?['VendorNumber'])))

Check on multiple fields

In this example the condition checks if the fields InfoCompleteNotificaction and VenderFilledNotificaction are equal to Yes and if VendorNumber is not empty.

  • Create a Flow that is connected to a SharePoint list.
  • Add the condition action.
  • Rename the condition to Condition – If Fields are Yes and VendorNumber is not empty.
  • Select the field and click on Edit in advanced mode.
  • The code for the selected condition is now visible.
  • Copy the code to your favorite editor.
  • We will be using the function and, equals, not and empty.
  • The condition should now look as follows.
    @and(equals(triggerBody()?['InfoCompleteNotificaction'], 'Yes'),equals(triggerBody()?['VenderFilledNotificaction'], 'Yes'),not(empty(triggerBody()?['VendorNumber'])))
    

PowerApp Search and Filters

In PowerApps we often show lots of information and a good PowerApp will provide the user with the ability to find the relevant data quickly. We can do this by providing the user with search and filter capabilities. Therefore it not a surprise to me that I get many questions about searching in PowerApps. In this blog I will show various examples of search and filter solutions. I created a small PowerApp to support all the examples.

Small PowerApp

  • Create a SharePoint list called FAQ with the columns Title and Priority as a single line of text.
  • Create a Canvas PowerApp.
  • Connect the PowerApp to the FAQ list.
  • Add a gallery and connect it to the FAQ list.
  • Create a dropdown control for the filter.
  • Create a text input control for the search box.
  • Create the PrioFilterOptions on the OnStart of the Home_Screen.
    ClearCollect(PrioFilterOptions, "", "1", "2","3")
    
  • Connect the PrioFilterOptions to the dropdown control.
  • Add the following items to the FAQ list.
    • Title: Question 1, Priority: 1
    • Title: Question 2, Priority: 2
    • Title: Question 3, Priority: 3

Filter using contains

The most frequently  asked question is; How can I search using contains? It’s possible to search like this by using the in operator. In all my examples I will be using the in operator.

Filter( Table, value in Field )

Filter with a search box

A search box is a text input control, we can use this control as a search box.

Filter(FAQ, Home_Search_Inputbox_SearchBox.Text in Title)

Filter with a dropdown

Filter(FAQ, Home_Search_DropDown_FilterPrio.Selected.Value in Priority)

Filter with a searchbox and a dropdown

This example has a little issue, after selecting a dropdown value you can no longer filter only by using the search box. If you select the empty value then the filter will use that as a filter value.

Filter(FAQ, Home_Search_DropDown_FilterPrio.Selected.Value in Priority && Home_Search_Inputbox_SearchBox.Text in Title)

Filter with a searchbox and a dropdown (when not empty)

In this example the user is able to ‘deselect’ the chosen option from the dropdown. I recommend always using this example when using a dropdown filter.

If(IsBlank(Home_Search_DropDown_FilterPrio.Selected.Value),
Filter(FAQ, Home_Search_Inputbox_SearchBox.Text in Title),
Filter(FAQ, Home_Search_DropDown_FilterPrio.Selected.Value in Priority && Home_Search_Inputbox_SearchBox.Text in Title))


SharePoint Online: Custom Search Refiner Display Templates

The Refinement Panel is a solid part of almost every classic search solution. In most cases we can configure the selected refiner perfectly by changing the settings, but not always. Fortunately we are also able to change the display template per selected refiner and create our own custom Refiner Display Templates. In this example I created a custom display template with the following customizations.

  • Removed the first two characters of the filter option.
  • Made the refinement panel wider.

More information about display templates in general can be found on MSDN Display Templates.

Create a custom Refinement display template

First we need to make a copy of the default refinement display template, the name of the display template is Filter_Default.

  • Navigate to the filter display templates: Master Page Gallery / Display Templates / Filters.
    (http://your-site/_catalogs/masterpage/Display Templates/Filters)
  • Copy the HTML file Filter_Default and give it a new name for example: Filter_Custom.html
  • Remember not to copy the JS file, this will be created automatically.
  • Update the Title field of the display template.
  • Open Filter_Custom.html in your favorite editor.
  • Remove the code which is not needed.
    • I removed rows 33-201 and 209-229
    • Note that this might be different for you

Solution for removing characters

  • Find the following code.
    <div id='Container'>
    
  • Find the following div located below the previous one.
    <div id='Value' name='Item'>
  • Between these divs add the if statement that shortens the shown filter options.
  • Note that is does not remove the show all items feature.
  • In my example I remove the first 2 characters.
    var refinementNameShorter=refinementName;
    
    if(refinementName!="All")
    {
        refinementNameShorter = refinementName.substring(2);
        refinementNameShorter = refinementNameShorter.substring(0, refinementNameShorter.indexOf("|"))
    }
    

Solution for wider refinement panel

  • Find the following code.
    <div id='Container'>
    
  • Inside this div is the following div located.
    <div id='Value' name='Item'>
    
  • Change this into the following code.
    <div id='Value' name='Item' style="width: 500px;">
    

Configure the refinement panel

  • Open the page with the refinement panel
  • Select by Display template the newly created Filter_Custom

Code result

PowerApps: Use a SharePoint list for PowerApps Styling

When developing with PowerApps​​ we often want to store information in a SharePoint list and access the information in the PowerApp. The three main reasons are to store the styling code, settings or just for data storage. In this post I will explain how to connect a SharePoint list to PowerApp and use it for the styling of the PowerApp. You will have a central location to maintain the styling of one or multiple PowerApps.

Connect​​​​ to PowerApp

  1. Create a SharePoint list called PowerAppStyling ​with the following columns.
    • ​​Title (single line of text)
    • Setting (single line of text)
  2. Activate versioning on the SharePoint list.
  3. ​Create a PowerApp.
    • ​In my example I created a PowerApp from a SharePoint list.
  4. ​Click on the tab View followed by Data sources.
  5. Click on Add data source.
  6. Click on SharePoint (for me the last option).
  7. Select the correct site or provide the URL and Click on Go.
  8. Select the the list and click on Connect.
  9. The list is now connected and can be used in the PowerApp.

Use for SharePoint list for s​tyling

We need the styling as soon as the PowerApp starts, so we need to store the styling in a collection when the PowerApp launches. If you can avoid creating collection on startup do so. You want the PowerApp to laod as quickly as possible. ​In the SharePoint list add the required styling code. You can use the following example.

  1. Open the PowerApp.
  2. On the first screen, find the OnStart action.
  3. Create a collection called Collection_Styling to store the PowerAppStyling​ datasource.
  4. When accessing the styling code, always get it from the collection. This is faster than accessing the SharePoint list.
  5. Create a label called Label_Style_Example.
  6. Set the Text to This is my style.
  7. Set the font color of the label.
  8. Set the fill (background) color of the label.
  9. Set the border color of the label.
  10. Set the border color of the label.
  11. The label will now look all black because the Collection_Styling is still empty, the PowerApp has not been started yet.
  12. Run the PowerApp and see the result, sometimes you need to restart the PowerApp multiple times.