SharePoint: New experience page in classic site

A customer wanted to use a web part, on a classic site page, that is only available for new experience (modern) site pages. This is not possible to do, we can however create new experience (modern) site pages in a classic site. I don’t recommend this often because the design of the pages are not equal and might confuse the users. In this post I will explain how you can do this.

Solution

  • Open the site pages library of your site.
  • Open the advanced settings of the library.
  • Select by List experience the option New experience
  • Open the site pages library and create a new site page in the library.
  • The page will be a new experience page.
  • If required set the List experience the option  back to Classic experience.

SharePoint: why you cannot Save Site as template

There are two reasons why you might not be able to save a site as a template. In this post I will explain what the reasons are and how you can figure out what is causing your problem. The first reasons is that the publishing feature is activated and the second reason is that custom scripts are not allowed.

1. Publishing  features activated

The most common issues is that the publishing feature is activated on the site or on a parent site. If you are trying to make a template of a subsite this will not work when the parent site has an active publishing feature.

  1. Open the site settings
  2. Click on Manage site features
  3. Check if the publishing feature is active
  4. Do this also for possible parent sites

‘Solution’ for subsite without Publishing active

I have never run into problems when using this method for subsites. However be careful it is not supported by Microsoft for a reason.

  1. Create the following URL for you specific site
  2. [SiteURL]/_layouts/savetmpl.aspx
    or
    [SiteURL]/_layouts/15/savetmpl.aspx

Truely not supported ‘solution’ when publishing is active

I don’t recommend using this so called solution, you can run into all kinds of issues. I do however want to mention this because you can find this all over the internet being claimed as an actual solution.

  1. Create the following URL for you specific site
  2. [SiteURL]/_layouts/savetmpl.aspx
    or
    [SiteURL]/_layouts/15/savetmpl.aspx

Second truely not supported ‘solution’ when publishing is active

I also don’t recommend using this so called solution, you can run into all kinds of issues. I do however also want to mention this because you can find this all over the internet being claimed as an actual solution.

  1. Open the site settings
  2. Click on Manage site features
  3. Deactivate the Publishing feature
  4. Create the following URL for you specific site
  5. [SiteURL]/_layouts/savetmpl.aspx
    or
    [SiteURL]/_layouts/15/savetmpl.aspx

2. Custom Scripts are not allowed

If publishing is not activated, it is possible that custom scripting is not allowed on the tenant level. You can see in the SharePoint Admin Center if its allowed or not. If you don’t have permission to do this you can also check it by using the following method.

  1. Open the site settings
  2. Click on Manage site features
  3. Do you see the following options? Then custom scripts are not allowed.
  4. Do you see the following options? Then custom scripts are allowed.

Solution to allow for custom scripts

  1. Open the SharePoint Admin Center in the Office 365 Admin Center

  2. Click on Settings and go to the Custom Script section.
  3. Choose “Allow users to run custom script” for Allow users to run custom script on personal sites and Allow users to run custom script on self-service created sites
  4. Click OK.
  5. It might take up to 24 hours before you can now save the site as an template.

SharePoint Online: File move and copy for modern document libraries

In the blogpost SharePoint Online: A few new features I briefly talked about the then new move and copy file feature. Microsoft release an update to extend the capabilities and making it even more useful. This update give you the ability to move or copy files anywhere in SharePoint with version management and metadata protection! Meaning that versions and metadata will be moved/copied with the file. The move and copy feature is very useful after or during a migration, users typically will restructure and move files to new locations to make better use of the new environment. During and after the migration project we did for Vestia users where able to quickly move files to new locations. You can read (in Dutch) all about the project on www.Macaw.nl

Move/Copy details

When moving or coping files to a different location the metadata will only be preserved if the destination by matching the column names. If there is no match then the metadata will be lost.
When you use data governance labels to control information policies for retention or records management those must exist in the destination location. If the destination does not support policies the move/copy action will be blocked. The move action will also be blocked if the version management settings are not the same in the destination.

Move files in Office 365

  • Select one or more files
  • Click on the Move to button
  • Select the destination location.
    Note that you can select OneDrive and any SharePoint Site you have access to.
    If your destination is not on the short list use browse sites  to find it.
  • Click on Move here to move the file of files.

Copy files in Office 365

  • Copy files works exactly the same, beside selecting Copy instead of Move.

Office 2016: Outlook My Templates

Today I want to briefly talk about the My Template feature in Outlook. This  great add-in makes it very easy to create simple templates for emails. I used the old way (see below) but this was not very user-friendly. With the new feature you can create and use simple templates with a very user-friendly  interface. The major difference is that we cannot add images in these templates, perhaps this well be added in the future.

Create a template

  1. Create a new email.
  2. Click on View templates
  3. Click on + Template
  4. Type the information for the template and save the template

Use a Template

  1. Create a new email.
  2. Click on View templates and select the template
  3. If needed add more information and send the email

Old way: Create a Template

  1. Create a new email.
  2. Type the information for the template (e.g., all the standard information).
  3. Click File and choose Save as.  Specify the template File name and Save as file type Outlook Template (.oft).  Be sure to save it in the default location for Microsoft Templates.
  4. Close the email and do not save it when prompted.

Old way: Use a Template

  1. Choose New Items | More Items | Choose Form.
  2. In the Look In: box, select User Templates in File System
  3. Select the form you wish to use and click Open
  4. You can now type the needed information and click Send.

SharePoint: Hub sites new in Office 365

Today at Ignite 2017, we (Microsoft) announced SharePoint hub sites, a new building block of the intranet, to bring together related sites to roll up news and activity, to simplify search, and to create cohesion with shared navigation and look-and-feel.   The digital workplace is dynamic and ever changing. Busi…

Source: SharePoint hub sites new in Office 365

With the new hub sites in Office 365 we can roll up all related team and communication sites in one location. This will provide the users with focused entry points to find everything about a topic. Even if the information is located on different sites. For every team and communication site we set the related hub site and if needed be change it. The hub site will show activities and information from all related sites and provide the user with a powerful search scope to search within all related sites. A faster and easier way for users to find what they need.

A big upside of using hub site is during a transformation of a company. Simply change the association for a site and it is ‘migrated’ to the new hub. No complicated migration process is required.

Office 365: PowerApps Examples of often used formula

Microsoft PowerApps is part of Office 365 and provides users the ability to create and use mobile apps that are connect to data within and even outside of Office 365. PowerApps is a very powerful tool to help users on a day by day basis to do more, faster and easier. Every user can create basic PowerApps that can be used within in minutes, but the best Apps need a bit of customization.

PowerApps uses formulas, similar to Excel formulas, to create the desired behavior, design and interactions. In this blogpost I will share a couple of very useful customization, which we will be using quick often.

Search in a gallery

The default solution for search is that the value entered in the search box will search in the title field of the data in the gallery. This will already work when you created the PowerApp based on a SharePoint list

  1. Insert a Text input element
  2. Set the hint text to Search for items
  3. Set the default value to blank
  4. Set the Items property of the gallery to
    Filter([Name of datasource], StartsWith(Title, TextSearchBox1.Text)
    
  5. The complete default code with sort funtion on the title field is as follows. You can use this if you have a button called SortDescending1.
    SortByColumns(Filter([Name of datasource], StartsWith(Title, TextSearchBox2.Text)), “Title”, If(SortDescending1, Descending, Ascending))

Search on multiple fields

For searching on multiple fields it is easier to use the search function than the filter function. It is possible to do it with the filter function but it will become a very long and complicated formula.

  1. Insert a Text input element
  2. Set the hint text to Search for items
  3. Set the default value to blank
  4. The syntax of searching on multiple field is as follows
    Search( Table, SearchString, Column1 , Column2, … )
  5. Set the Items property of the gallery to
     Search(Tabel1_1, TextSearchBox1.Text, Title, Description)

Filter a gallery

Many PowerApp will use filters to provide users with a fast way to find the required data.

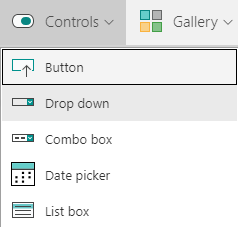
  1. Insert a Drop down control
  2. Name the drop down ddStatusFilters
  3. Connect the drop down to the status options, I will connect it to a collection called StatusFilters
  4. Create a collection called StatusFilters, that will be created on the Onvisible property of the screen
    ClearCollect(StatusFilters,{Status:”New”},{Status:”Approved”},{Status:”Rejected”})
  5. Set the Items property of the drop down to
    StatusFilters
  6. Set the Items property of the gallery to
    Filter([Name of datasource], ddStatusFilters.Selected.Value = Status)

Filter and search combined

  1. Create a search control and a filter control, see examples Search in a gallery and Filter a gallery
  2. Change the Items property of the gallery to
    Filter(SpecialistRequests, ddStatusFilters.Selected.Value in Status || TextSearchBox1.Text in Title)
  3. This will filter the status field on the selected filter in the drop down and filter the title field on the text in the search box.

Hide fields based on a condition

Field can be hidden based on a condition, this will help you make the form of a app more dynamic and easier to use. In this example we will hide the comment field if the status is new.

  1. Open the EditForm
  2. Change the Visible property of the Comment field to
    StatusDataCardValue.Text<>”New”
  3. StatusDataCardValue is the name my DataCardValue assosiated with the Status field.