Office 365: Microsoft StaffHub

Microsoft StaffHub is a tool within Office 365 and you can start using it for your planning. Microsoft StaffHub is a cloud-based platform that works across all your devices. It enables firstline workers and their managers to manage time, communicate with their teams, and share content. The tool give you an easy and straight forward solution to created shifts for different groups and inform them what to do. You can create shift, request vacation or request shift swaps, communcate with the team and all by using the mobile phone!

Create shifts

Export to PFD or Excel

Requests

Communicate

Assign tasks

Add file or URL


SharePoint: Add a web part to a page layout

When customizing SharePoint we often create our own page layouts for solutions like news, events or information pages. In some cases I add a web part to the page layout. Adding web parts to a page layout when you use your own editor (not SharePoint Designer) can be a bit difficult if you don’t know all the coding details. To make live a bit more easy I use the following steps.

Solution

The solution consist of two parts creating the required web part and adding it to a page layout, three if you us another editor than SharePoint Designer.

Creating the web part

  • Add the required web part to a test page
  • Configure the web part as required
  • Export the web part to your local computer
  • Upload the web part into the web part (galery), located on the site collection settings

Page layout

  • Open SharePoint Designer and open the site collection where you uploaded the web part
  • Create a new page layout or edit an existing page layout
  • Go to the location where you want to add the web part
  • Click on Insert, then web parts and select the required web part

Another editor

  • Open the page layout in your editor
  • Copy the web part code from SharePoint Designer and paste it into your editor of choice

User experience: Hyperlink redirection

A customer had an issue with the accessibility of an important centralized reporting list. The list contains the status of different knowledge sites, but the list was not directly accessible from those sites. Users that needed to update the list often where unable to find it. We added a hyperlink to the centralized list (the specific item) with a ‘redirect’ back to the related knowledge site. This changed the user experience from a centralized, semi hidden list, to an easy to find and easy to use list.

Solution

  1. Create a normal hyperlink, for example.
    https://myintranet.sharepoint.com/sites/planner/Lists/Tasks/EditForm.aspx?ID=1
    
  2. Add the source parameter after the hyperlink.
    https://myintranet.sharepoint.com/sites/planner/Lists/Tasks/EditForm.aspx?ID=1&Source=
    
  3. Add after the source parameter the redirect hyperlink.
    https://myintranet.sharepoint.com/sites/planner/Lists/Tasks/EditForm.aspx?ID=1&Source=https://myintranet.sharepoint.com/sites/otherlocation
    
  4. When the user clicks on the hyperlink the target location will be openend.
  5. When the users clicks a button (ok, save or cancel) the source hyperlink will be openend


SharePoint Online: Managed Properties User information not available

During the development of a reporting solution that depends heavily on search, I encountered an issue with the crawled and managed properties on SharePoint Online.
The problem was narrowed down to two issues.

  • Not all the fields where showing up as crawled properties.
  • The crawled/mapped property for the user fields only contains the display name.

When a user field is added normally there are multiple crawled properties that will appear, the ows_[field name] and the ows_q_USER_[field name]. Only the ows_[field name] was showing up.
The ows_[field name] only contains the display name, but I needed the display name and e-mail. The the ows_q_USER_[field name] was required, which contains all the available user information. Both issues were resolved using by following the steps below.

Solution: User field

  1. Make sure the field is added to an item and contains a value, otherwise it will not be crawled.
  2. Determine the required managed property type, for a people field that is a string.
  3. Add the crawled property to a preset managed property, the name will be similar to ows_[field name].
  4. Map ows_[field name] to  RefinableString00.
  5. After about 15 minutes more crawled and managed properties will be available.
  6. For an user field we need the crawled property ows_q_USER_[field name].
  7. Connect this crawled property to a new mapped property or use the one that was automatically created.
  8. I recommend not to remove the mapping of the crawled property (ows_[field name]) to the preset managed property. In some cases, this causes the problem to reappear.

Solution: No crawled property availible

This solution works a little bit different.

  1. Determine the required managed property type, for a text field that is a string.
  2. Make sure the field is added to an item and contains a value, otherwise it will not be crawled.
  3. Force a reindex.
  4. Go to the advanced settings of the list or library
  5. Reindex the list
  6. Wait 15-30 minutes and see if the field has been crawled, the name will be similar to ows_[field name].
  7. If this did not work try the following steps.
  8. Add a (random) text field to a preset managed property, for example to RefinableString01.
  9. Wait 15-30 minutes and see if your field has been crawled, the name will be similar to ows_[field name].
  10. If so add the crawled property to your custom managed property.
  11. So far, these steps have always fixed my missing properties problem.

SharePoint Online: Document dropdown navigation

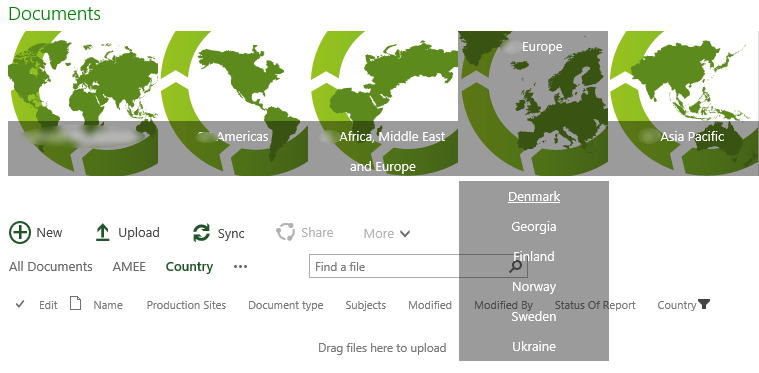
An international customer needed a good looking and user friendly navigation solution for a large set of documents. Users search for documents related to the region and country they work in. So we created an easy and good looking navigation focused on the regions and countries. The navigation element is added to the 5 region views and on the country view, allowing the users to easily navigate between regions and countries. The user hovers over a regions and the related countries will be shown.

Solution

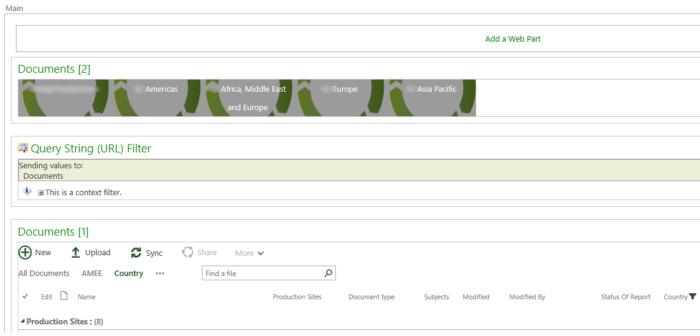
The solution consists of two main parts, the country view with filter and the navigation element. First I will explain how the country view works, followed by the navigation element.

Country view

The country view uses an query string (URL) filter that is added to the view page. This filter takes the value of the parameter Country out of the URL and filters the document based on this parameter.

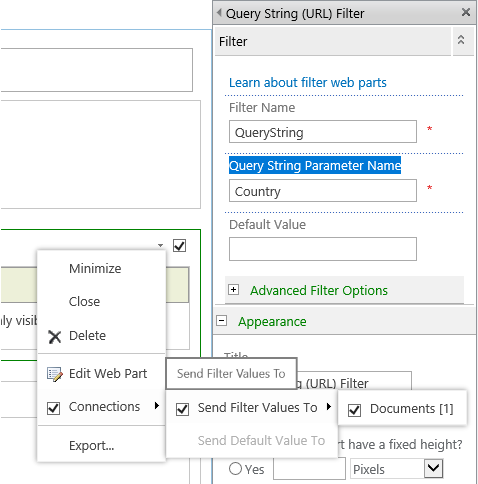
  • Add the Query String (URL) Filter to the page.
  • Set the Query String Parameter Name to Country.
  • Configure the Web part connection to send filter values to the document library.
  • The documents will be filtered when you add the parameter with a value to the URL
    ?country=Denmark+(DK)
    

Navigation element

The navigation element consists of three parts, JavaScript, CSS and the HTML.

  • Store the JavaScript, CSS and the HTML file on SharePoint.
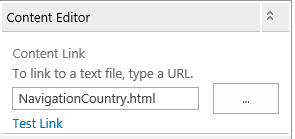
  • Add a Content Editor Web Part to the country view page.
  • Link the HTML file in the Content Link Setting
  • The HTML page show the structure of the navigation, the pictures, links etc.
  • The CSS file provided the looks.
  • The JavaScript is used to activate the hover.

JavaScript and CSS working together

JavaScript controls the hover function (mouseenter and mouseleave), the hover is active on all elements (div) with the class top.
Only div’s with a region picture have the class top set.

  • When the mouse enters the div, JS will add the class active to the div. 
  • When the mouse leaves the div, JS will remove the class active from to div.
$(document).on({
    mouseenter: function () {
        console.log('mouse-in');
        $(this).addClass('active');
    },

    mouseleave: function () {
        console.log('mouse-out');
        $('.top').removeClass('active');
    }
}, '.top');

When the class active is added the corresponding CSS is applied to the div, resulting in:

  • The dropdown (div with URLs) will be shown.
    • The div is hidden by default.
      display: none;
      
  • The overlay on the region div will be set to full.

.top.active .bottom-container { 
	display: block;
}

.active.top > a > .title {
	height:150px;
	top: 0;	
}