SharePoint Online: Managed Properties User information not available

During the development of a reporting solution that depends heavily on search, I encountered an issue with the crawled and managed properties on SharePoint Online.
The problem was narrowed down to two issues.

  • Not all the fields where showing up as crawled properties.
  • The crawled/mapped property for the user fields only contains the display name.

When a user field is added normally there are multiple crawled properties that will appear, the ows_[field name] and the ows_q_USER_[field name]. Only the ows_[field name] was showing up.
The ows_[field name] only contains the display name, but I needed the display name and e-mail. The the ows_q_USER_[field name] was required, which contains all the available user information. Both issues were resolved using by following the steps below.

Solution: User field

  1. Make sure the field is added to an item and contains a value, otherwise it will not be crawled.
  2. Determine the required managed property type, for a people field that is a string.
  3. Add the crawled property to a preset managed property, the name will be similar to ows_[field name].
  4. Map ows_[field name] to  RefinableString00.
  5. After about 15 minutes more crawled and managed properties will be available.
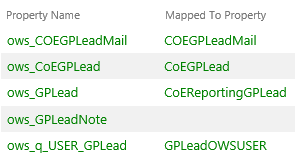
  6. For an user field we need the crawled property ows_q_USER_[field name].
  7. Connect this crawled property to a new mapped property or use the one that was automatically created.
  8. I recommend not to remove the mapping of the crawled property (ows_[field name]) to the preset managed property. In some cases, this causes the problem to reappear.

Solution: No crawled property availible

This solution works a little bit different.

  1. Determine the required managed property type, for a text field that is a string.
  2. Make sure the field is added to an item and contains a value, otherwise it will not be crawled.
  3. Force a reindex.
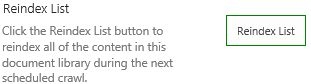
  4. Go to the advanced settings of the list or library
  5. Reindex the list
  6. Wait 15-30 minutes and see if the field has been crawled, the name will be similar to ows_[field name].
  7. If this did not work try the following steps.
  8. Add a (random) text field to a preset managed property, for example to RefinableString01.
  9. Wait 15-30 minutes and see if your field has been crawled, the name will be similar to ows_[field name].
  10. If so add the crawled property to your custom managed property.
  11. So far, these steps have always fixed my missing properties problem.

Display Template custom footer

The Control Template is responsible for the information that is shown in the footer. By default no footer will be displayed, we are able to change this to what ever HTML we want. But remember that we do not have any item related information in the control template. In this blog post I will explain how too create a footer. More information on display templates can be found on my blog post SharePoint 2013 custom display templates.

Solution

1. Edit the related Control Template.
2. Find the end tag of the main UL.

<ul class="cbs-List">
   _#= ctx.RenderGroups(ctx) =#_
</ul>

3. We can place the footer direct below the </ul> or after the noResults If statement, but within the main DIV.

<!--#_
if (ctx.ClientControl.get_shouldShowNoResultMessage())
{
_#-->
        <div class="_#= noResultsClassName =#_">_#= $noResults =#_</div>
<!--#_
}
_#-->

4. Add the required footer html, for example a URL to a info page.

<div>
   <a href="/info.aspx">More info</a>
</div>

5. Publish the control template.

Result

CustomFooterText

Display Template custom no results text

The Control Template is responsible for the information that is shown when there are no results returned. Located in the control template is a JavaScript If statement that checks if there are no results returned. If there are no results then a default variable (noResults) will be displayed. We are able to change this to what ever HTML and text we want. In this blog post I will explain who to change this. More information on display templates can be found on my blog post SharePoint 2013 custom display templates.

Solution

1. Edit the related Control Template.
2. Find the if statement that checks if there are no results returned.

<!--#_
if (ctx.ClientControl.get_shouldShowNoResultMessage())
{
_#-->
        <div class="_#= noResultsClassName =#_">_#= $noResults =#_</div>
<!--#_
}
_#-->

3. Remove the default variable noResults and if needed remove the default class noResultsClassName

<!--#_
if (ctx.ClientControl.get_shouldShowNoResultMessage())
{
_#-->
        <div class=""> </div>
<!--#_
}
_#-->

4. Change the default text and if need add a new class for styling.

<!--#_
if (ctx.ClientControl.get_shouldShowNoResultMessage())
{
_#-->
        <div class="MyClass">This is a custom no results text!</div>
<!--#_
}
_#-->

5.Publish the Control Template

Result

CustomNoResultsText


Display Template Show Limits Characters

Display templates are used to show the queried results in a attractive and useful layout. With the CQWP we used XSLT to format the data as required, but with display templates we need to use JavaScript. One of my most formatted field is the publishing page content field. In this blog post I will explain how you can limit the number of characters shown. In this post I also explain how to remove the HTML markup.

Solution publishing page content
1. Edit the related Item Template.
2. Add the PublishingPageContent to the ManagedPropertyMapping. For a clean example I removed all mappings besides Title and PublishingPageContent.

<mso:ManagedPropertyMapping msdt:dt="string">'Titel':'Title','PublishingPageContent':'PublishingPageContentOWSHTML'</mso:ManagedPropertyMapping>

3. Create a variable for the PublishingPageContent column.

var PublishingPageContentHTML = $getItemValue(ctx, "PublishingPageContent");

4. The PublishingPageContentHTML will contain the page content but with styling. The following code will remove the styling.

var div = document.createElement("div");
div.innerHTML= PublishingPageContentHTML;
var PublishingPageContentL = div.textContent|| div.innerText|| "";

5. In most situations we also want to show a maximum number of characters followed bu three dots. The following code will limit the amount of characters to 175 followed by the required dots. If the content is less then 175 characters long, no dots will be displayed.

var PublishingPageContent = "";
if (PublishingPageContentL.toString().length > 175) {
	PublishingPageContent = PublishingPageContentL.toString().substring(0,175) + "...";
}
else {
	PublishingPageContent = PublishingPageContentL;
}

6. Us the code below to display the PublishingPageContent.

<div>
   _#= $htmlEncode(PublishingPageContent ) =#_
</div>


Result

CSWP Result

Remove HTML markup with display templates

Display templates are used to show the queried results in a attractive and useful layout. With the CQWP we used XSLT to format the data as required, but with display templates we need to use JavaScript. One of my most formatted field is the publishing page content field. In this blog post I will explain how you can show the field without the formatting tags by using JavaScript.

Solution publishing page content
1. Edit the related Item Template.
2. Add the PublishingPageContent to the ManagedPropertyMapping. For a clean example I removed all mappings besides Title and PublishingPageContent.

<mso:ManagedPropertyMapping msdt:dt="string">'Titel':'Title','PublishingPageContent':'PublishingPageContentOWSHTML'</mso:ManagedPropertyMapping>

3. Create a variable for the PublishingPageContent column.

var PublishingPageContentHTML = $getItemValue(ctx, "PublishingPageContent");

4. The PublishingPageContentHTML will contain the page content but with styling. The following code will remove the styling.

var div = document.createElement("div");
div.innerHTML= PublishingPageContentHTML;
var PublishingPageContentL = div.textContent|| div.innerText|| "";

5. Us the code below to display the PublishingPageContent.

<div>
   _#= $htmlEncode(PublishingPageContent ) =#_
</div>

Result

CSWP Result

Custom date formats with display templates

Display templates are used to show the queried results in a attractive and useful layout. With the CQWP we used XSLT to format the data as required, but with display templates we need to use JavaScript. One of my most formatted field are the date fields. In this blog post I will explain how you can change the format of a date field by using JavaScript.

Solution date format
1. Edit the related Item Template.
2. Add the ArticleStartDate to the ManagedPropertyMapping. For a clean example I removed all mappings besides Title and ArticleStartDate in the code below.

<mso:ManagedPropertyMapping msdt:dt="string">'Titel':'Title','ArticleStartDate':'ArticleStartDateOWSDATE'</mso:ManagedPropertyMapping>

3.  Create a variable for the ArticleStartDate column.

var ArticleStartDate = ctx.CurrentItem.ArticleStartDateOWSDATE;

4. To be able to format the date we need to create a new variable of the type Date.

var localArticleDate = new Date(ArticleStartDate);

5. Us the code below to display the ArticleStartDate with the required format.

<div>
   _#= localArticleDate.format("dd-MM-yyyy")
</div>


Result

CSWP Result