Teams / Power Automate adaptive cards

When sharing information or sending out a notification on teams I like to use the adaptive card feature. Adaptive Cards are the Teams method of sharing and displaying blocks of information in an easy-to-read manor without the complexity of customizing CSS or HTML to render them. With adaptive cards you can even create polls, show weather information, and create hyperlinks.

Creating a feedback form

  • Create a Power Automate flow with the required trigger.
  • Add the Post adaptive card in a chat or channel Teams action.
  • Select the Group chat (Channel or Group Chat) or provide the chat ID.
  • Add the following JSON code for an example feedback form with a title, single line, and multi-line text input fields and two types of choice list.
{
  "$schema": "http://adaptivecards.io/schemas/adaptive-card.json",
  "type": "AdaptiveCard",
  "version": "1.0",
  "body": [
    {
      "type": "TextBlock",
      "size": "Medium",
      "weight": "Bolder",
      "id": "Title",
      "text": "EXAMPLE FEEDBACK FORM",
      "horizontalAlignment": "Left"
    },
    {
      "type": "Input.Text",
      "placeholder": "{acFullName}",
      "style": "text",
      "isMultiline": false,
      "maxLength": 75,
      "id": "acFullName"
    },
    {
      "type": "Input.Text",
      "placeholder": "{acComments}",
      "style": "text",
      "isMultiline": true,
      "maxLength": 200,
      "id": "acComments"
    },
    {
      "type": "TextBlock",
      "size": "Medium",
      "weight": "Bolder",
      "text": "Do you like Adaptive Cards?",
      "horizontalAlignment": "Left",
      "separator": true
    },
    {
      "type": "Input.ChoiceSet",
      "id": "acDecision",
      "value": "1",
      "choices": [
        {
          "title": "Yes!",
          "value": "Yes"
        },
        {
          "title": "Of course!",
          "value": "Of course"
        }
      ],
      "style": "expanded"
    },
    {
      "type": "TextBlock",
      "text": "Suggest follow-up discussion regarding:",
      "weight": "Bolder"
    },
    {
      "type": "Input.ChoiceSet",
      "id": "acFollowUp",
      "isMultiSelect": true,
      "value": "",
      "choices": [
        {
          "title": "Everything",
          "value": "Everything"
        },
        {
          "title": "Always",
          "value": "Always"
        }
      ]
    }
  ],
  "actions": [
    {
      "type": "Action.Submit",
      "title": "Submit"
    }
  ]
}

Creating a Poll

  • Create a Power Automate flow with the required trigger.
  • Add the Post adaptive card in a chat or channel Teams action.
  • Select the Group chat (Channel or Group Chat) or provide the chat ID.
  • Add the following JSON code for an example Poll with a title, header line, header, text, and a short poll.
{
    "$schema": "http://adaptivecards.io/schemas/adaptive-card.json",
    "type": "AdaptiveCard",
    "version": "1.0",
    "body": [
        {
            "type": "TextBlock",
            "text": "Example Poll Request",
            "id": "Title",
            "spacing": "Medium",
            "horizontalAlignment": "Center",
            "size": "ExtraLarge",
            "weight": "Bolder",
            "color": "Accent"
        },
        {
            "type": "TextBlock",
            "text": "Example Header Tagline Text",
            "id": "acHeaderTagLine",
            "separator": true
        },
        {
            "type": "TextBlock",
            "text": "Example  Poll Header",
            "weight": "Bolder",
            "size": "ExtraLarge",
            "spacing": "None",
            "id": "acHeader"
        },
        {
            "type": "TextBlock",
            "text": "Lorem ipsum dolor sit amet, consectetur adipiscing elit. Integer vestibulum lorem eget neque sollicitudin, quis malesuada felis ultrices. ",
            "id": "acInstructions",
            "wrap": true
        },
        {
            "type": "TextBlock",
            "text": "Example Poll Question",
            "id": "acPollQuestion"
        },
        {
            "type": "Input.ChoiceSet",
            "placeholder": "Select from these choices",
            "choices": [
                {
                    "title": "Choice 1",
                    "value": "Choice 1"
                },
                {
                    "title": "Choice 2",
                    "value": "Choice 2"
                }
            ],
            "id": "acPollChoices",
            "style": "expanded"
        }
    ],
    "actions": [
        {
            "type": "Action.Submit",
            "title": "Submit",
            "id": "btnSubmit"
        }
    ]
}

Creating a hyperlink

  • Create a Power Automate flow with the required trigger.
  • Add the Post adaptive card in a chat or channel Teams action.
  • Select the Group chat (Channel or Group Chat) or provide the chat ID.
  • You can use dynamics content for the hyperlink text and the hyperlink itself.
{
    "$schema": "http://adaptivecards.io/schemas/adaptive-card.json",
    "type": "AdaptiveCard",
    "version": "1.0",
    "body": [
       {
            "type": "TextBlock",
            "text": "This is example 1 [Hyperlink Texts](https://powerautomate.microsoft.com/)",
            "id": "acHeader",
            "wrap": true
        },
       {
            "type": "TextBlock",
            "text": "This is example 2 [@{triggerOutputs()['headers']['x-ms-user-name-encoded']}](https://powerautomate.microsoft.com/)",
            "id": "acHeader",
            "wrap": true
        }
    ]
}

Finding the chat ID

  • There are multiple ways to find the chat ID, I like to use the following way.
  • Open teams in the browser and open the chat
  • In the URL you can see the ID of the chat. You need to copy the code after conversations including the @ and that is after the @.
  • In my first example the ID is: 19:de13fe3a9cae407ba31abc84421e9ab4@thread.v2
  • In my second example the ID is: 19:95b0d2cb-aa0c-4e0c-8fcf-2f7b77c5afdb_d523c084-0c04-41d0-81d2-943ad42abe9a@unq.gbl.spaces
  • The action in Power Automate with find the chat and show the name of that chat.
https://teams.microsoft.com/_#/conversations/19:de13fe3a9cae407ba31abc84421e9ab4@thread.v2?ctx=chat
https://teams.microsoft.com/_#/conversations/19:95b0d2cb-aa0c-4e0c-8fcf-2f7b77c5afdb_d523c084-0c04-41d0-81d2-943ad42abe9a@unq.gbl.spaces?ctx=chat
Power Automate: Custom Flow loging

When managing multiple Power Automate Cloud Flows it can easily become a big task to figure out what went wrong and where. My client has more than 10 Cloud Flows that run multiple time per day or per hour. The solution is to create a log table (dataverse) or list (SharePoint) where all the runs are stored. The log table contains all the data an administrator needs to maintain the Cloud Flows. In my example I create a Dataverse table.

The Dataverse log table

In the log table we store the following data.

The Cloud Flow

In every Cloud flow a try and catch scope is added. All the main actions are in the try scope, if one of these actions fails than the catch scope will be used.

  • Add a Scope with the name Try.
  • Add the action the Dataverse Add a new row action.
  • Select the log table by Table name.
  • Select the Log status Processing, I use Processing, Failed and Successful.
  • Add the Cloud Flow name to Process name.
  • Add the following code to the Environment field.
workflow()?['tags']?['environmentName']
  • Add the following code to External URL, use the code snippets for the fx code.
    This creates a link to the actual flow run.
workflow()?['tags']?['environmentName']
workflow()?['name']
workflow()?['run']?['name']
  • Set the Status Reason to Active.
  • Add the end of the try scope add the Dataverse Update a row action.
  • Select the log table by Table name.
  • Add the ID of the create log in the Row ID field.
  • Select Successful in the Log status field.
  • Add a Scope with the name catch.
  • Add the Filter Array action.
  • Add the result of the try scope in the From field.
result('Try')
  • Add the following filter Status is equal to Failed
item()?['status']
  • Add the Dataverse Update a row action.
  • Select the log table by Table name.
  • Add the ID of the create log in the Row ID field.
  • Select Failed in the Log status field.
  • Select Inactive in the Status field.
  • Add the following text to the Log details: Flow log action(s):
  • Add the following code to the Log details, to show the error message from the try scope.
body('Filter_results_with_failed')[0]?['outputs']

Power Automate: Advanced Flow building

Power Automate is one of my favorite tools from the Power Platform. It is extremely versatile and can be used to automate tasks between online services and automate processes ranging from simple to highly complex. In this post, I will share with you 3 advanced expressions I have used recently on my project. One part of the project is to convert XML data to data we can store in the dataverse.

Convert XML to JSON for easy access

For a project I needed to read multiple XML files with millions of rows and store data from the files into the dataverse. XML is harder to use in a Flow then JSON, so with a simple expression I transformed the XML to JSON.

  • Add a compose action with the name XML to JSON with the following code.
json(xml(variables('XML')))
  • Change the variable(‘XML’) to your XML content or store your XML content in that variable.
  • Add a parse json action set the Content to the output of the XML to JSON compose.
  • Add/create the JSON schema.

Using path in JSON

In most cases when you need to save data from JSON you can use the dynamic content to find it.
But sometimes you are looking for a field name that is not unique. In my case I needed a field called country related to the company. But the country field was used multiple times for various blocks. You can select the correct country by using the path (location) of the field in an expression.

  • Select the JSON through the dynamic content.
  • Copy the code from the dynamic content to the Expression.
  • Add the path add the end of the code.
  • I added .company.country to select the country of the company.
body('Parse_JSON').company.country

Dataverse lookup field

Lookup fields in Dataverse are really useful, but when you select them through the dynamic content the value will be the id not the display value. If the data must be readable for users, you can use the following steps to select the display value.

  • Add a compose to the flow.
  • Select the lookup field in the Inputs through the dynamic content.
  • Copy the code from the dynamic content to the Expression.
  • Your output looks something like this.
outputs('company')?['body/rc_countrycode']}
  • Add the @OData.Community.Display.V1.FormattedValue’ after rc_countrycode (your field name will be different).
  • The end results looks like this.
outputs('company')?['body/rc_countrycode@OData.Community.Display.V1.FormattedValue']

Power Automate: 6 flow building tips

Power Automate is one of my favorite tools from the Power Platform. It is extremely versatile and can be used to automate tasks between online services and automate processes ranging from simple to highly complex. In this post, I will share with you 6 tips and tricks when building flows in Power Automate.

Flow templates

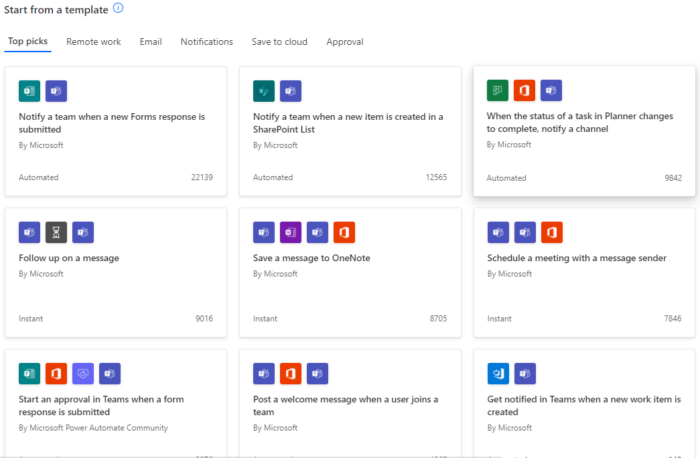
A good way to get started with Power Automate is to use a template. Microsoft created a huge library of templates to choose from. You can browse by category to find your scenario, and then follow the steps in the template to create a flow from the template. You can also us the templates to figure out how to setup certain actions.

Equal to empty

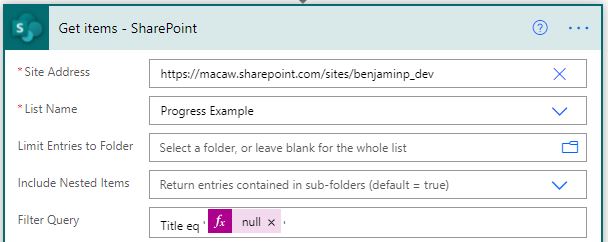
Over the years many colleagues have asked me; how do I check if a value is empty? You can do this with the null expression! Note that sometimes you need to place the null between ‘ ‘.

Use parallel branches

Most flow builders forget to use the parallel branches. With parallel branches you can have two or more actions that run at the same time, after which the flow will only proceed once all parallel steps have completed. Parallel branches can be very useful for approval flows. For example, you have a request that needs to be approved by both IT and Sales, but the approval doesn’t need to be in a particular order. To save time you can run the approvals parallel.

Use scopes

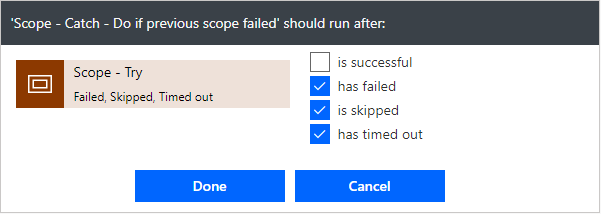
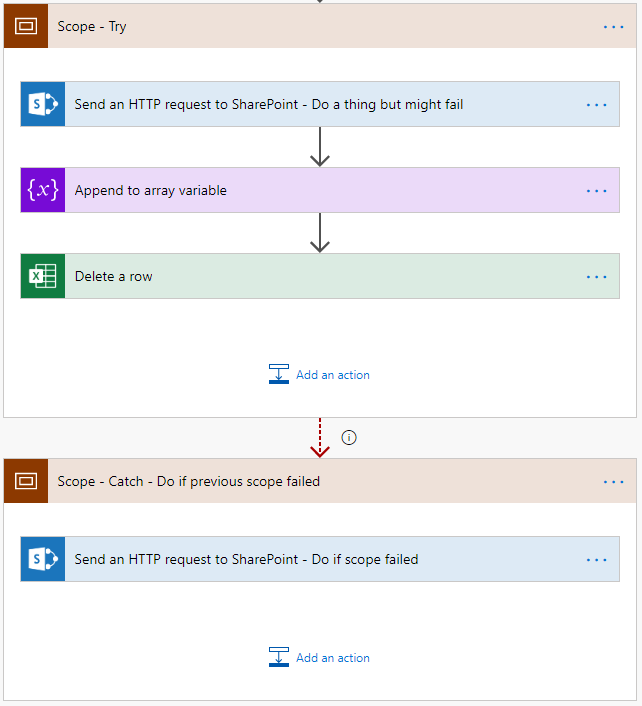
We can use the action scope to group actions to make the flow easier to read. There is however another great use for them. The scope action encapsulates a block of actions and inherit the last terminal status (Succeeded, Failed, Cancelled) of actions inside. This in combination with the Configure run after setting we can create a try and catch logic in our flows. In this example the second scope (catch) only runs if the first scope (Try) failed.

  • Create a scope with some actions
  • Create a second scope after the first scope
  • Set the Configure run after setting of the second scope to has failed, is skipped and has timed out.
  • In this scenario the catch scope will only run if the Try scoped failed.
  • The flow will look like this.

Add redundant owners

If you have a flow that is used by your entire team, make sure you add a couple of co-owners. Then you will not be bothered during your vacation when the flow breaks. If you keep adding the same colleaguesas co-owners you can consider creating a security group and add the security group to the flows. Also make sure you add the co-owners to all the resources required by the flow. For example, the shared mailed that is used by the flow.

Connections

Actions use by default the connection (if required) of the creator of the flow. This is not always the best way to setup the connections. For example, if your flow updates a list you might not want to see your name as the modifier. I recommend using a dedicated account (service account) for most shared flows. The added benefit of using a dedicated account is that the flow will keep working even if you change your job.

Power Automate: Start a Flow from a column change

With Microsoft Power Automate we can now create flows that start based on specific columns being updated in SharePoint!  This is a feature I have been waiting on for years! The action is called Get changes for an item or a file. The action returns a boolean for each field, whether it was just changed or not. Based on this boolean you know if a field was changed.

Creating the flow

  • Create a SharePoint list, I created the following project list.
  • Enable versioning on the list.
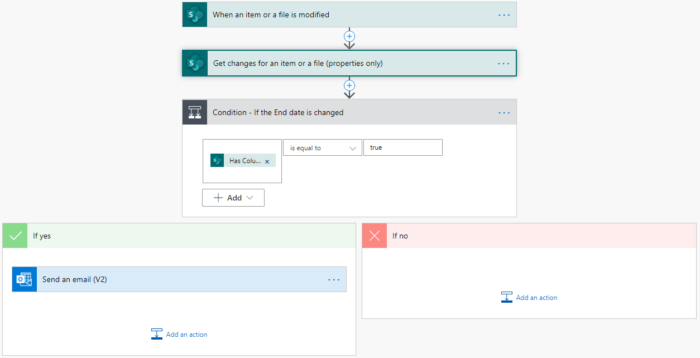
  • Create a flow and use the trigger When an item or a file is modified.
  • Select your site and list.
  • Add the action Get changes for an item or a file (properties only).
  • Fill in the site address, library name and the ID of the item that was triggered.
  • The field Since is used to get the changes we need to make a comparison. If you use 1.0 you will compare the current item version with version 1.0. But we want the latest changes so we use the following expression.
sub(int(triggerOutputs()?['body/{VersionNumber}']),1)
  • I want to send an email when the end date of a project changes.
  • Add the action Conditions to check if the end date was changed.
  • Add the dynamic content Has Column Changed: End date.
    This returns a boolean value.
  • Put the required actions in the If yes section after the condition.
    In my example I am sending an email.
  • Add the action Send an email (V2) and fill in as follows.

Flow: Button to launch a Flow/Automate from a view

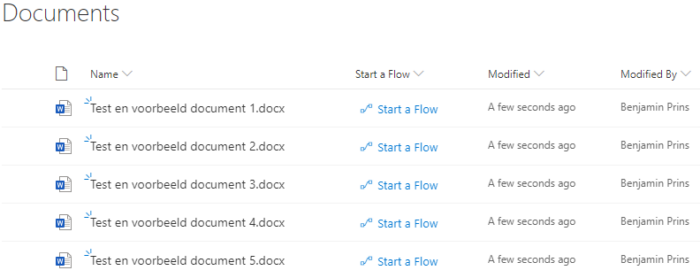
You can use column formatting (JSON) to create buttons that start a Flow on the corresponding list item in SharePoint. The button will be shown in the view for easy and fast access. After clicking the button the Flow Launch Panel will be displayed and you can start the Flow. This button is faster then clicking on the … then Flows followed by clicking the correct Flow.

Creating the button

  • Open the settings of the document library.
  • Create a new single line of text column with the name Start a Automate.
  • Go to a view where the new column is visible.
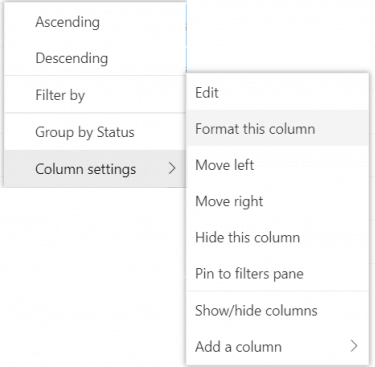
  • Open the menu of the column, click on Columns settings followed by Format this column.
  • If required click on the advanced mode option.
  • Copy and change the code below.
  • Change the txtContent to the name that needs to displayed as the value of the column. Currently it is Start the Automate.
  • Change the actionParams id to the Power Automate ID, see the steps below.
{
  "$schema": "https://developer.microsoft.com/json-schemas/sp/v2/column-formatting.schema.json",
  "elmType": "button",
  "customRowAction": {
    "action": "executeFlow",
    "actionParams": "{\"id\": \"788b1689-e999-99d9-9f37-fc539d5ba36b\"}"
  },
  "attributes": {
    "class": "ms-fontColor-themePrimary ms-fontColor-themeDarker--hover"
  },
  "style": {
    "border": "none",
    "background-color": "transparent",
    "cursor": "pointer"
  },
  "children": [
    {
      "elmType": "span",
      "attributes": {
        "iconName": "Flow"
      },
      "style": {
        "padding-right": "6px"
      }
    },
    {
      "elmType": "span",
      "txtContent": "Start the Automate"
    }
  ]
}
  • Add the JSON code and save the changes.
  • The button can only start Power Automate from the default environment.

Finding the Automate ID

  • Open Power Automate.
  • Click on the name of the Automate.
  • In the ID is located in the URL after shared.
  • For the following Flow URL the ID is 788b1689-e999-99d9-9f37-fc539d5ba36b
  • The button can only start Automates form the default environment.
https://emea.flow.microsoft.com/manage/environments/Default-40ce6286-0e4a-4500-8bb1-bf46447c5f7f/flows/shared/788b1689-e999-99d9-9f37-fc539d5ba36b/details