Flow: Button to launch a Flow/Automate from a view

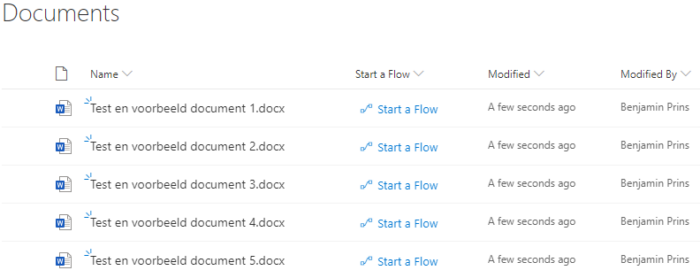
You can use column formatting (JSON) to create buttons that start a Flow on the corresponding list item in SharePoint. The button will be shown in the view for easy and fast access. After clicking the button the Flow Launch Panel will be displayed and you can start the Flow. This button is faster then clicking on the … then Flows followed by clicking the correct Flow.

Creating the button

  • Open the settings of the document library.
  • Create a new single line of text column with the name Start a Automate.
  • Go to a view where the new column is visible.
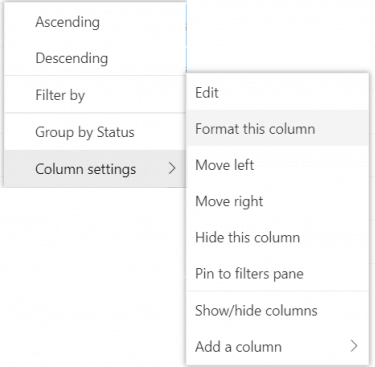
  • Open the menu of the column, click on Columns settings followed by Format this column.
  • If required click on the advanced mode option.
  • Copy and change the code below.
  • Change the txtContent to the name that needs to displayed as the value of the column. Currently it is Start the Automate.
  • Change the actionParams id to the Power Automate ID, see the steps below.
{
  "$schema": "https://developer.microsoft.com/json-schemas/sp/v2/column-formatting.schema.json",
  "elmType": "button",
  "customRowAction": {
    "action": "executeFlow",
    "actionParams": "{\"id\": \"788b1689-e999-99d9-9f37-fc539d5ba36b\"}"
  },
  "attributes": {
    "class": "ms-fontColor-themePrimary ms-fontColor-themeDarker--hover"
  },
  "style": {
    "border": "none",
    "background-color": "transparent",
    "cursor": "pointer"
  },
  "children": [
    {
      "elmType": "span",
      "attributes": {
        "iconName": "Flow"
      },
      "style": {
        "padding-right": "6px"
      }
    },
    {
      "elmType": "span",
      "txtContent": "Start the Automate"
    }
  ]
}
  • Add the JSON code and save the changes.
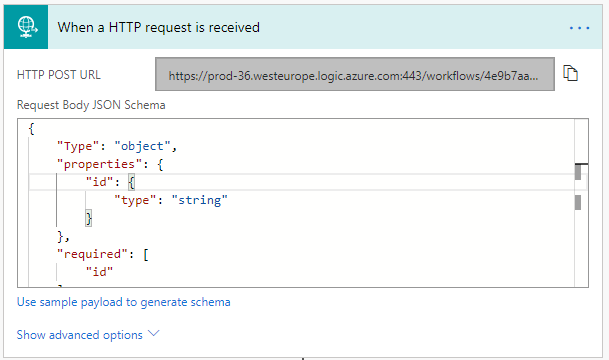
  • The button can only start Power Automate from the default environment.

Finding the Automate ID

  • Open Power Automate.
  • Click on the name of the Automate.
  • In the ID is located in the URL after shared.
  • For the following Flow URL the ID is 788b1689-e999-99d9-9f37-fc539d5ba36b
  • The button can only start Automates form the default environment.
https://emea.flow.microsoft.com/manage/environments/Default-40ce6286-0e4a-4500-8bb1-bf46447c5f7f/flows/shared/788b1689-e999-99d9-9f37-fc539d5ba36b/details

Flow and Twitter

The default Twitter web part it great and easy to use. You can follow a Twitter user (@), a URL of a user account, tweet or collection. These options where not enough for a communications department who wanted to show the #, @Company, the company name and from:[Company] on a SharePoint page. We were able to do this with a PowerAutomate Flow and a custom content query web part. In this post I will explain how you can do this.

SharePoint: Create a list

  • Create a SharePoint list to store the twitter information.
  • We created the following columns to store the information, your requirements might be different.
Column nameType
Favorite countsNumber
Followers countsNumber
LocationSingle line of text
Media urlsMultiple lines of text
Original tweetMultiple lines of text
Original tweet tweeted bySingle line of text
TweetMultiple lines of text
Tweeted bySingle line of text
Created atDate and time
TweetIdSingle line of text
Original tweet idSingle line of text
TypeChoice
RetweetsSingle line of text
ProfileImageUrlNumber
NameUserSingle line of text

Flow: Getting the information

  • Open PowerAutomate and create a new Flow.
  • Add the trigger When a new tweet appears.
  • Enter the required search term, see the example below.
  • We wanted to be able to filter on the different types of results, for example on # or @. This information is added to the item that will be created in the SharePoint list.
  • A tweet can be multiple types so we need an array and append all the types to it.
  • Initialize a variable called TypeTweet as an array.
  • Add a scope called Append to array – TypeTweet.
  • Add a condition that filters the #Office365 out of the TweetText.
  • If the result is yes then append the value #Office365 to the array.
  • Repeat the steps for all types of tweets.
  • Add a scope called Create list item.
  • Add the SharePoint Create item action.
  • Connect all the columns to the correct information.

Custom Content Query Web part

We used a variation of the React Content Query Web Part from Github. This is a modern version of the CQWP where you have all the freedom to grab and style items from a list or library.

Flow: Tips and tricks

Microsoft Flow is a very powerful tool and can be used to do many different things. I think it has become my favorite tool in Office 365. Therefor I want to spread the Flow love and tell you a couple of tips and tricks when developing Flows.

Copy actions

A very useful and time saving capability within Micorosft Flow is that we can copy and paste actions. You can copy configured actions and reuse them! The best thing about this capability is that you can copy an action from one flow and past it into another. I often use this to copy the more complex HTTP request actions. This feature is currently in preview, but so far I have not encountered any issues with it.

  • Click on the … on an action.
  • Click on Copy to my clipboard (preview).
  • Click on + New step.
  • Open the tab My clipboard.
  • Select the copied action.

Continue flow after a failed action

By default a flow will stop working if an action fails. If you know that an actions might fail occasionally you can setup a situation where only that action fails but not the whole flow. You can do with the Configure run after setting.

  • Click on the … of the action after the action that might fail.
  • Click on Configure run after.
  • Here you can configure if the action will be run even if the previous failed, skipped or timed out.
  • In this example I selected both is successfull and has failed to.
  • The flow will now continue if the previous action failed or succeeded.

Scope try and catch

We can use the action scope to group actions to make the flow easier to read. There is however another great use for them. The scope action encapsulate a block of actions and inherit the last terminal status (Succeeded, Failed, Cancelled) of actions inside. This in combination with the Configure run after setting we can create a try and catch logic in our flows. In this example the second scope (catch) only runs if the first scope (Try) failed.

  • Create a scope with some actions
  • Create a second scope after the first scope
  • Set the Configure run after setting of the second scope to has failed, is skipped and has timed out.
  • In this scenario the catch scope will only run if the Try scoped faild.
  • The flow will look like this.

SharePoint: Get all the IDs

SharePoint has many IDs and when you are developing on SharePoint quite often you require one of these IDs. You might need the web ID or the Office 365 tenant ID. Not all of the IDs are easy to find. In this blog post I wrote done a list of various IDs and where to find them. If I missed one, feel free to leave a comment.

Office 365 tenant ID

  1. Sign in to the Azure Active Directory admin center as a global or user management admin.
  2. Under Manage, select Properties. The tenant ID is shown in the Directory ID box.
  3. Or try the direct link. https://aad.portal.azure.com/#blade/Microsoft_AAD_IAM/ActiveDirectoryMenuBlade/Properties

Web ID for a SharePoint site

The web ID of a site can be found with the help of the API.

SharePoint on-premise

https://<site>/_api/web/id

SharePoint Online

https://<site>.SharePoint.com/_api/web/id

SharePoint Online sub site collection

https://<site>.sharepoint.com/sites/<subsitecoll>/_api/web/id

Content type ID

  • Navigate to the location of the content type.
    • For example open the list settings.
    • Click on the content type name.
  • Open the settings page of the content type.
  • The ID is located in URL after ctype=
_layouts/15/ManageContentType.aspx?ctype=0x01010050A0D7467D640B4A90298761CEAB2DBF04

List ID

  • Navigate to the location of the list.
  • Open the list settings.
  • The ID is located in URL after List=
_layouts/15/listedit.aspx?List=9db54e81-a910-44e5-a2fc-ac3e0733bc71

Document Library ID

  • Navigate to the location of the list.
  • Open the list settings.
  • The ID is located in URL after List=
_layouts/15/listedit.aspx?List=0e93dff3-5530-4503-8b42-8b8cbbdee663

Role IDs

SharePoint uses role IDs to create the permissions levels for SharePoint Groups. These role IDs are a set of numbers that define the precise permissions level details. You can read in the blog post SharePoint: Get the Role ID on how to find the role IDs.

List workflow ID

  • Navigate to the list.
  • Open the workflow settings.
  • Click on the name of the workflow, this opens the setting for the worklfow.
  • The ID is located in URL after SubscriptionId=
    • The { and } are not part of the ID.
/_layouts/15/AddWrkfl.aspx?List={45743782-4F04-4E33-8605-4E1DCBBCE44E}&SubscriptionId={1F6A7AF5-E671-42A5-AB35-66376F42FF99}

Site workflow ID

  • Navigate to the site.
  • Open the workflow settings.
  • Click on the name of the workflow, this opens the setting for the worklfow.
  • The ID is located in URL after SubscriptionId=
    • The { and } are not part of the ID.
/_layouts/15/AddWrkfl.aspx?List={45743782-4F04-4E33-8605-4E1DCBBCE44E}&SubscriptionId={1F6A7AF5-E671-42A5-AB35-66376F42FF99}

Permission group ID

  • Note that permission group IDs are unique within a site collection.
  • Navigate to the location of the permission group and open the group.
  • The ID is located in URL after MembershipGroupId=
/_layouts/15/people.aspx?MembershipGroupId=41

Flow: Approval reminders

For a complicated review process a customer required that users receive reminders on their approval tasks. In most cases you will need a reminder for tasks, but flow approval tasks (at the writing of this blog) don’t have a default reminder setting.

Microsoft has stated that this will become a default feature, but it is unknown when it will be released. So for now you can use the Following solution.

The solution consist of two flows, a flow that is responsible for the overall process and one flow for the reminders.

Reminder flow being started

First we will need to create the reminder flow. This is required because we will need the HTTP POST URL of the reminder flow in the process flow to be able to starts the reminder Flow.

  • Create a flow with the trigger: When a HTTP request is received.
  • Open the trigger action, the generated HTTP POST URL will be used in the other flow.
  • Set the Request Body JSON Schema to be able to receive an id value.
    {     "Type": "object",     "properties": {         "id": {             "type": "string"         }     },     "required": [         "id"     ] } 
  • Add the action Parse JSON.
  • Set the output of the trigger called body as the content (input) for the Parse JSON action.
  • Set the following schema.
    {     "type": "object",     "properties": {         "id": {             "type": "string"         }     } } 
  • Add the delay action and set the timer.
  • Add the Get Item (by ID).
  • Set the action Get Item (by ID) to use the ID generated in the parse JSON action.
  • Now you can add all the required actions and manipulations you need to do on the item.
  • In my flow I check if the SP Document status, if the status is not reviewed a reminder is send, if reviewed nothing happens.

Process flow – starts reminder flow

When you start a flow on an item you will need to tell the flow on which item to start. In my example I am using a fixed id. In most cases you will need to create a more dynamic solution.

  • Create a flow that starts with your preferred trigger.
  • Add a parallel action.
  • Add the HTTP action to the flow to branch.
  • Set the method to POST.
  • Set the URI, copy it from the trigger of the flow that is being started.
  • Set the Body.
    {   "id": "60" } 
  • Add the start and wait for approval to the other branch.
  • If the approval is done I set the property SP Document status to reviewed, this way no reminder will be send.

Flow: Button Flow with user input

Button Flows are great for repetitive tasks that that can run with just a push of a button. But also, to gather information for the users that starts the button Flow. This is a less known feature but very useful!

The Flow

  • Create a Flow with the manual trigger (Flow button).
  • Click on add an input, you can add various types of input.
  • When the Flow starts the user can provide the required input.
  • Click on the … of an input field to make it optional or required.
  • An input text field can also be modified to be a drop-down list or a multi-select list.