Office 365: What’s new?

The updates for Office 365 keep coming and coming, Microsoft is not sitting still! I am very excited for the following new features. Note that some of these features are already live, being rolled out or still being developed.

Teams: New meeting experience

With the latest Teams update you can turn on the new meeting experience. Meetings and calls will than open in separate windows. Giving you the option to drag a meeting to a different screen and keep working with Teams on your second screen.

The meeting controls are moved to the top of the meeting screen and are always showing, always out of the way of the shared content and video.

The Large gallery view lets you see up to 49 video streams at once. This only works with 10 or more attendees who are sharing video.

I also want to highlight an older feature that most people don’t know about. That is the ability to zoom in on the shared content. Unable to read what the presenter is showing? Zoom into the content by pressing the Control-key and spinning the mouse scroll wheel.

With Contextual Search in Microsoft Teams you can find information very faster. You can search for content in a specific channel or chat by pressing CTRL + F. Search results will only contain messages and files found in the selected chat or channel!

Yammer: New experience is available worldwide

The new experience for Yammer is available worldwide! In my other blog post you can read about the new features.

Search: New user experience

Microsoft gave a preview of the new search user experience. We will be able to create our own vertical (similar to scopes) and filters. The verticals are in preview, so you might be able to use them already.

PowerApp Search and Filters

In PowerApps we often show lots of information and a good PowerApp will provide the user with the ability to find the relevant data quickly. We can do this by providing the user with search and filter capabilities. Therefore it not a surprise to me that I get many questions about searching in PowerApps. In this blog I will show various examples of search and filter solutions. I created a small PowerApp to support all the examples.

Small PowerApp

  • Create a SharePoint list called FAQ with the columns Title and Priority as a single line of text.
  • Create a Canvas PowerApp.
  • Connect the PowerApp to the FAQ list.
  • Add a gallery and connect it to the FAQ list.
  • Create a dropdown control for the filter.
  • Create a text input control for the search box.
  • Create the PrioFilterOptions on the OnStart of the Home_Screen.
    ClearCollect(PrioFilterOptions, "", "1", "2","3")
    
  • Connect the PrioFilterOptions to the dropdown control.
  • Add the following items to the FAQ list.
    • Title: Question 1, Priority: 1
    • Title: Question 2, Priority: 2
    • Title: Question 3, Priority: 3

Filter using contains

The most frequently  asked question is; How can I search using contains? It’s possible to search like this by using the in operator. In all my examples I will be using the in operator.

Filter( Table, value in Field )

Filter with a search box

A search box is a text input control, we can use this control as a search box.

Filter(FAQ, Home_Search_Inputbox_SearchBox.Text in Title)

Filter with a dropdown

Filter(FAQ, Home_Search_DropDown_FilterPrio.Selected.Value in Priority)

Filter with a searchbox and a dropdown

This example has a little issue, after selecting a dropdown value you can no longer filter only by using the search box. If you select the empty value then the filter will use that as a filter value.

Filter(FAQ, Home_Search_DropDown_FilterPrio.Selected.Value in Priority && Home_Search_Inputbox_SearchBox.Text in Title)

Filter with a searchbox and a dropdown (when not empty)

In this example the user is able to ‘deselect’ the chosen option from the dropdown. I recommend always using this example when using a dropdown filter.

If(IsBlank(Home_Search_DropDown_FilterPrio.Selected.Value),
Filter(FAQ, Home_Search_Inputbox_SearchBox.Text in Title),
Filter(FAQ, Home_Search_DropDown_FilterPrio.Selected.Value in Priority && Home_Search_Inputbox_SearchBox.Text in Title))


SharePoint Online: Custom Search Refiner Display Templates

The Refinement Panel is a solid part of almost every classic search solution. In most cases we can configure the selected refiner perfectly by changing the settings, but not always. Fortunately we are also able to change the display template per selected refiner and create our own custom Refiner Display Templates. In this example I created a custom display template with the following customizations.

  • Removed the first two characters of the filter option.
  • Made the refinement panel wider.

More information about display templates in general can be found on MSDN Display Templates.

Create a custom Refinement display template

First we need to make a copy of the default refinement display template, the name of the display template is Filter_Default.

  • Navigate to the filter display templates: Master Page Gallery / Display Templates / Filters.
    (http://your-site/_catalogs/masterpage/Display Templates/Filters)
  • Copy the HTML file Filter_Default and give it a new name for example: Filter_Custom.html
  • Remember not to copy the JS file, this will be created automatically.
  • Update the Title field of the display template.
  • Open Filter_Custom.html in your favorite editor.
  • Remove the code which is not needed.
    • I removed rows 33-201 and 209-229
    • Note that this might be different for you

Solution for removing characters

  • Find the following code.
    <div id='Container'>
    
  • Find the following div located below the previous one.
    <div id='Value' name='Item'>
  • Between these divs add the if statement that shortens the shown filter options.
  • Note that is does not remove the show all items feature.
  • In my example I remove the first 2 characters.
    var refinementNameShorter=refinementName;
    
    if(refinementName!="All")
    {
        refinementNameShorter = refinementName.substring(2);
        refinementNameShorter = refinementNameShorter.substring(0, refinementNameShorter.indexOf("|"))
    }
    

Solution for wider refinement panel

  • Find the following code.
    <div id='Container'>
    
  • Inside this div is the following div located.
    <div id='Value' name='Item'>
    
  • Change this into the following code.
    <div id='Value' name='Item' style="width: 500px;">
    

Configure the refinement panel

  • Open the page with the refinement panel
  • Select by Display template the newly created Filter_Custom

Code result

SharePoint Online: Managed Properties User information not available

During the development of a reporting solution that depends heavily on search, I encountered an issue with the crawled and managed properties on SharePoint Online.
The problem was narrowed down to two issues.

  • Not all the fields where showing up as crawled properties.
  • The crawled/mapped property for the user fields only contains the display name.

When a user field is added normally there are multiple crawled properties that will appear, the ows_[field name] and the ows_q_USER_[field name]. Only the ows_[field name] was showing up.
The ows_[field name] only contains the display name, but I needed the display name and e-mail. The the ows_q_USER_[field name] was required, which contains all the available user information. Both issues were resolved using by following the steps below.

Solution: User field

  1. Make sure the field is added to an item and contains a value, otherwise it will not be crawled.
  2. Determine the required managed property type, for a people field that is a string.
  3. Add the crawled property to a preset managed property, the name will be similar to ows_[field name].
  4. Map ows_[field name] to  RefinableString00.
  5. After about 15 minutes more crawled and managed properties will be available.
  6. For an user field we need the crawled property ows_q_USER_[field name].
  7. Connect this crawled property to a new mapped property or use the one that was automatically created.
  8. I recommend not to remove the mapping of the crawled property (ows_[field name]) to the preset managed property. In some cases, this causes the problem to reappear.

Solution: No crawled property availible

This solution works a little bit different.

  1. Determine the required managed property type, for a text field that is a string.
  2. Make sure the field is added to an item and contains a value, otherwise it will not be crawled.
  3. Force a reindex.
  4. Go to the advanced settings of the list or library
  5. Reindex the list
  6. Wait 15-30 minutes and see if the field has been crawled, the name will be similar to ows_[field name].
  7. If this did not work try the following steps.
  8. Add a (random) text field to a preset managed property, for example to RefinableString01.
  9. Wait 15-30 minutes and see if your field has been crawled, the name will be similar to ows_[field name].
  10. If so add the crawled property to your custom managed property.
  11. So far, these steps have always fixed my missing properties problem.

SharePoint Online: Search tips and tricks

SharePoint Online can store large volumes of all kinds of information, form project documents, to personal documents, to video’s and lots more. Finding the correct information can become harder and harder over time. With SharePoint search and my 8 tips you will be able to find the correct content faster than before.
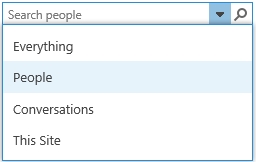
1 Search scope

SharePoint search uses default and custom search scopes. Search scopes are used to narrow down the search area, generating fewer and better results. Select a search scope to focus the search result. For example, when searching for a colleague select the search default search scope People.
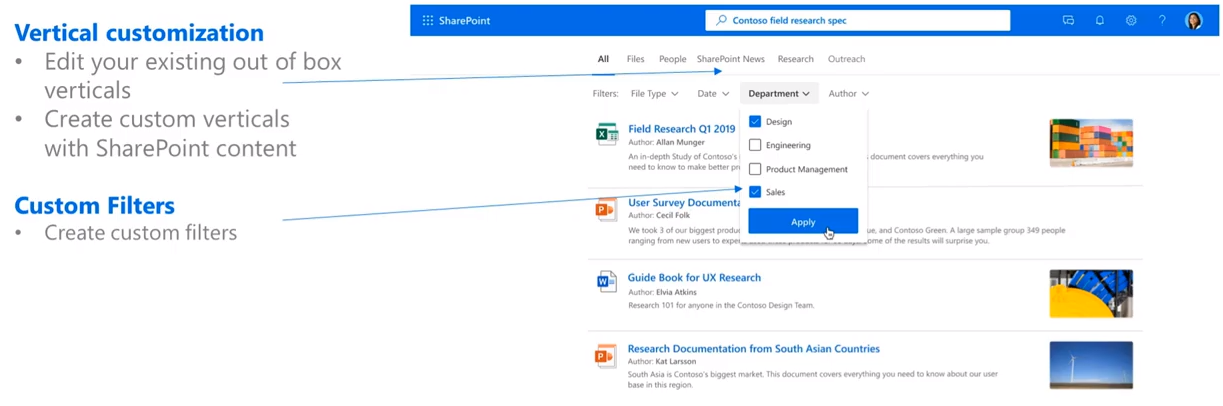
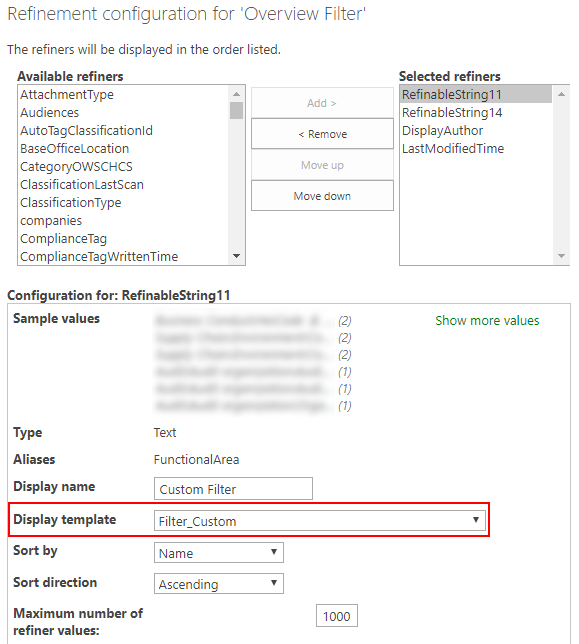
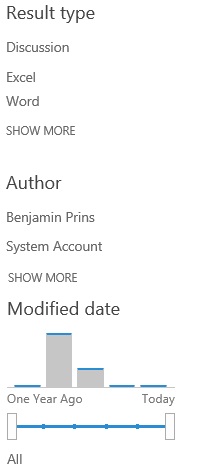
2 Refinement panel

When SharePoint presents the results you can narrow down the results by filtering the results with the refinement panel. Common refinement options are result type, author and modified date. Custom refinement options can be added by the administrator.

Refinement planel

3 Wildcard

If you are not sure about the spelling or you are searching for variations of a term you can use the wildcard symbol *. Wildcards widen the search results, this will help find data that is similar to the search term.

Examples

  • Budget* to search for all items starting with the word budget.

4 Quotes

Use double quotes “” to find exact phrases if you are sure about the phrases.
Example: “Department budget 2017”

5 Commands

You can use search commands (Boolean operators) to narrow or expand the search results. Note that all SharePoint search commands need to be writing in capitals.

OR Use OR to expand your search to include more terms. The returned search results include one or more of the specified free text expressions or property restrictions
NOT Use NOT to narrow your search results. The returned search results don’t include the specified free text expressions or property restrictions.
AND  Use AND to narrow your search results. The returned search results include all of the free text expressions.
+  Use + to narrow your search results. The returned search results include all of the free text expressions.
Use – to narrow your search results. The returned search results don’t include the specified free text expressions or property restrictions.

Examples

  • “Project plan” OR “Business Case”
  • Department -Budget
  • “Project plan” AND Review

6 Specifying properties

When searching for information you can specify which type of information (also known as properties or metadata) you are looking for.  Metadata or properties are the data that to describe the content and is used when storing or filtering the searh results. SharePoint captures by default a lot of metadata such as author, filename, title and last modified date. The main purpose of using metadata is to make sure all the content stored in SharePoint can be found easily.

A basic property search consists of the following three parts: a property name a operator and a value.

<Property Name><Property Operator><Property Value>

Example:

  • Author:Benjamin
  • filename:”Budget Report”
  • filename:Project*

7 Value and Property restrictions

When using properties to narrow down the search results it is possible to make the search query even more specific with the use of different property restrictions. The most used and best known is the : operator. When using the : operator the returned results will all be equal to the specified value . There are a lot more operators available a few examples are:

Operator Description Example
: Returns results where the value is equal to the property value (short description) Author:John
= Returns results where the value is equal to the property value Title=Projectplan
< Returns results where the value is less then the property value Created<9/02/2017
> Returns results where the value is greater then the property value Created>9/02/2017
<= Returns search results where the property value is less than or equal to the value specified in the property restriction Modified<=9/02/2017
>= Returns search results where the property value is greater than or equal to the value specified in the property restriction. Modified>=9/02/2017
<> Returns search results where the property value does not equal the value specified in the property restriction. Title<>Testfile

SharePoint supports more Search operations for SharePoint Online. See the full list of the property operators on Keyword Query Language (KQL) syntax referene.

8 Try again

The best tips when searching for information is that if you did not find the correct document, change the search query a bit. Add or remove commands, terms and properties. Not all documents will be found with the first attempt.

Supporting links

SharePoint Online: Search refiners and searchable columns

Adding search refiners and creating searchable columns with SharePoint Online is a little bit different then with SharePoint 2013 on premise. In this blog post I will explain how to add search refiners and how to make custom columns searchable. There are 5 major parts we need to implement;

  • Create a custom column
  • Add some content
  • Map a crawled property to a refinable managed property
  • Created the alias
  • Configure the refiners

Solution

1. Create your custom column, for example Product.
2. Create some content with the custom column.
3. Wait for the column to be added as a crawled property, this might take up to 24 hours.
4. Open the SharePoint admin center and click on Search.
SharePointAdminCenter
5. Click on Manage Search Schema.
6. Depending on the type of column you will need to use different type of preset Managed Properties.

Managed property name Data type for mapping
RefinableDate00 – RefinableDate19 Dates.
RefinableDecimal00 – RefinableDecimal09 Numbers with max three decimals.
RefinableDouble00 – RefinableDouble09 Numbers with more than three decimals.
RefinableInt00 – RefinableInt49 Whole numbers.
RefinableString00 – RefinableString99 Strings, Person or Group, Managed Metadata, Choice and Yes/No

7. Search the related type on Managed Property.

RefinableString01
8. Click on Edit Map Property in het drop-down menu.
9. Add the Crawled property of the custom column, in our example it will be ows_Product.
AddMapping
10. Fill in the alias, this will make the column searchable.
11. Save the changes.
12. Close the SharePoint admin center and open the search center result page.
13. Set the page in edit modus and edit the Refinement web part.

EditRefinerWebPart
14. Click on Choose refiners… and add the managed property, in this example RefinableString01
15. Change the display name to the custom columns name, otherwise the refiner will be shown as RefinableString01
16. Search for some content and enjoy the result!

Result

SearchRefinerResult2