SharePoint: why you cannot Save Site as template

There are two reasons why you might not be able to save a site as a template. In this post I will explain what the reasons are and how you can figure out what is causing your problem. The first reasons is that the publishing feature is activated and the second reason is that custom scripts are not allowed.

1. Publishing  features activated

The most common issues is that the publishing feature is activated on the site or on a parent site. If you are trying to make a template of a subsite this will not work when the parent site has an active publishing feature.

  1. Open the site settings
  2. Click on Manage site features
  3. Check if the publishing feature is active
  4. Do this also for possible parent sites

‘Solution’ for subsite without Publishing active

I have never run into problems when using this method for subsites. However be careful it is not supported by Microsoft for a reason.

  1. Create the following URL for you specific site
  2. [SiteURL]/_layouts/savetmpl.aspx
    or
    [SiteURL]/_layouts/15/savetmpl.aspx

Truely not supported ‘solution’ when publishing is active

I don’t recommend using this so called solution, you can run into all kinds of issues. I do however want to mention this because you can find this all over the internet being claimed as an actual solution.

  1. Create the following URL for you specific site
  2. [SiteURL]/_layouts/savetmpl.aspx
    or
    [SiteURL]/_layouts/15/savetmpl.aspx

Second truely not supported ‘solution’ when publishing is active

I also don’t recommend using this so called solution, you can run into all kinds of issues. I do however also want to mention this because you can find this all over the internet being claimed as an actual solution.

  1. Open the site settings
  2. Click on Manage site features
  3. Deactivate the Publishing feature
  4. Create the following URL for you specific site
  5. [SiteURL]/_layouts/savetmpl.aspx
    or
    [SiteURL]/_layouts/15/savetmpl.aspx

2. Custom Scripts are not allowed

If publishing is not activated, it is possible that custom scripting is not allowed on the tenant level. You can see in the SharePoint Admin Center if its allowed or not. If you don’t have permission to do this you can also check it by using the following method.

  1. Open the site settings
  2. Click on Manage site features
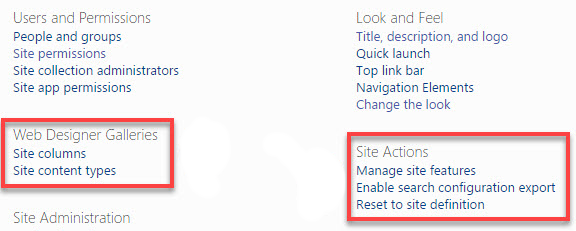
  3. Do you see the following options? Then custom scripts are not allowed.
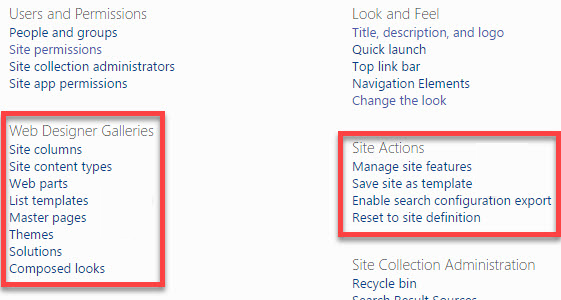
  4. Do you see the following options? Then custom scripts are allowed.

Solution to allow for custom scripts

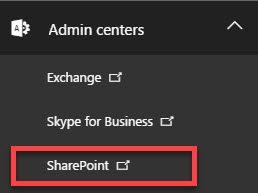
  1. Open the SharePoint Admin Center in the Office 365 Admin Center

  2. Click on Settings and go to the Custom Script section.
  3. Choose “Allow users to run custom script” for Allow users to run custom script on personal sites and Allow users to run custom script on self-service created sites
  4. Click OK.
  5. It might take up to 24 hours before you can now save the site as an template.

SharePoint: Add a web part to a page layout

When customizing SharePoint we often create our own page layouts for solutions like news, events or information pages. In some cases I add a web part to the page layout. Adding web parts to a page layout when you use your own editor (not SharePoint Designer) can be a bit difficult if you don’t know all the coding details. To make live a bit more easy I use the following steps.

Solution

The solution consist of two parts creating the required web part and adding it to a page layout, three if you us another editor than SharePoint Designer.

Creating the web part

  • Add the required web part to a test page
  • Configure the web part as required
  • Export the web part to your local computer
  • Upload the web part into the web part (galery), located on the site collection settings

Page layout

  • Open SharePoint Designer and open the site collection where you uploaded the web part
  • Create a new page layout or edit an existing page layout
  • Go to the location where you want to add the web part
  • Click on Insert, then web parts and select the required web part

Another editor

  • Open the page layout in your editor
  • Copy the web part code from SharePoint Designer and paste it into your editor of choice

SharePoint JSLink: Custom field view on form

With JSLink you have the ability to quickly and easily change how a list views and forms are rendered. In this example I will explain how to change a field or fields located in the view, display, new or edit forms. The advantage of only changing the look and feel of specific fields is that all the default features and functions will remain functional. For example paging will still work and you will not need to create custom paging.

Solution

In this solution I will change the look and feel of the default % complete column.

  1. Create a custom SharePoint list called Progress Example.
  2. Add the default % complete column.
  3. Save the JSLink Percentage Complete to SharePoint.
  4. Link the JSLink to the form on new, edit, display and view web parts.
  5. The view and display form will be shown as a progress bar with the exact number shown.
  6. The edit en new forms will be shown as a progress bar that you change with the exact number shown.

Explanation

  1. The JSLink overrides the default rendering of the percentage complete (% complete) column.
  2. Each column and form that needs a different rendering needs to be linked to the new render function.
    You can link multiple forms to one function.
  3. In the following code the view and display column are linked to the same function called percentCompleteViewDisplayFiledTemplate.
  4. The edit and new form are linked to the function called percentCompleteEditFiledTemplate.
    (function  ()  
        // Create object that have the context information about the field that we want to change it's output render  
       var overrideNameField  =  {};  
       overrideNameField.Templates  =<  {};  
       overrideNameField.Templates.Fields  =  {  
            // Apply the new rendering for Priority field on List View 
            "PercentComplete": {    "View": percentCompleteViewDisplayFiledTemplate,
                                    "EditForm": percentCompleteEditFiledTemplate,
                                    "NewForm": percentCompleteEditFiledTemplate,
                                    "DisplayForm": percentCompleteViewDisplayFiledTemplate
            }
         };  
         SPClientTemplates.TemplateManager.RegisterTemplateOverrides(overrideNameField);
    })(); 
    
  5. In the functions you can rewrite how the column is rendered.
  6. The function percentCompleteEditFiledTemplate rewrites the rendition.
    // This function provides the rendering logic for New and Edit forms for percentage complete column
    function percentCompleteEditFiledTemplate(ctx) { 
     
      var formCtx = SPClientTemplates.Utility.GetFormContextForCurrentField(ctx); 
     
        // Register a callback just before submit. 
        formCtx.registerGetValueCallback(formCtx.fieldName, function () { 
            return document.getElementById('inpPercentComplete').value; 
        }); 
     
        return "<input type='range' id='inpPercentComplete' name='inpPercentComplete' min='0' max='100' oninput='outPercentComplete.value=inpPercentComplete.value' value='" + formCtx.fieldValue + "' /> <output name='outPercentComplete' for='inpPercentComplete' >" + formCtx.fieldValue + "</output>%"; 
    } 
    
  7. The result is an input slide bar instead of the default text box.

SharePoint JSLink: Paging

When you use JSLink not all default SharePoint list features will be generated automaticly, for example paging will not be available. When you require paging you need to code this yourself. In this example I will create an example list with no custom styling besides the custom paging.

Solution

  1. Create a custom list called Paging Example with a title field.
  2. If required changed the fields to be shown.
  3. Create a page and add the Paging Example web part to the page.
  4. Create the JSLink file called BasicPaging.js
  5. Link the JSLink to the web part to load the BasicPaging.js

Explanation

  1. The JSLink overrides the default Templates (Header, Item and Footer).
  2. The paging has been added to the Footer template.
  3. The following variables are used to get the first and last row and the previous and next hyperlinks.
    var firstRow = ctx.ListData.FirstRow;
    var lastRow = ctx.ListData.LastRow;
    var prev = ctx.ListData.PrevHref;
    var next = ctx.ListData.NextHref;
    
  4. The following code will render the paging are required and uses the default SharePoint classes and images.
    var footerHtml = "<div class='Paging'>";
    footerHtml += prev ? "<a class='ms-commandLink ms-promlink-button ms-promlink-button-enabled' href='" + prev + "'><span class='ms-promlink-button-image'><img class='ms-promlink-button-left' src='/_layouts/15/images/spcommon.png?rev=23' /></span></a>" : "";
    footerHtml += "<span class='ms-paging'><span class='First'>" + firstRow + "</span> - <span class='Last'>" + lastRow + "</span></span>";
    footerHtml += next ? "<a class='ms-commandLink ms-promlink-button ms-promlink-button-enabled' href='" + next + "'><span class='ms-promlink-button-image'><img class='ms-promlink-button-right' src='/_layouts/15/images/spcommon.png?rev=23'/></span></a>" : "";
    footerHtml += "</div>";
    footerHtml += "</div>";
    return footerHtml;  
    

SharePoint JSLink: Multiple web parts on a page

With JSLink you have the ability to quickly and easily change how a list views and forms are rendered. Together with jQuery, CSS and even JavaScript you can present a SharePoint list in endless ways. JSLink works very well when you only one web part with a custom JSLink located on a page. The default behavior with multiple web parts on a page is that all web parts will use the JSLink. This is counter intuitive since we set the JSLink on one web part. With the solution below we can make sure that only the correct web part use the custom JSLink code. The solution is created in cooperation with Peter van Koesveld.

Solution

This solution works for a page where one web part needs to be modified by the JSLink.

  1. Create a JavaScript file with the following code: JSLinkMultipleWebParts.
  2. Change the if statements to match the name of the list.
    if (ctx.ListTitle == "ListTitle")
    
  3. Change the headerHtml, ItemHtml and footerHtml to show the list as required.
  4. In the example the Title field will be displayed, make sure this field is available.
  5. Save the JavaScript file to SharePoint.
  6. Set the JSLink property.

Explanation

  1. The JSLink overrides the default Templates (Header, Item and Footer).
  2. Then if the ListTitle equals the provided ListTitle the custom code is run for the header, Item and Footer.
  3. If the ListTitle does not match the default RenderTemplate will be used.
    function renderItem() {
        if (ctx.ListTitle == "ListTitle") {
            //CustomItemRender
        } else {
            //Return the default Item Template
        	return RenderItemTemplate(ctx);
        }
    }
    
    • RenderHeaderTemplate
      return RenderHeaderTemplate(ctx);
      
    • RenderItemTemplate
      return RenderItemTemplate(ctx);
      
    • RenderFooterTemplate
      return RenderFooterTemplate(ctx);
      

SharePoint JSLink: Accordion

With JSLink you have the ability to quickly and easily change how a list views and forms are rendered. Together with jQuery, CSS and even JavaScript you can present a SharePoint list in endless ways. In this example I will create a FAQ list with a accordion display style.

Solution

  1. Create a custom list called FAQ with a title and description field (Multiple Lines of Text).
  2. If required changed the fields to be shown.
  3. Create a page and add the FAQ web part to the page.
  4. Create the JSLink file called AccordionView.js
  5. Create the JavaScript file called accordion.js
  6. Create the CSS file called accordion.css
  7. Save the background image to SharePoint.
  8. Change the background-image URLs if needed.
  9. Link the JSLink to the web part to load the AccordionView.js.
  10. Add the accordion.js and accordion.css to the page, for example by using a Content Editor web part.
  11. Add jQuery to the page.
  12. Make sure that jQuery is loaded before the other JavaScript. Errors might otherwise be generated.