SharePoint 2013 Workflow: Start a workflow using a REST call

SharePoint 2013 workflows do not have a default action to start another 2013 workflow. There is an action to start 2010 workflows, but for my solution I required the more advanced actions only available with SharePoint 2013  workflows. With the help of the call http web service action I was able to create a REST call that started the workflow. The solution was build on SharePoint Online (Office 365) using a SharePoint 2013 workflow.

The REST call workflow consist of three major parts;

  1. The HTTP web service URL
  2. The SubscriptionID of the workflow that needs to be started
  3. The itemID of the item on which the workflows needs to be started.

A side note: The workflow that is being started needs to be configured to start manually. I could not find any reference on MSDN about this, but without this option I would get an error message.

Solution

  1. Create a SharePoint 2013 workflow
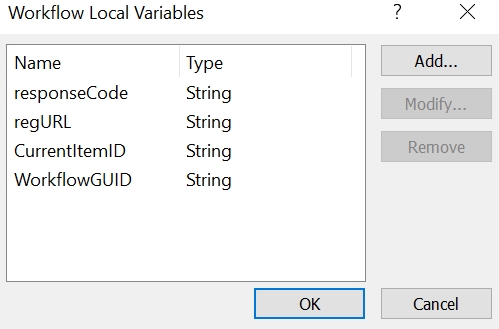
  2. Create a string variable called CurrentItemID
  3. Create a string variable called WorkflowGUID
  4. Create a string variable called regURL
    workflowvariables
  5. Now we need to find the SubscriptionID of the workflow we want to start. It is possible to use another REST call to find the SubscriptionID. But I prefer the following method.
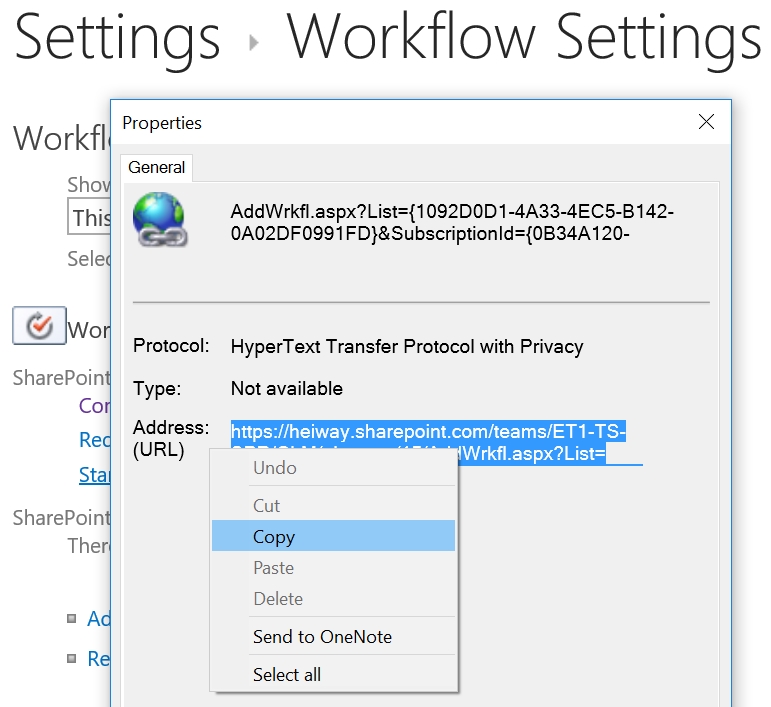
  6. Navigate to the workflow settings of the list where the workflow is located
  7. Right-click on the workflow and open the properties
  8. Copy the URL and find the SubscriptionID within the URL
    getsubscriptionid
  9. Set the variable WorkflowGUID with the found SubscriptionID
  10. Set the variable CurrentID with the ItemID of the current item or item on which the workflow needs to start.
    setvariables
  11. Then store the following URL to the variable regURL
    [%workflow Context: Current Site URL%]_api/SP.WorkflowServices.WorkflowInstanceService.Current/StartWorkflowOnListItemBySubscriptionId(subscriptionId='[%Variable: WorkflowGUID%]',itemID='[%Variable: CurrentItemID%]')
    
  12. Add the Call HTTP web service to the workflow and set the “this” to the regURL
  13. Set the HTTP Method to HTTP POST
    setcallhttpwebservice
  14. The workflow will now look like this
    fullwfstartanotherwf
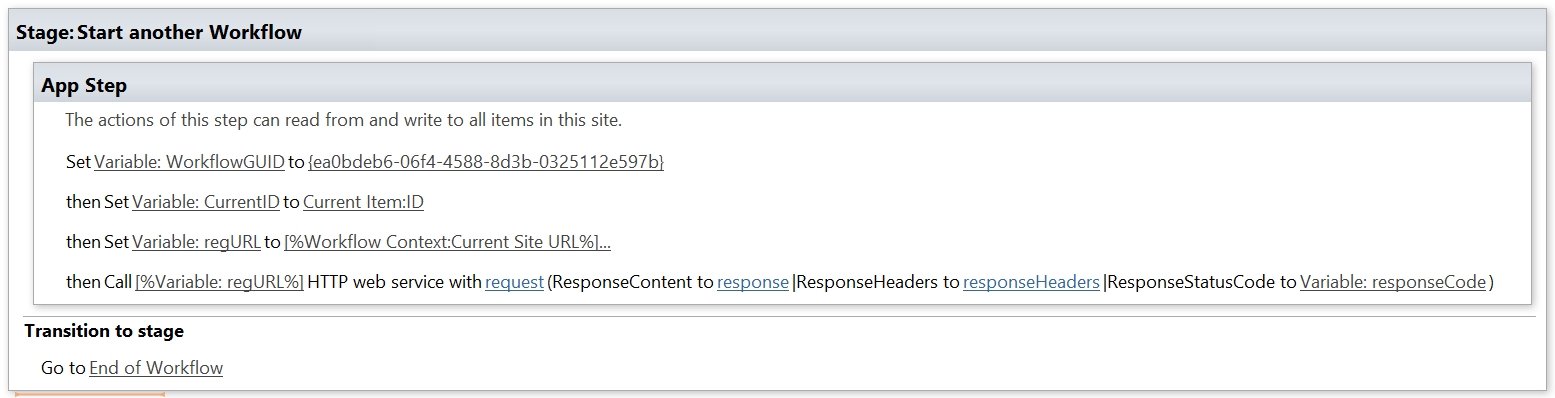
  15. The app step is used to make sure the workflow has the required permissions. More details about the App Stepp will be explained in another blog post.


Remove HTML markup with display templates

Display templates are used to show the queried results in a attractive and useful layout. With the CQWP we used XSLT to format the data as required, but with display templates we need to use JavaScript. One of my most formatted field is the publishing page content field. In this blog post I will explain how you can show the field without the formatting tags by using JavaScript.

Solution publishing page content
1. Edit the related Item Template.
2. Add the PublishingPageContent to the ManagedPropertyMapping. For a clean example I removed all mappings besides Title and PublishingPageContent.

<mso:ManagedPropertyMapping msdt:dt="string">'Titel':'Title','PublishingPageContent':'PublishingPageContentOWSHTML'</mso:ManagedPropertyMapping>

3. Create a variable for the PublishingPageContent column.

var PublishingPageContentHTML = $getItemValue(ctx, "PublishingPageContent");

4. The PublishingPageContentHTML will contain the page content but with styling. The following code will remove the styling.

var div = document.createElement("div");
div.innerHTML= PublishingPageContentHTML;
var PublishingPageContentL = div.textContent|| div.innerText|| "";

5. Us the code below to display the PublishingPageContent.

<div>
   _#= $htmlEncode(PublishingPageContent ) =#_
</div>

Result

CSWP Result

SharePoint 2013 Visual Workflows

A new feature of SharePoint 2010 was to visual design workflows in Visio. It was only possible to visual design the workflow, the configuration of the actions could only be done with SharePoint Designer. This is still possible in SharePoint 2013 but there is also something new. With SharePoint Designer 2013 it is possible to visual design the workflow and fully configure the actions!


Text-based Designer


Visual Designer

Changing the view

1. Create a new workflow in SharePoint Designer.
2. Change the default Text-based view to the new Visual designer view, by clicking on Views.

3. Add actions and logic to the workflow.
4. Configure the actions.