SharePoint 2013 CQWP Office Online hyperlink

With the introduction of Office Online (Office web apps) files can be opened in the browser with Office Online (Office web apps) or with the local client. If able SharePoint 2013 will open files (.pptx, docx, xslx) in office Online and other files in the related client (doc, xsl, pdf etc.) This behavior works great within the document library, however this does not work out of the box for files that are displayed using a content query webpart. With XSLT we are able to create an variable which creates per file the required hyperlink.

Solution
1. Edit the CQWP Template where the semi dynamic hyperlink is required.
2. First we need to create the variable that builds the correct office online or default hyperlink. The default hyperlink opens the files in the client software.

<xsl:variable name="DynamicURL">
   <xsl:choose>						
      <xsl:when test="contains(@FileExtension,'docx')">
         /sites/PH/OH/_layouts/WopiFrame.aspx?sourcedoc=<xsl:value-of select="@LinkUrl"/>	
      </xsl:when>
      <xsl:when test="contains(@FileExtension,'pptx ')">
         /sites/PH/OH/_layouts/WopiFrame.aspx?sourcedoc=<xsl:value-of select="@LinkUrl"/>	
      </xsl:when>
      <xsl:when test="contains(@FileExtension,'xslx')">
         /sites/PH/OH/_layouts/WopiFrame.aspx?sourcedoc=<xsl:value-of select="@LinkUrl"/>	
      </xsl:when>
      <xsl:otherwise>
         <xsl:value-of select="@LinkUrl"/>
      </xsl:otherwise>
   </xsl:choose>
</xsl:variable>

3. The choose function determines the file type and sets the correct Office Online hyperlink or the default Hyperlink based of LinkUrl field.
4. Secondly we need to use the DynamicURL variable to create the hyperlink.

<a href="{$DynamicURL}" target="_blank">
   <xsl:value-of select="@Name"/>
</a>


Result
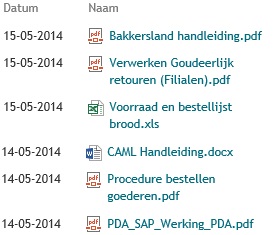
Files with extensions docx, pptx and xslx will open in Office Online other files will open in the related client.

CQWP Hyperlink Office Online

SharePoint Custom Grouping with XSLT

For SharePoint solution where the look and feel or clean code is very important we often create custom header.xslt ContentQueryMain.xslt and ItemStyle.xstl files. The files are almost completely empty to provide us with maximal control. This also means we need to recreate functionality that normally works by default. A good example is the ability to group the results.

Solution
1. Create the custom XSLT files and link the files to the Content Query Web Part.
2. The following code is a complete example of a custom Content Query Main XSLT file. This code generates grouping.

<xsl:stylesheet
    version="1.0"
    exclude-result-prefixes="x xsl cmswrt cbq" 
    xmlns:x="http://www.w3.org/2001/XMLSchema"
    xmlns:xsl="http://www.w3.org/1999/XSL/Transform"
    xmlns:cmswrt="http://schemas.microsoft.com/WebPart/v3/Publishing/runtime"
    xmlns:cbq="urn:schemas-microsoft-com:ContentByQueryWebPart">
    <xsl:output method="xml" indent="no" media-type="text/html" omit-xml-declaration="yes"/>

  <xsl:key name="Grouping" match="Row" use="@GroupingColumn" />

  <xsl:template match="/">
 <xsl:for-each select="/dsQueryResponse/Rows/Row[generate-id(.)=generate-id(key('Grouping',@GroupingColumn))]/@GroupingColumn">
  <xsl:sort />
        <xsl:value-of select="."/>
        <xsl:for-each select="key('Grouping', .)">
         <br /><xsl:value-of select="@Title" />
         </xsl:for-each>
        <br/>
      </xsl:for-each>     
    </xsl:template>
</xsl:stylesheet>

3. Change the XSLT where needed

Result
CQWP Custom Grouping

Show Pictures with Slimbox in SharePoint

Pictures are an important part of a SharePoint site, it enriched the otherwise plain look and feel. With a little extra effort we can integrate Slimbox to show the pictures in a very slick and modern way.

Solution

1. Download Slimbox2 and jQuery, in this example I used jQuery 1.8.3 uncompressed.
2. Save the files in the Style Library of SharePoint. Note that not all the Slimbox files are required to be stored in SharePoint.
3. Include the jQuery javascript, the Slimbox javascript and the Slimbox CSS to the page, page-layout or the master page.

<script type="text/javascript" src="js/jquery.js"></script>
<script type="text/javascript" src="js/slimbox2.js"></script>
<link rel="stylesheet" href="css/slimbox2-rtl.css" type="text/css" media="screen" />

5. Create a picture library and save a couple of pictures to the library. The picture library will provide the necessary thumbnails without any extra effort.
6. Add a CQWP to a page and query the pictures.
7. Create a XSLT that shows the small thumbnails of the pictures, for example in a banner view.

Slimbox Result 1

8. I created two variables for the default SharePoint Thumbnails, Thumbnail_w and Thumnbail_t. And used the following code to show the small thumbnail with a Slimbox link to the bigger thumbnail.

<a href="{$Thumbnail_w}" rel="lightbox" title="{@Title}">
   <img src="{$Thumbnail_t}" alt="alt" class="PhotoAppThumbnail" />
</a>

9. Also note that the title field is added to the Slimbox link, the title will be displayed on the Slimbox overlay.

Result

Slimbox Result 1

SharePoint 2013 Editable column in the Dataview and Quickedit

With the dataview and Quickedit view user are able to quickly edit multiple items and columns. The following overview contains a list of which columns are editable. Remember depending on the SharePoint 2013 version and updates different columns might be editable.

Overview

Column Type SP 2013 Cloud SP 2013 Onpremise
Title Editable Editable
Single Text Editable Editable
Multiple lines of Rich Text Editable Editable
Multiple lines of plain Text Editable Editable
Choice Editable Editable
Numbers Editable Editable
Currency Editable Editable
Date and Time Editable Editable
LookUp Editable Editable
Checkbox Editable Editable
Person and Group Editable Editable
Hyperlink Editable Editable
Hyperlink as Picture Editable Editable
Managed Metadata Editable Editable
Task Outcome Not Editable Not Editable
Calculated Not Editable Not Editable
Content type Not Editable Not Editable

SharePoint Designer: Clearing the cache

SharePoint Designer sometimes is out of sync with SharePoint. SharePoint Designer will incorrectly show items as checked out (or checked in) and refuses to be update with the actual status. In some cases the following error will be shown when trying to check out/in an item.

“Cannot perform this operation. The file is no longer checked out or has been deleted.”

Solution
The solution to this problem is to clear the cache of SharePoint Designer.

1. If opened close SharePoint Designer
2. Open the folder %APPDATA%MicrosoftWeb Server ExtensionsCache
3. Delete the contents
4. Open the folder %USERPROFILE%AppDataLocalMicrosoftWebsiteCache
5. Delete the contents
6. Problem solved.