SharePoint Default value for multi line column

By default SharePoint gives you the option to set the default column value for a lot of different type of columns. Unfortunately is this option is not available for the multi line column.
But with jQuery and a bit of JavaScript we can! This solution has been create in cooperation with Peter Heibrink.

Solution
1. Download the latest version of jQuery or the compressed jQuery
2. Save the Default Rich Text JavaScript to a JS file

<!-- 	TODO: Set reference to the jQuery.-->
<script type="text/javascript" src="[/...../jquery-1.10.2.min.js]"></script>
<!-- 	TODO: Set the varibale for the fieldname with the display name of the milti line column
	TODO: Set the HTML for the default value-->

<script type="text/javascript">
	jQuery(document).ready(function() {
		var fieldName="Body";
		var defaultText = "<b>Default value</b><br />This is the default rich text value...";
		if(jQuery('nobr:contains(' + fieldName + ')').closest('tr').find('input[id$="TextField_spSave"]').val() == "") {
			jQuery('nobr:contains(' + fieldName + ')').closest('tr').find('input[id$="TextField_spSave"]').val(defaultText);
		}
	});
</script>

3. Save jQuery and Default Rich Text JavaScript somewhere on SharePoint
4. Navigate to the SharePoint list where the multi line column needs a default value
5. Open the advanced library settings and set Launch forms in dialog to No.
DialogYesNo
6. Open the New item page for the list and edit the New item page
7. Add a content editor web part to the page with a Content link to the Default Rich Text JavaScript
ContentLink
8. Save the changed and add a new item!

Result
defaultRichValue

SharePoint 2013 Group by content type

Just like SharePoint 2010 it is not possible with SharePoint 2013 to create a view with a ‘group by’ or ‘sort’ for the content type column with the help of the the user interface. Fortunately we can create the ‘group by’ content type view with the help of SharePoint Designer and a bit of code. Sorting the view on content type is not possible with this solution. When using this solution be aware of the following downside. When the view is modified through code, you should no longer edit the view through the user interface. When you edit the view through the user interface the code will be removed automatically.

Solution
1. Create through the user interface the view you need.
2. Set the Group By on the column Created.
3. Save the view.
4. Open the view with SharePoint designer in the advanced mode.
5. Find the following code.

<GroupBy Collapse="TRUE" GroupLimit="30"><FieldRef Name="Created"/></GroupBy>

6. Change Created into ContentType
8. Save the changes.

Result
???????????

Inhoudstype is dutch for Contenttype. 

SharePoint 2013 Promoted Results aka Best Bets

With SharePoint 2013 the term Best Bets is no longer used, the new term is Promoted Results. The concept of the feature is the same, an administrator can serve (promoted) results based on specific search phrases enter by a user. The promoted result will appear on the top of the search results, this is a powerful way to promoted search results within SharePoint 2013. Specific results can be brought forward to the users attention with minimal effect and without changing any difficult ranking mechanic or index.

Solution

1. Open SharePoint 2013 Central Administrator.
2. Open the Managed Service Applications and click on the Search Service Application.
3. Click on Query Rules.
QueryRules
4. Select the context (source), in this example I used the Local SharePoint Results (System).
QueryRulesSource
5. Click on New Query Rule.
NewQueryRule
6. Enter a Rule name.
RuleName
7. Specify the exact phrases for the promoted result, use a ; to separate multiple phrases.
8. In this example I will make a promoted link to a image library.
ResultPhrase
9. Click on Add Promoted Result.
AddPromotedResult
10. Enter the Title and the Description of the Promoted Result.
11. Specify the URL that will be linked to the promoted result.
PromotedResultConfig
12. Save all the changes.
13. The promoted result is created and ready for use.

Result

Custom Promoted Result

SharePoint 2013 Search Refinement panel

In SharePoint the refinement panel is used to narrow down the search results. SharePoint provides a set of default refiners containing result type, author and modified date. Compared to previous version changing the refiners is simplified and very straight forward. Existing refinement options can be added through the user interface and options can be set per refinement.

RefinementOptions

Change the refinement panel

1. Edit the Search results page.
2. Edit the the refinement panel.
RefinementPanelEdit
3. Click on Choose Refiners…
RefinementPanelChooseFilters
4. With the Refinement configuration available refiners can be added or removed and ordered.
RefinementConfiguration1

5. The following setting can be changed for every selected refiner.
RefinementConfiguration2
6. Apply the changes and publish the search results page.

Create new refinement options

1. Open Central administration and open the Manage service applications.
2. Select the Search Service Application and click on Manage in the ribbon.
3. Click on Search Schema under Queries and Results
SearchSchema
4. If you are adding a newly created column make sure the column is available in the Crawled Properties
5. If the column is not available preform and crawl.
5. Click on New Managed Property
New Managed Property
6. Enter the Property name and select the correct type.
Managed Property name
7. Select the following options; Searchable, Queryble and Retrievable.
Managed Property Settings
8. Select Yes – active by Refinable
RefinementYes
9. Click on OK to save the changes.
10. Preform a crawl to make the new refinement available.
11. Add the refinement option in the refinement panel.

SharePoint 2013 The Site Mailbox

The site mailbox is a new app for SharePoint 2013 designed to work with emails and there attachments. With the site mailbox it is easy to store emails and documents on a team site to keep track of all the communications. The site mailbox will even be available in outlook to fully benefit from all the features. The Exchange 2013 Mailbox is synchronized with a SharePoint 2013 Site Mailbox, this means that you can work with the emails and document through the browser or Outlook.

Create a Site Mailbox

1. Create a Team site on SharePoint 2013.
2. Click on Keep email in context to create a new Site Mailbox.
Get started with your site
3. Click on AddIt
AddiT
4. The Site Mailbox Mailbox has been added.
Site mailbox new
5. It will take a moment for SharePoint 2013 to create the Site Mailbox.
6. When the Site Mailbox is created it can take up to 30 minutes before the mailbox can be used. SharePoint 2013 will send an email to all the owners and members of the site.

File an email from Outlook

To file an email from Outlook to the Site Mailbox simple drag and drop the email to the sites inbox.
File email

File a documents from Outlook

To file a document from Outlook to the Site Mailbox simple open the email and drag and drop the attachment to the sites Documents library.

File document

Forward a document from the Site mailbox

With SharePoint it is no longer needed to email documents around, to distribute a document simple send the user a link. This will provide everybody with the same document without any versioning issues.
Right-click on a document and click on Forward to send an email with a link to the document.

Forward a Document

Forward multiple documents from the Site mailbox

Forwarding a single document is nice, but forwarding multiple document with minimal afford is really cool.
Create a new Email and drag and drop the documents onto the email.

Forward Multiple Documents

Remove Site Mailbox from Outlook

When a project is finish or the team site is no longer need, you might want to remove the Site mailbox from Outlook. This will only remove the Site Mailbox from Outlook the content will still be available on the team site.
Right-click on the Site Mailbox and click on Close “Site Name” to remove the mailbox from Outlook.

Close Site Mailbox

Manage all Site Mailboxes in Outlook

Right-click on the root mailbox associated with the SharePoint 2013 site and click on Manage All Site Mailboxes… to remove the mailbox from Outlook.
This will open a web page in the browser where you can select the Site Mailboxes that need to be shown in Outlook.
Manage All Site Mailboxes

Open the team site from Outlook

When working from outlook with the Site Mailbox there is a fast way to open the associated team site. Right-click on the document folder associated with the sites mailbox and click on Open in Web Browser to open the linked team site.
Open in Web Browser

SharePoint 2013 Search tips and tricks

Search is a very big part of almost every SharePoint site but searching through the content is not the goal, finding the correct content is. In this post I will give 8 tips to get better search results!
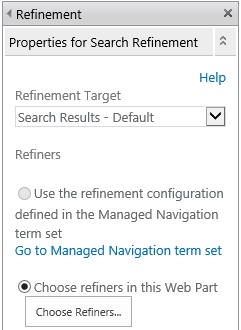
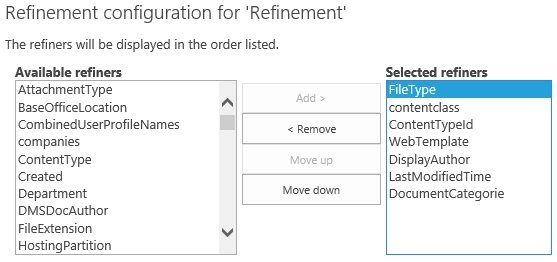
1 Refinement panel

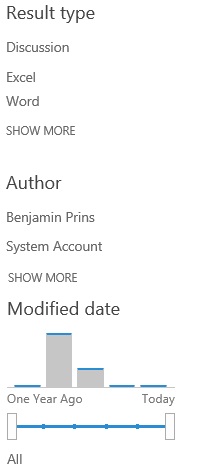
Use the refinement panel on the search results page to narrow down the results. When SharePoint displays the search results you can filter the results by using the refinement panel. Common refinement options are result type, author and modified date.

Refinement planel

2 Use Boolean operators

Boolean operators are used to narrow or expand the search results. Capitalization usually does not matter in search, except for operators. For Boolean operators to work correctly they need to be written in capitals.

AND Use AND to narrow your search results. The returned search results include all of the free text expressions
NOT Use NOT to narrow your search results. The returned search results don’t include the specified free text expressions or property restrictions.
OR  Use OR to expand your search to include more terms. The returned search results include one or more of the specified free text expressions or property restrictions.

Example: “Project plan” OR “Business Case”

3 Use wildcards

Use a wildcard * if you want to be sure to get variations of the term you are looking for or if you are not sure about the spelling.
Example: Project* to search for all item starting with the word project.

4 Use double quotes

Use double quotes “” to find exact phrases if you are sure about the phrases.
Example: “Progress report”

5 Use Search shortcuts

SharePoint search has a few handy shortcuts that make searching for specific types of content faster and easier. When using a shortcut SharePoint combines property filters to narrow down the search results. When searching for a document called Projectplan search for projectplan doc instead of projectplan. In the background SharePoint will change the search shortcut from doc into filetype:doc OR filetype:docx, filtering the results and displaying only Word documents.

Search shortcuts Result
Deck or decks Only PowerPoint presentations will be shown
Slide or slides Only PowerPoint presentations will be shown
Doc Only Word documents will be shown
Video Only video files will be shown
Site Only SharePoint sites will be shown
Blog or blogs Blog sites will be shown
Post Only shows the news feed activities
Conversation Only conversations (discussions) will be shown

6 Use Specifying properties

The most easy way to explain what properties are is to use the less technical term SharePoint uses which is; metadata. Metadata is the data captured to describe the content. By default SharePoint captures a lot of metadata such as document title, document type, last modified date. The main purpose of using metadata is to make sure all the content stored in SharePoint can be found easily.

A basic property restriction consists of the following three parts: a property name a operator and a value

<Property Name><Property Operator><Property Value>

Example: Author:John or Title:Projectplan

7 Use Property restrictions (operators)

When using properties to narrow down the search results it is possible to make the search query even more specific with the use of different property restrictions. The most used and best known is the : operator. When using the : operator the returned results will all be equal to the specified value . There are a lot more operators available a few examples are:

Operator Description Example
: Returns results where the value is equal to the property value (short description) Author:John
= Returns results where the value is equal to the property value Title=Projectplan
< Returns results where the value is less then the property value Created>9/20/2012
> Returns results where the value is greater then the property value Modified<10/10/2012

Search in SharePoint 2013 supports several new property operators. See the full list of the property operators on Keyword Query Language (KQL) syntax referene table 2.

8 Try again

If you did not find the correct document, change the search query a bit. Add or remove terms, operators and properties. Not all documents will be found with the first attempt.

If you want to know more about the new search features check out the post SharePoint 2013 new search features.

Supporting links

Keyword Query Language (KQL) syntax referene

Fast Query Lanquage (FQL) syntax reference