Flow and Twitter

The default Twitter web part it great and easy to use. You can follow a Twitter user (@), a URL of a user account, tweet or collection. These options where not enough for a communications department who wanted to show the #, @Company, the company name and from:[Company] on a SharePoint page. We were able to do this with a PowerAutomate Flow and a custom content query web part. In this post I will explain how you can do this.

SharePoint: Create a list

  • Create a SharePoint list to store the twitter information.
  • We created the following columns to store the information, your requirements might be different.
Column nameType
Favorite countsNumber
Followers countsNumber
LocationSingle line of text
Media urlsMultiple lines of text
Original tweetMultiple lines of text
Original tweet tweeted bySingle line of text
TweetMultiple lines of text
Tweeted bySingle line of text
Created atDate and time
TweetIdSingle line of text
Original tweet idSingle line of text
TypeChoice
RetweetsSingle line of text
ProfileImageUrlNumber
NameUserSingle line of text

Flow: Getting the information

  • Open PowerAutomate and create a new Flow.
  • Add the trigger When a new tweet appears.
  • Enter the required search term, see the example below.
  • We wanted to be able to filter on the different types of results, for example on # or @. This information is added to the item that will be created in the SharePoint list.
  • A tweet can be multiple types so we need an array and append all the types to it.
  • Initialize a variable called TypeTweet as an array.
  • Add a scope called Append to array – TypeTweet.
  • Add a condition that filters the #Office365 out of the TweetText.
  • If the result is yes then append the value #Office365 to the array.
  • Repeat the steps for all types of tweets.
  • Add a scope called Create list item.
  • Add the SharePoint Create item action.
  • Connect all the columns to the correct information.

Custom Content Query Web part

We used a variation of the React Content Query Web Part from Github. This is a modern version of the CQWP where you have all the freedom to grab and style items from a list or library.

Flow: Tips and tricks

Microsoft Flow is a very powerful tool and can be used to do many different things. I think it has become my favorite tool in Office 365. Therefor I want to spread the Flow love and tell you a couple of tips and tricks when developing Flows.

Copy actions

A very useful and time saving capability within Micorosft Flow is that we can copy and paste actions. You can copy configured actions and reuse them! The best thing about this capability is that you can copy an action from one flow and past it into another. I often use this to copy the more complex HTTP request actions. This feature is currently in preview, but so far I have not encountered any issues with it.

  • Click on the … on an action.
  • Click on Copy to my clipboard (preview).
  • Click on + New step.
  • Open the tab My clipboard.
  • Select the copied action.

Continue flow after a failed action

By default a flow will stop working if an action fails. If you know that an actions might fail occasionally you can setup a situation where only that action fails but not the whole flow. You can do with the Configure run after setting.

  • Click on the … of the action after the action that might fail.
  • Click on Configure run after.
  • Here you can configure if the action will be run even if the previous failed, skipped or timed out.
  • In this example I selected both is successfull and has failed to.
  • The flow will now continue if the previous action failed or succeeded.

Scope try and catch

We can use the action scope to group actions to make the flow easier to read. There is however another great use for them. The scope action encapsulate a block of actions and inherit the last terminal status (Succeeded, Failed, Cancelled) of actions inside. This in combination with the Configure run after setting we can create a try and catch logic in our flows. In this example the second scope (catch) only runs if the first scope (Try) failed.

  • Create a scope with some actions
  • Create a second scope after the first scope
  • Set the Configure run after setting of the second scope to has failed, is skipped and has timed out.
  • In this scenario the catch scope will only run if the Try scoped faild.
  • The flow will look like this.

Flow: Set permissions using REST API

For a customer I am creating Microsoft Flows to support various business processes. One Flow controls the process of reviewing and approving vital business documents. These documents are so important that during the day to day business the reviewers and approvers are unable to edit these documents. Only when the documents are in review a select few are allowed to edit them.

Microsoft Flow contains many default actions for all sorts of tasks, but
during the writing of this blog post there is no default action that can set permissions or break the inheritance.

In this blog post I will explain how set custom permissions, break the inheritance and restore the inheritance using the REST API.

Register app and grant app permissions

For the Flow to work we will need to Register an App and grant it permissions. During the registration of the App we will receive various id’s we will use in the Flow.

  • Navigate to the app registration page on the SharePoint site.
https://<tenant>.sharepoint.com/_layouts/15/appregnew.aspx
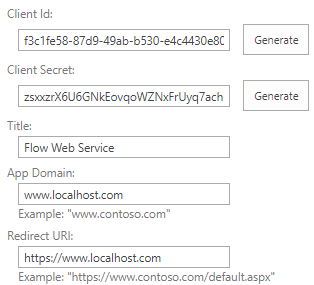
  • Generate a Client ID and Client Secret.
  • Set the Title to Flow Web Service
  • Set App Domain to www.localhost.com
  • Set Redirect URI to https://www.localhost.com
  • Save the generated Client Id and Client Secret.
  • Navigate to the Grant permissions to an app page. This must be done by browsing to the appinv.aspx page of the site.
http://<hostname>/<the Site Collection>/_layouts/15/appinv.aspx
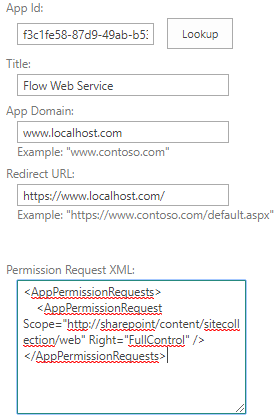
  • Fill in the Client Id and click on Lookup
  • Now we will grant the App full control access to the site collection.
  • Set the following XML as the Permission Request XML
<AppPermissionRequests>
    <AppPermissionRequest Scope="http://sharepoint/content/sitecollection/web" Right="FullControl" />
</AppPermissionRequests>
  • Click on Create.
  • A pop-up screen will appear asking to Trust the App, click on Trust It.
  • The App has been granted permissions and can be used in the Flow.

Creating the Flow

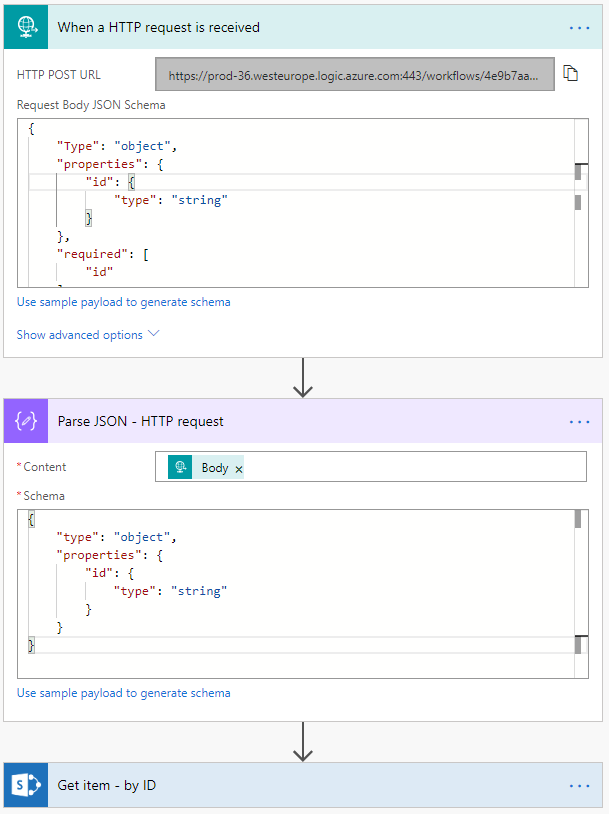
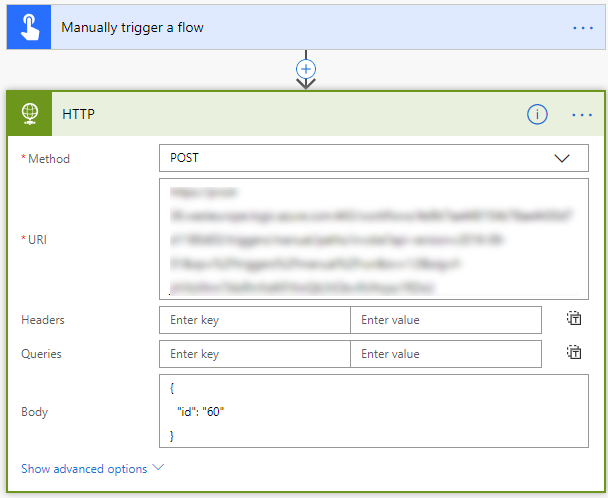
  • Create a Flow with the required trigger.
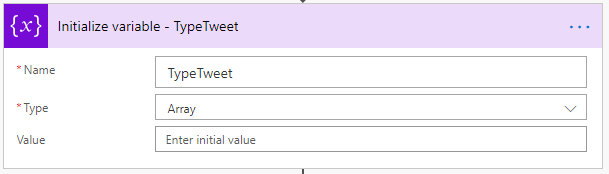
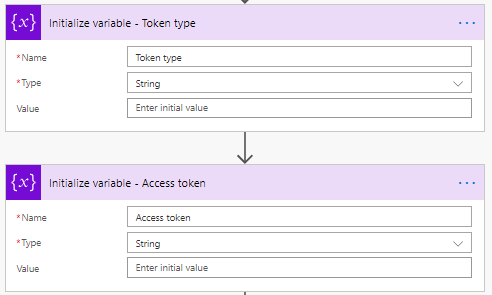
  • Add two initialize variable actions for the Token type and Access token.
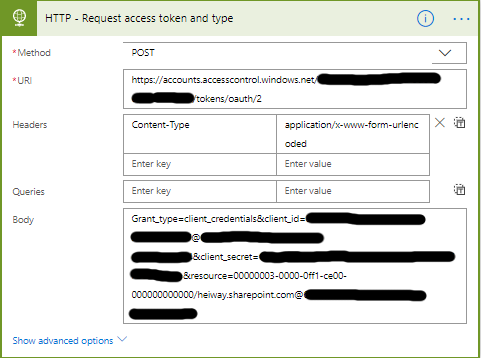
  • Add the HTTP action to acquire the access token and type.
  • Set the name to HTTP – Request access token and type
  • Set the Method to POST.
  • The URI is different for every tenant, you will need to your tenant id.
  • https://accounts.accesscontrol.windows.net/<tenant ID>/tokens/OAuth/2
  • Set the Headers as follows.
  • The key is Content-Type
  • The value is application/x-www-form-urlencoded
  • For the body you will need the tenant ID, client_credentials, client_id and client_secret.
  • grant_type=client_credentials&client_id=
    <Client ID>@<Tenant ID&client_secret=<Encoded Client Secret>&resource=00000003-0000-0ff1-ce00-000000000000/<tenant>.sharepoint.com@<Tenant ID>
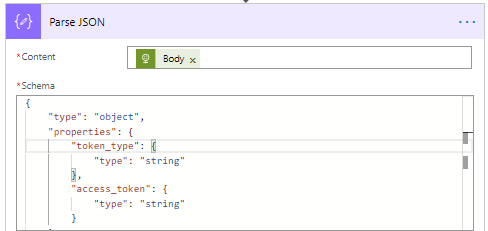
  • Add a Parse JSON action.
  • Set the content to the BODY (result) of the HTTP – Request access token and type action.
  • Use the following Schema to parse the JSON.
{
    "type": "object",
    "properties": {
        "token_type": {
            "type": "string"
        },
        "access_token": {
            "type": "string"
        }
    }
}
  • Set the variable Token type and Access token using the results of the parsed JSON.
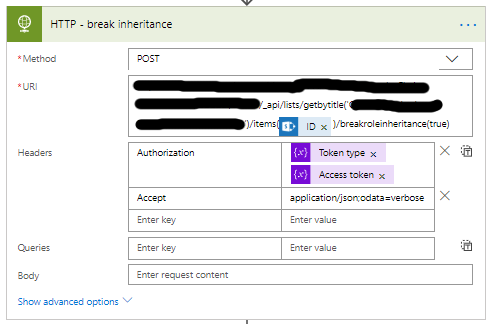
  • Now you can break the inheritance, add a HTTP action.
  • Set the name to HTTP – break inheritance.
  • Set the Method to POST.
  • The URI is different for every item/list you want to change.
  • <site url>/_api/lists/getbytitle(‘<list display name>’)/items(<ITEM ID>)/breakroleinheritance(true)
  • Set the Headers as follows.
  • The key is Authorization
  • The value is the Token type and Access token variable. Make sure to add a space between the variables.
  • The key is Accept
  • The value is application/json;odata=verbose
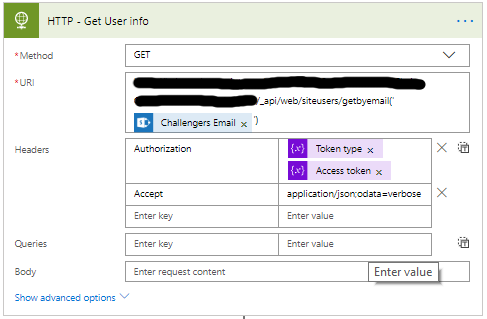
  • Now you can grant an user permissions, I am granting the challenger (property of the item) contribution access.
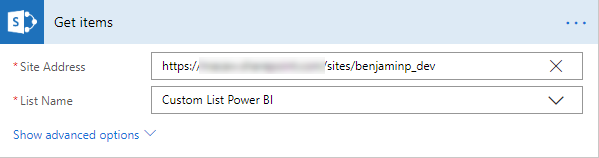
  • Add a HTTP action, with this action we will get the users information.
  • Set the name to HTTP – Get User info
  • Set the Method to GET
  • The URI is different for every location where you want to get the information from.
    <site url>/ _api/web/siteusers/getbyemail(‘<Challengers email>’)
  • Set the same Headers as before.
  • Add the Parse JSON action, name is Parse JSON – Get User Principal ID
  • Set the content to the BODY (result) of the
    HTTP – Get User info action
  • Add the following Schema to the Use sample payload to generate the schema option.
  • Make sure to enter your own account details.
{
  "d": {
    "results": [
      {
        "Id": 9,
        "LoginName": "i:0#.f|membership|<youraccount>",
        "Title": "<your name>",
        "PrincipalType": 1,
        "Email": "<youremail>",
        "IsSiteAdmin": true
      },
      {
        "Id": 14,
        "LoginName": "i:0#.f|membership|<youraccount>",
        "Title": "Example Title",
        "PrincipalType": 1,
        "Email": "<youremail>",
        "IsSiteAdmin": false
      }
  
    ]
  }
}
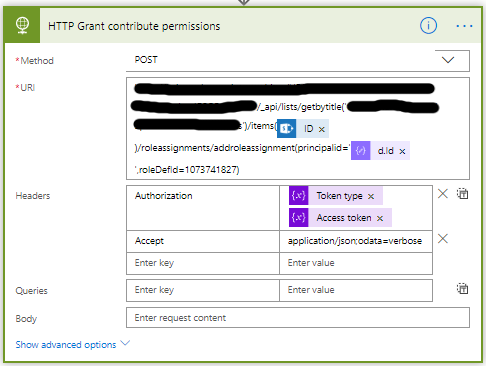
  • Add a HTTP action, set the name to HTTP – Grant contribute permissions
  • Set the Method to POST
  • The URI is different for every item/list you want to change.
    <site url>/_api/lists/getbytitle(‘<list display name>’)/items(<ITEM ID>)//roleassignments/addroleassignment(principalid='<d.ID>’roleDefId=1073741827)
  • The id 1073741827 stands for contributor, in my blog post SharePoint: Get the Role ID you can read more about role id’s.
  • Set the same Headers as before.
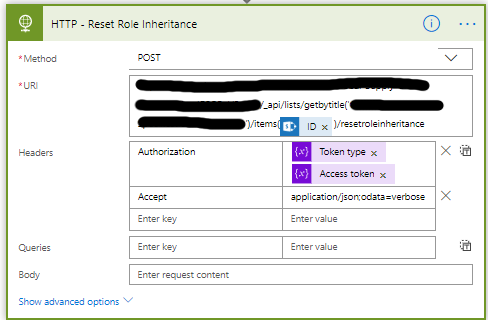
  • Now you can reset the inheritance if needed, add a HTTP action
  • Set the name to HTTP – Reset Role Inheritance
  • Set the Method to POST
  • The URI is different for every item/list you want to change.
    <site url>/_api/lists/getbytitle(‘<list display name>’)/items(<ITEM ID>)/resetroleinheritance
  • Set the same Headers as before.
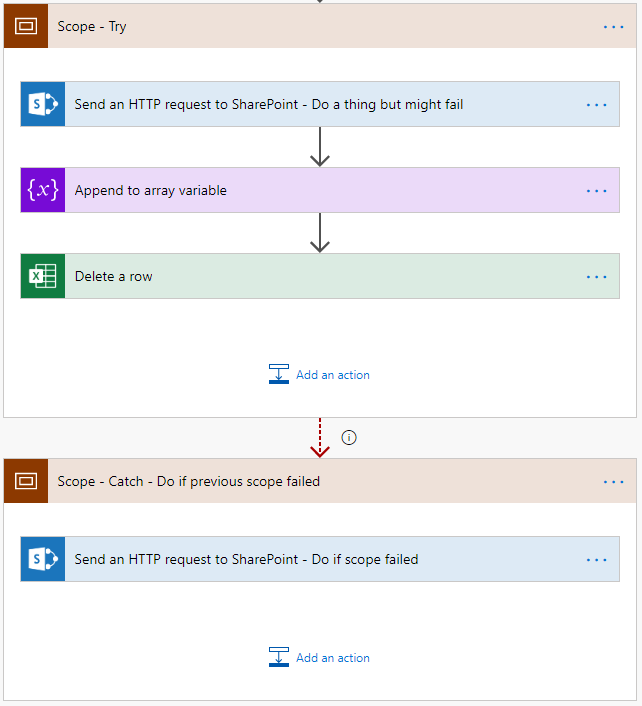
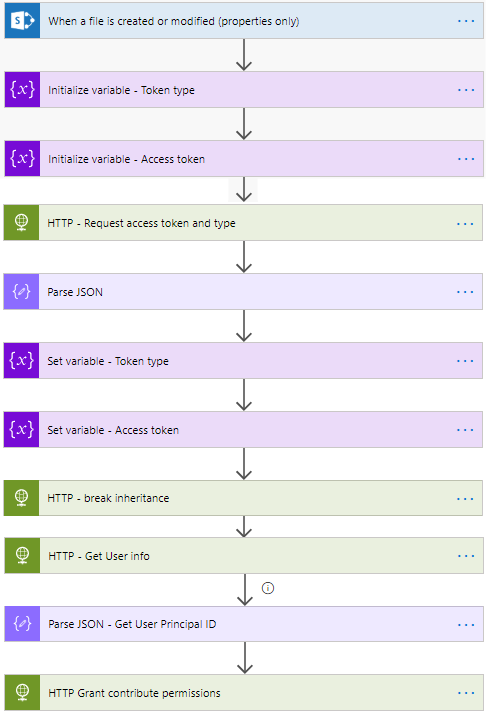
  • Your Flow will now look like this.

Flow: Performance issue

In my previous blog post Flow: Start a flow with another flow I talked about a flow that was becoming very big and slow. In this blog post I will explain why the Flow was very slow and how you can prevent this from happening.

The purpose of the Flow was to convert a complete SharePoint List into a comma separated Excel file. This was not a simple extract but also various data manipulations and user profile data request where required. The Flow ended up with a large number of for each loops and unique variables.

Reason 1: Too many of the action Initialize variable

The Flow contained too many unique variables. I noticesd hat there was a steep incline in the overall processing time when I added more and more unique variables. It started to become slow after about 12 variables. Try too avoid to many unique variables.

Reason 2: Nested for each loops

The Flow also contained too many nested Apply to each actions. This slowed down the Flow but much less than the unique variables. Try too avoid nested loops.

Flow: Start a flow with another flow

A flow was becoming very big and slow and this generated an undesirable situation, it also interfed with the overall duration of the process. The original flow looped through all the items of a SharePoint list and preformed several actions and manipulations, this look more than a hour. The solution was to created a flow that looped through all the items and a second flow that preformed all the actions and manipulations if required.

During the writing of this blog post there is no default action that can start another flow. But we can start a flow by using the action called HTTP (web service).

Flow being started

First we will need to create the flow that is being started. This is required because we will need the HTTP POST URL of this flow in the flow that starts a Flow. This flow will receive an id and then start on that item.

  • Create a flow with the trigger: When a HTTP request is recieved.
  • Add the action Parse JSON.
  • Add the Get Item (by ID).
  • Open the trigger action, the generated HTTP POST URL will be used in the other flow.
  • Set the Request Body JSON Schema to be able to receive an id value.
    {     "Type": "object",     "properties": {         "id": {             "type": "string"         }     },     "required": [         "id"     ] } 
  • Set the output of the trigger called body as the content (input) for the Parse JSON action.
  • Set the following schema
    {     "type": "object",     "properties": {         "id": {             "type": "string"         }     } } 
  • Set the action Get Item (by ID) to use the ID generated in the parse JSON action.
  • Now you can add all the required actions and manipulations you need to do on the item.

Flow that start a flow

When you start a flow on a item you will need to tell the flow on which item to start. In my example I am using a fixed id. In most cases you will need to created a more dynamic solution.

  • Create a flow that starts with your preferred trigger, in my example I used the manual trigger.
  • Add the HTTP action to the flow.
  • Set the method to POST.
  • Set the URI, copy it from the trigger of the flow that is being started.
  • Set the Body .
    {   "id": "60" } 

Flow: Working around the lookup column threshold limit

Microsoft Flow is a very powerful and useful tool. Flow provides reliable solutions for automating processes and supporting business solutions. Flow can synchronize, collect and create data and much more. When creating a Flow that is connected to a SharePoint List you might encounter one of the limits of Flow. In this blog post I will explain how to work with the lookup column threshold limit.

What is the lookup column threshold limit?

The lookup column threshold limit it the maximum number (12) of lookup columns you can collect using an action or trigger in Flow. When you go over this limit you will receive the following error.

“The query cannot be completed because the number of lookup columns it contains exceeds the lookup column threshold enforced by the administrator.”

The threshold limit is set by Microsoft and cannot be changed. The reason this limit exists is to make sure the performance of the Flow is up to standards. You can also encounter this limit in PowerBI, but this post only focus on Flow.

The Lookup columns are

  • Lookup
  • Managed metadata (single and multi-value)
  • People and group (single and multi-value)
  • Workflow status
  • Created by (people and group)
  • Modified by (people and group)

Working around the limit

When using an action to collect data from a SharePoint list you can limit the gathered columns by selecting a view in the action.

  • Add the Get Items action.
  • Click on Show advanced options.
  • Select the view with the required columns (less than 12 lookup columns).
  • For certain SharePoint triggers you can also do this.