SharePoint Default value for multi line column

By default SharePoint gives you the option to set the default column value for a lot of different type of columns. Unfortunately is this option is not available for the multi line column.
But with jQuery and a bit of JavaScript we can! This solution has been create in cooperation with Peter Heibrink.

Solution
1. Download the latest version of jQuery or the compressed jQuery
2. Save the Default Rich Text JavaScript to a JS file

<!-- 	TODO: Set reference to the jQuery.-->
<script type="text/javascript" src="[/...../jquery-1.10.2.min.js]"></script>
<!-- 	TODO: Set the varibale for the fieldname with the display name of the milti line column
	TODO: Set the HTML for the default value-->

<script type="text/javascript">
	jQuery(document).ready(function() {
		var fieldName="Body";
		var defaultText = "<b>Default value</b><br />This is the default rich text value...";
		if(jQuery('nobr:contains(' + fieldName + ')').closest('tr').find('input[id$="TextField_spSave"]').val() == "") {
			jQuery('nobr:contains(' + fieldName + ')').closest('tr').find('input[id$="TextField_spSave"]').val(defaultText);
		}
	});
</script>

3. Save jQuery and Default Rich Text JavaScript somewhere on SharePoint
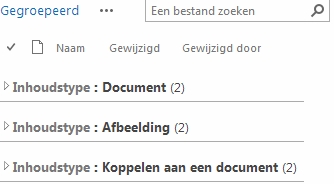
4. Navigate to the SharePoint list where the multi line column needs a default value
5. Open the advanced library settings and set Launch forms in dialog to No.
DialogYesNo
6. Open the New item page for the list and edit the New item page
7. Add a content editor web part to the page with a Content link to the Default Rich Text JavaScript
ContentLink
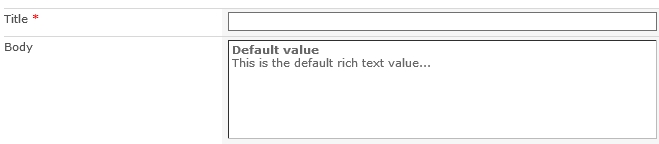
8. Save the changed and add a new item!

Result
defaultRichValue

SharePoint 2013 Group by content type

Just like SharePoint 2010 it is not possible with SharePoint 2013 to create a view with a ‘group by’ or ‘sort’ for the content type column with the help of the the user interface. Fortunately we can create the ‘group by’ content type view with the help of SharePoint Designer and a bit of code. Sorting the view on content type is not possible with this solution. When using this solution be aware of the following downside. When the view is modified through code, you should no longer edit the view through the user interface. When you edit the view through the user interface the code will be removed automatically.

Solution
1. Create through the user interface the view you need.
2. Set the Group By on the column Created.
3. Save the view.
4. Open the view with SharePoint designer in the advanced mode.
5. Find the following code.

<GroupBy Collapse="TRUE" GroupLimit="30"><FieldRef Name="Created"/></GroupBy>

6. Change Created into ContentType
8. Save the changes.

Result
???????????

Inhoudstype is dutch for Contenttype. 

SharePoint 2010/2013 Folders and document set

Many companies are using folder and folders within folders. SharePoint 2010 and 2013 have two different kinds of folders, a document set and the ‘normal’ folder.

With SharePoint 2010 creating a folder in a document set using windows explorer is possible but not recommended. When a folder is present in the document set a number of features will break, for example the share column and record function.

The document set function of SharePoint 2013 Preview seems to be under construction.  It is possible to create document set but the GUID of de document set will be broken. The overview of the structure options for SharePoint 2013 is an indication of what might be, we will have to wait for the full version to verify the options.

In SharePoint 2010 it is possible to…

  • create a folder within a folder
  • create a document set within a folder
  • create a folder within a document set with the windows explorer (creating folders within document set is not advised )

In SharePoint 2010 it is not possible to…

  • create a folder within a document set through the GUID
  • create a document set within a document set

In SharePoint 2013 Preview it is possible to…

  • create a folder within a folder
  • create a document set within a folder
  • create a folder within a document set

In SharePoint 2013 Preview it is not possible to…

  • create a document set within a document set

Add View folder link for document search results

In the default document search results it is only possible to open the documents. It is not possible to navigate to the documents location.

Solution

1. Edit the Search Core Results Web part on the Search Center results page.
2. Click on XSL Editor under Display properties.
4. In the XSLT look for the following code.

<xsl:template name="ViewInBrowser">
        <xsl:param name="browserlink" />
        <xsl:param name="currentId" />
        <xsl:if test="string-length($browserlink) &gt; 0">
            <span class="srch-urllink">
                <a href="{$browserlink}" id="{concat($currentId,'_VBlink')}">
                    <xsl:value-of select="$ViewInBrowser" />
                </a>

3. Add the following code after the code for ViewInBrowser.

<!-- Toon View Folder link bij documenten -->    
<xsl:if test="isdocument = 'True'">
  <a>
    <xsl:attribute name="href">
      <xsl:value-of select="sitename"/>
    </xsl:attribute>
    View Folder
  </a>                         
</xsl:if>

4. Save the changes and  enjoy the result.

Result

Display related items within a page layout

An intranet resolves around its content and the findability of the content. Providing the user with useful information is vital for a good intranet. An example of providing useful information is to show related new articles besides a news article.

Solution

The solution consist of three parts the content type, page layout and a content query web part (CQWP).

Content type configuration

1. Create a new content type with Article page as parent.
2. Create a term set named news categories.
3. Add a few terms.
4. Add a new column named News Category linked to the news categories term set.

Page layout and CQWP configuration

1. Open the site in SharePoint Designer
2. Create the news page layout
3. Link the news content type to the page layout.
4. Add a web part zone
5. Add a CQWP to a web part zone.
6. Configure the CQWP to show the news items.
7. Configure the Additional filters.


6. Show items when: News catergory is equal to [PageFieldValue: News Category].

[PageFieldValue: News Category]

7. Or Title is not equal to [PageFiedlValue: Title].

[PageFiedlValue: Title]

7. Add the News Catergory column to the page layout.
8. Save the page layout and enjoy the result.

Result

Display department members with people search

Do you need a dynamic overview with all the members of a department? With the People Search Core Web Part this is easily accomplished, even without changing any XSLT!

Solution

1. Add a People Search Core Results Web Part to a page.
2. Edit the Web Part.
3. Select under Results Query Options, by Cross-Web Part query ID; Query 2
4. Enter the query in Fixed Keyword, for example department:IWS or Department:ICT.

5. Navigate to the Enterprise Search Centers default results page.
6. If needed create temporarily a Enterprise Search Center.
7. Edit the Results page (http://[root]/sites/search/pages/results.aspx) and set the People Matches Web Part in edit mode.
8. Open the Display properties of the People Matches Web Part.


9. Deselect Use Location Visualization.
10. Open the XSLT Editor.
11. Copy and save the XSLT in a local XSLT file.
12. Navigate to the People Search Core Results Web Part.
13. Open the Display properties of the People Matches Web Part.
14.  Deselect Use Location Visualization.
15. Copy and save the XSLT from the local XSLT file.
16. Safe the changes and enjoy the result.

Result