Presence and user profile URL with XSLT

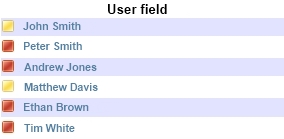
When showing a person field, the field does not show the presence and there is no link to the users My site. With XSLT it is possible to show the prensence of the user and create a URL to the users My Site.

Solution showing the presence 

1. Open the ItemStyle.xsl in SharePoint Designer.
2. Add the reference to the header of the XSLT file, if the reference is missing.

xmlns:ddwrt="http://schemas.microsoft.com/WebParts/v2/DataView/runtime"

3.  Add the following code to the XSLT template.

<xsl:variable name="UserEmail">
   <xsl:value-of select="ddwrt:UserLookup(string(@UserField) ,'EMail')" />
</xsl:variable>

<img width="12" height="12" id="{generate-id(@UserField)}" onload="IMNRC('{$UserEmail}');" alt="UserPresence" src="/_layouts/images/blank.gif" border="0" complete="complete" Sortable="1" valign="middle"/>

4. Change the @UserField to your user field.

Solution creating the user profile URL

1. Open the ItemStyle.xsl in SharePoint Designer.
2. Add the reference to the header of the XSLT file, if the reference is missing.

xmlns:ddwrt="http://schemas.microsoft.com/WebParts/v2/DataView/runtime"

3. Add the following code to the XSLT template.

<xsl:variable name="UserFieldLogin">
   <xsl:value-of select="ddwrt:UserLookup(string(@UserField) ,'Login')" />
</xsl:variable>

<a href="https://my.macaw.nl/Person.aspx?accountname={$UserFieldLogin}"> 
<xsl:value-of select="@UserField"/></a>

4. Change the @UserField to your user field.
5. Change the My Site example URL to your My Site URL.

<a href="https://my.macaw.nl/Person.aspx?accountname={$UserFieldLogin}">


Result
Remove HTML markup in Content Query Web Part

Issue
When showing a multi line or text column with Rich text or Enhanced rich text all the supporting HTML tags will be visible in the result. The tags make the result unreadable for end users.

With XSLT it is possible to remove the tags and make the result clean and readable. All the markups will be removed, also text markups.

Solution

1. Open the ItemStyle.xsl in SharePoint designer.
2. Make a the new removeMarkUp template.

<xsl:template name="removeMarkup">
   <xsl:param name="string" />
   <xsl:choose>
   <xsl:when test="contains($string, '&lt;')">
      <xsl:variable name="nextString">
	<xsl:call-template name="removeMarkup">
	   <xsl:with-param name="string" select="substring-after($string, '&gt;')" />
	</xsl:call-template>
      </xsl:variable>
         <xsl:value-of select="concat(substring-before($string, '&lt;'), $nextString)" />
   </xsl:when>
   <xsl:otherwise>
      <xsl:value-of select="$string" />
   </xsl:otherwise>
   </xsl:choose>		
</xsl:template>

3. Add the cleanBody variable to the template which renders the content query.

<xsl:variable name="cleanBody">
   <xsl:call-template name="removeMarkup">
      <xsl:with-param name="string" select="@Body"/>
   </xsl:call-template>
</xsl:variable>

4. Show the clean body with this code.

<xsl:value-of select="$cleanBody" />

5. All the HTML markup is removed!

Show all fields and values with XSLT

When developing with XSLT it is often useful to check which fields and values are available. The following solution will give you an easy and quick solution to view all the fields with there values.

Solution

1. Open the ItemStyle.xsl in SharePoint Designer.
2. Add the following code.

<xsl:template name="AllValues" match="Row[@Style='AllValues']" mode="itemstyle">
	<xsl:for-each select="@*">
		<xsl:value-of select="name()"/>
		<xsl:text> = </xsl:text>
		<xsl:value-of select="."/><br/>
	</xsl:for-each> 
</xsl:template>

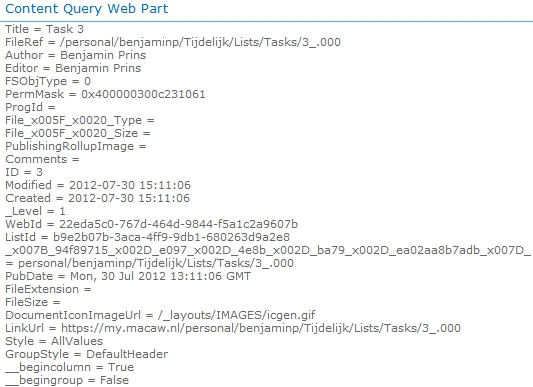
3. Select the ALLValues Item style in the Content Query Web Part settings.

Result

This example shows all the values from a task list.

Custom date formats with XSLT

The default format of a date field is something like 2012-01-01 00:00:00 – this is dependent on the language of the SharePoint installation. It is a very common requirement to display a date field in a different format.

Example

 2012-01-01 00:00:00


Example code

<xsl:value-of select="@ArticleStartDate"/>


Solution

1. Open the ItemStyle.xsl in SharePoint Designer or your favorite editor.
2. To be able to use the FormatDate function, add the DDWRT name space reference in the top section.

xmlns:ddwrt=“http://schemas.microsoft.com/WebParts/v2/DataView/runtime”

3. Use the code below to display the date field in the location you want the date shown. Every language has a different country code. The example in this article uses the UK country code (1033).

<xsl:value-of select="ddwrt:FormatDateTime(string(@ArticleStartDate) ,1033 ,'dd-mm-yyyy')"/>


Result

 01-01-2012

There are many different ways to display dates, take a look on MSDN for all the format specifiers. The country codes (supported locale identifiers) can also be found on MSDN.

Spaces in XSLT

Ever had a problem with rendering spaces in XSLT? I have. Most text can be placed directly in XSLT; however, when the text contains only a space, nothing will be rendered.

Example

<xsl:value-of select="@ProjectName"/> <xsl:value-of select="@ProjectStatus"/>


Example result

 ProjectnameGood


Solution
Place the space between the text tags and the space will be rendered correctly.

<xsl:value-of select="@ProjectName"/>
<xsl:text> </xsl:text>
<xsl:value-of select="@ProjectStatus"/>


Result

 Projectname Good