The interface for building Microsoft Flow is great and an incredible amount of configuration can be done through the interface without coding. If the required configuration is not available through the interface you can always try the advanced mode. For a flow solution I needed to create a few advanced conditions, I was able to create them using the advanced mode. In this blog post I will explain how to create custom conditions and show where you can find all the available functions.
- Check if a field is empty.
- Check if multiple fields are not empty.
- Check if multiple fields are equal to Yes and a field is not empty.
More information about the functions can be found here and here.
Check if field is empty
- Create a Flow that is connected to a SharePoint list.
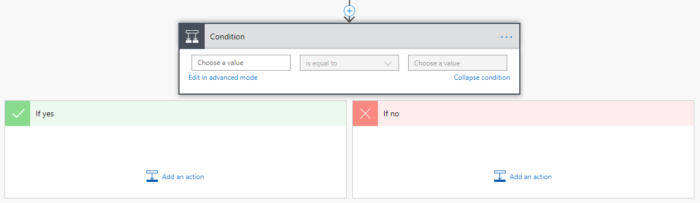
- Add the condition action.
- Rename the condition to Condition – If Field name is empty.
- Select the field and click on Edit in advanced mode.

- The code for the selected condition is now visible.
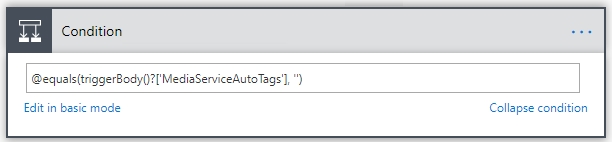
- Change the equals function empty and remove the ‘ and ” at the end.
- The condition should now look as follows.
@empty(triggerBody()?['MediaServiceAutoTags'])

Check if fields are not empty
It’s also possible to compare multiple fields, for example if multiple fields are not empty. For my solution I needed to make sure all the required formation was provided by the user before sending an email notification. In this example the condition checks if SupplierName and VendorNumber are not empty.
- Create a Flow that is connected to a SharePoint list.
- Add the condition action.

- Rename the condition to Condition – If Field name is not empty.
- Select the field and click on Edit in advanced mode.
- The code for the selected condition is now visible.
- Copy the code to your favorite editor.
- We will use the functions not and empty to find out if the fields contains data.
@not(empty(triggerBody()?['SupplierName']))
- Then combine the code for both fields with the and function.
@and(not(empty(triggerBody()?['SupplierName'])),not(empty(triggerBody()?['VendorNumber'])))
Check on multiple fields
In this example the condition checks if the fields InfoCompleteNotificaction and VenderFilledNotificaction are equal to Yes and if VendorNumber is not empty.
- Create a Flow that is connected to a SharePoint list.
- Add the condition action.
- Rename the condition to Condition – If Fields are Yes and VendorNumber is not empty.
- Select the field and click on Edit in advanced mode.
- The code for the selected condition is now visible.
- Copy the code to your favorite editor.
- We will be using the function and, equals, not and empty.
- The condition should now look as follows.
@and(equals(triggerBody()?['InfoCompleteNotificaction'], 'Yes'),equals(triggerBody()?['VenderFilledNotificaction'], 'Yes'),not(empty(triggerBody()?['VendorNumber'])))