Knowing how your external users are using you Power Pages is very important. Especially if you are sharing import documents through the Power Pages. In this blog post, we will show you how to set up a Power Page with a script that monitors the downloads and stores this data in Dataverse. By leveraging this functionality, you can gain valuable insights into user behaviour, track file downloads, and make data-driven decisions.
This solution was created together with my colleague Rik de Koning who speaks regularly at Power Platform events.
Power Pages configuration
Before we can save data to the Dataverse with a JavaScript we need to configure the Power Pages to allow the web api access. You need to configure the first 2 settings for each Dataverse table where data needs to be stored.
- Open the Portal Management of your Power Pages.
- Go to Site Settings
- Here you need to add three settings.
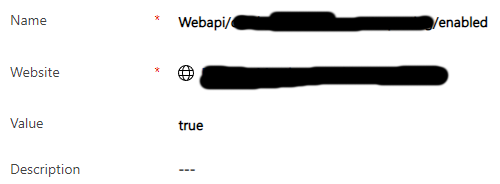
- The first setting is to enable the web api on your Dataverse table.
- Name: Webapi/[table logical name]/enabled
- Website: Select the website
- Value: true
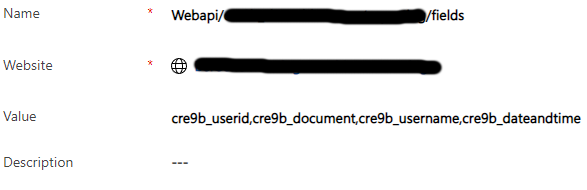
- The second setting is to allow the web api to access the fields
- Name: Webapi/[table logical name]/fields
- Website: Select the website
- Value: cre9b_userid,cre9b_document,cre9b_username,cre9b_dateandtime
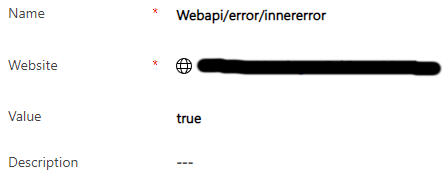
- The third setting is to allow for errors to be displayed.
- Name: Webapi/error/innererror
- Website: Select the website
- Value: true
The JavaScript
In our example we created a button that both downloads a document (note with an attached file) and creates a new record in a Dataverse table. The api call to create the record is added as a onclick event on the button, while the href is linked to the actual document. The JavaScript itself needs to be added on the content page linked to the Information page. If you have another use case please look at the details of the Portal Web API on Learn Microsoft.
- Open the Portal Management and open the Web Pages
- Open the Information page where the JavaScript needs to be added.
- Open the related Content page.
- First you will need to add the Wrapper AJAX function, this will give you the function safeAjax to use the web api.
(function(webapi, $){
    function safeAjax(ajaxOptions) {
        var deferredAjax = $.Deferred();

        shell.getTokenDeferred().done(function (token) {
            // add headers for AJAX
            if (!ajaxOptions.headers) {
                $.extend(ajaxOptions, {
                    headers: {
                        "__RequestVerificationToken": token
                    }
                });
            } else {
                ajaxOptions.headers["__RequestVerificationToken"] = token;
            }
            $.ajax(ajaxOptions)
                .done(function(data, textStatus, jqXHR) {
                    validateLoginSession(data, textStatus, jqXHR, deferredAjax.resolve);
                }).fail(deferredAjax.reject); //AJAX
        }).fail(function () {
            deferredAjax.rejectWith(this, arguments); // on token failure pass the token AJAX and args
        });

        return deferredAjax.promise();
    }
    webapi.safeAjax = safeAjax;
})(window.webapi = window.webapi || {}, jQuery);
- You can now add a function to the script that gathers the required information and send that to the safeAjax funtion. The safeAjax function then executes the api call.
function openfile(url) {
	var nowDateTime = new Date();
	var username = "{{ user.fullname }}";
	var contactid = "{{user.contactid}}";

    webapi.safeAjax({
		type: "POST",
		url: "/_api/[tablename]",
		contentType: "application/json",
		data: JSON.stringify({
			"cre9b_userid": contactid,
			"cre9b_document": url,
			"cre9b_username": username,
			"cre9b_dateandtime": nowDateTime

		}),
		success: function (res, status, xhr) {
      //print id of newly created table record
			console.log("entityID: "+ xhr.getResponseHeader("entityid"))
		}
	});
}
- You can use the {{ user.[column] }} to get data out of the contacts table.
- url is not a default options, I created a variable in a different part of the JavaScript.
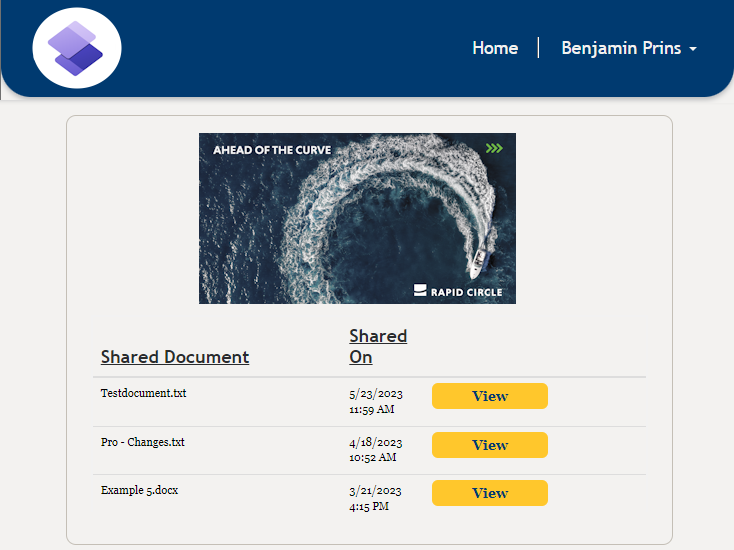
For everybody that is interested in how we added the buttons I have added that code as well. With a JavaScript we created a button for each file (note) by changing the URL column into a button.
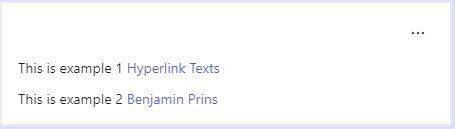
$('.entitylist').on("loaded", function () {
    // this will get the index of the corresponding table header
    var columnindex = $('th:contains("URL")').index();
    // this will loop through each table row below the corresponding table header
    $('tr').each(function () {
        var column = $('td', this).eq(columnindex);
        if (column.text().includes("https://")) {
            // this will find all a attributes based on the document links link
            const documentLinks = document.querySelectorAll(`[href="${column.text()}"]`)
            documentLinks.forEach(documentLink => {
                // this will set the className and the text of the link accordingly
                documentLink.className = "btnViewDocument"
                documentLink.target = "_blank"
                documentLink.text = "View"
                documentLink.onclick = function() { openfile(documentLink.href);};
            });
        }
    });
    // this will clear the name of the corresponding table header
    document.querySelector(`[aria-label*="URL"]`).innerHTML = ""
    document.querySelector(`[aria-label*="Created On"]`).innerHTML = "Shared On"
});