Power App: How to export and import a SharePoint Power App Form

At this moment there is no out-of-the-box way to export/import a SharePoint Power App form between SharePoint list. Even when you duplicate the SharePoint List the custom SharePoint Power App form will not be duplicated. But fear not, there is a way to transfer the form. However its not for the faint of heart you will need to manual edit the forms code.

Exporting the form

  • Open the settings of the SharePoint list with the SharePoint Power App form.
  • Click on Form settings.
  • Click on See versions and usage; this will open the app in the Power App Studio.
  • Click on Export package.
  • Give the package a name and set the import setup to Create as new.
  • Click on Export.

Duplicate the SharePoint list

We will need a exact copy of the original SharePoint list, otherwise the names (references) will not be the same.

  • Click in SharePoint on the menu on the left on the +
  • Click on Existing list
  • Select the SharePoint site and the select your list, my list is called My Demo List.
  • Leave the name the same and click on Create.
  • A duplicated list is now created, but without the SharePoint Power App form.
  • For the manual changes we will need to get the list id
  • Open de list settings and copy the list ID from the URL.

Manually changing the references

  • Navigate to the exported SharePoint Power App form create a copy of it and unzip it.
  • Open the unzipped folder.
  • Navigate to Microsoft.PowerApps – Apps – [numeric value].
  • Open the JSON file with only numbers in its name in your favorite code editor (I am using Visual Studio Code).
  • Find the old list id and replace it with the new ID. Depended on you app, the ID might need to be replaces multiple times.
  • Now find the site URLs that reference the old site and change them to the new site. There might be multiple URLs that need to be updated, my app had 5.
  • Save the changes to the file.
  • Now we need to unzip the MSAPP File.
  • Change the type from msapp to zip and unzip the folder.
  • Open the unzipped folder.
  • Open the Properties.json and change the old URL to the new URL.
  • Open the DataSources file.
  • Change al the old URLs to the new URL, be aware there are some partial URLs that need to be changed.
  • Save all the changes and remake the zip file.
  • Remove the old MSAPP file.
  • Rezip the folder and set the name to be exactly the same as the old msapp file.
  • Make sure you did not add an extra folder layer to the new zip file.
  • Change the file type of the zip file to msapp.
  • Remove the unzipped folder.
  • Go to the top level of the folder and rezip the whole app.
  • Make sure you did not add an extra folder layer to the new zip file.

Importing the form

  • Upload the updated exported package (zip).
  • Change the name of the app, the names of app need to be unique.
  • If required setup the connections.
  • If required select the flows.
  • Click on import.
  • Wait for the import to finish.
  • Open the new (duplicated) SharePoint list.
  • Click on Integrate – Power Apps – Customize forms.
  • This will open the imported app.
  • Publish the app.
  • Go back to the list and create an item, the SharePoint Power App form will now be opened.
    • You might need to refresh the page for the app to appear.

Power Platform: Enhancing SharePoint Integrated Power Apps with Post-Submit Actions

Creating a seamless user experience in a SharePoint integrated Power App (Canvas App) can be challenging, especially when performing actions after form submission. Once a form is submitted, it closes, but the OnSuccess property allows you to run code post-submission.

In this blog, I’ll show you how to use the OnSuccess property to make changes to the newly created SharePoint item. Although you can’t use ThisItem or link directly to data cards, I’ll guide you through the process to ensure your app functions smoothly.

By the end, you’ll know how to enhance your Power App’s functionality and improve user experience. Let’s dive in!

Create a SharePoint list

  • Create a SharePoint list on any SharePoint site.
  • Add 1 text column named OnSuccesData.

Create the SharePoint integrated power app.

  • Open the created SharePoint list.
  • Click on Integrate, Power Apps, Customize Forms app.
  • This will create a basic SharePoint integrated power.
  • Remove the Attachments DataCard.
  • Click on the SharePointForm1 and add a custom datacard.
  • Add a label and a Text Input objects on the datacard.
  • Rename the label to lbl_OnSuccesData.
  • Rename the Text Input to txt_OnSuccesData.
  • Set the OnChange to the following code.
    • We need to store the Text value in a variable, because when you call directly for txt_OnSuccesData.Text it will work for editing items but not for creating items.
Set(varOnSuccesData, txt_OnSuccesData.Text);
  • Set the 2 objects below each other.
  • Set the text of the label to On Succes Data.
  • Set the Default of the text input to “”.
  • Create a new blank Power Automate flow from the power app.
  • Name the flow to Actions after submission.
  • Set the following text inputs.
    • ItemID
    • OnSuccesData
  • Add the SharePoint action Update item and set it for the earlier created SharePoint list.
  • Set the Id to ItemID from the power app.
  • Set On Succes Data to OnSuccesData from the power app.
  • Save the Power Automate flow.
  • Open the Power App again.
  • Select the OnSuccess property of the SharePointForm1 object.
  • Add before the ResetForm(Self); code the following code to start the Power Automate flow.
Actionsaftersubmission.Run(SharePointForm1.LastSubmit.ID, varOnSuccesData);
  • Test your app by putting a text in the title and a text in the second On Succes Data text input object.
  • After you save the form, the flow will start and store the On Succes Data in the SharePoint on success data column.

Office 365: What’s new from Microsoft Ignite

During Microsoft Ignite many innovations that transform the workplace communications have been announced. Its impossible to name them all, so instead I will share with you my favorite innovations. Note that some of these features are already live, being rolled out or still being developed.

SharePoint app bar

The SharePoint app bar might even be my favorite announcement from Ignite. The app bar will be visible on every site on your intranet providing a consistent navigation experience. But it’s not only for navigation, that is just the beginning. The app bar also shows personal relevant sites, news feed and the files.
The SharePoint app bar will appear after you set a SharePoint site as a home site.
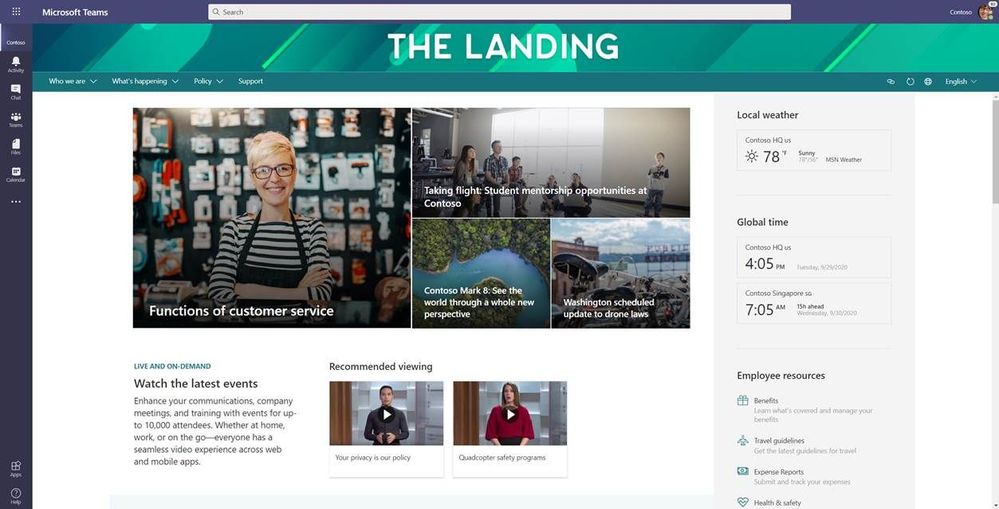
thumbnail image 1 of blog post titled 


							Introducing a SharePoint app bar that features global navigation


							Re: Introducing a SharePoint app bar that features global navigation


							Re: Introducing a SharePoint app bar that features global navigation


							Re: Introducing a SharePoint app bar that features global navigation


							Re: Introducing a SharePoint app bar that features global navigation


							Re: Introducing a SharePoint app bar that features global navigation


							Re: Introducing a SharePoint app bar that features global navigation


							Re: Introducing a SharePoint app bar that features global navigation


							Re: Introducing a SharePoint app bar that features global navigation


							Re: Introducing a SharePoint app bar that features global navigation


							Re: Introducing a SharePoint app bar that features global navigation


							Re: Introducing a SharePoint app bar that features global navigation


							Re: Introducing a SharePoint app bar that features global navigation


							Re: Introducing a SharePoint app bar that features global navigation


							Re: Introducing a SharePoint app bar that features global navigation


							Re: Introducing a SharePoint app bar that features global navigation


							Re: Introducing a SharePoint app bar that features global navigation


							Re: Introducing a SharePoint app bar that features global navigation


							Re: Introducing a SharePoint app bar that features global navigation


							Re: Introducing a SharePoint app bar that features global navigation

Home site in Teams

Your intranet (home site) is coming to Microsoft Teams. With the home site app for Microsoft Teams users gain direct access to the SharePoint Home site in Teams. The home site app in Teams gives your users global navigation across sites, communities, and teams; quick access to sites they use regularly; and a personalized news feed.

thumbnail image 1 captioned The home site app for Teams brings the power of your SharePoint-based intranet home site seamlessly into Microsoft Teams.

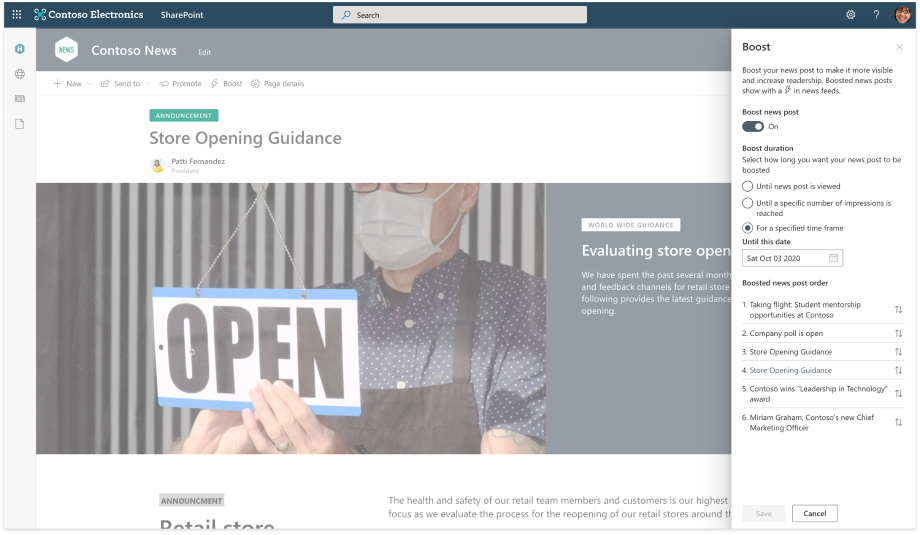
SharePoint: News boost

Microsoft listened to our request; we are getting the ability to boost news! With this feature you wil be able to boost the visibility of your important news articles. You can boost a news post until it has been read, for a set number of impressions, or until a given date.

thumbnail image 3 of blog post titled 


							Innovations for workplace communications and employee engagement in Microsoft 365

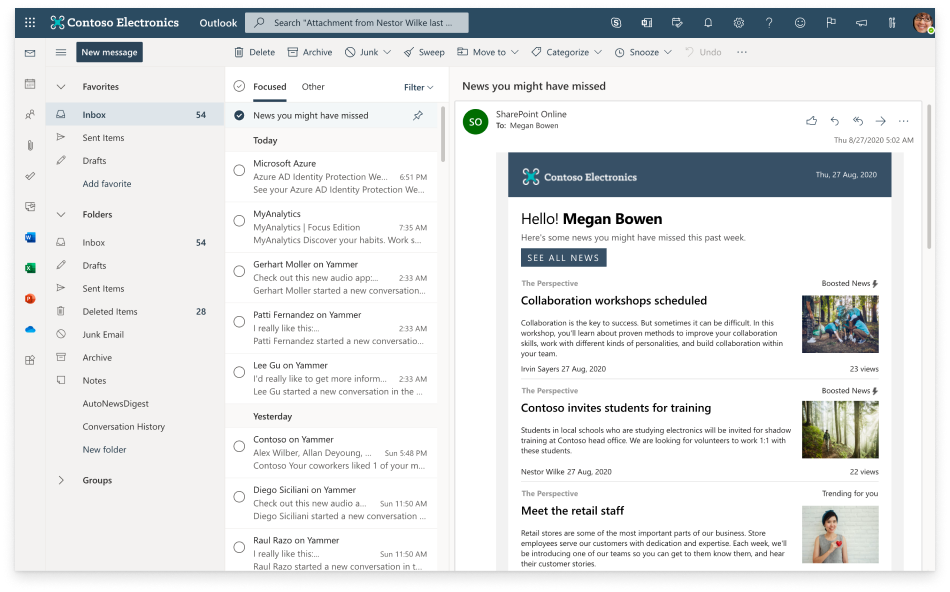
SharePoint: news digest 

Keeping up with all the all the news and information can be harder than it seems. With the automatically generated news digest you will receive an email summary of the news articles you have missed. This will ensure that everybody will be well informed. The news digest can be customized with your organization’s branding.
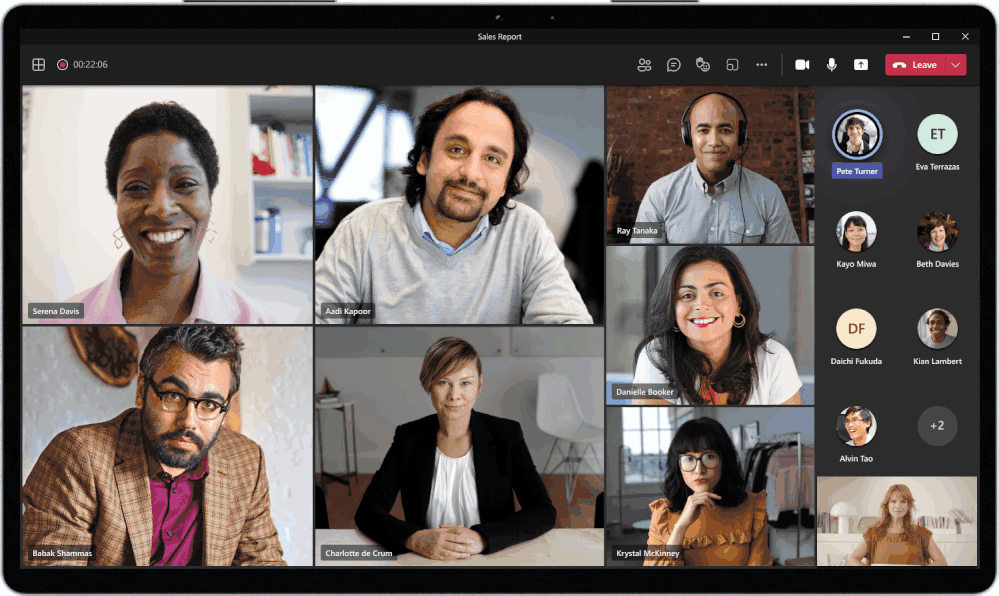
thumbnail image 5 of blog post titled 


							Innovations for workplace communications and employee engagement in Microsoft 365

Teams: Dynamic view

Dynamic view makes uses of AI to optimize shared content and video participant, it intelligently arranges the elements of your meeting for an optimal viewing experience. The viewing experience will change when people join, turn on video, start to speak or when starting to present. You will still be able change the layout based on your preference.
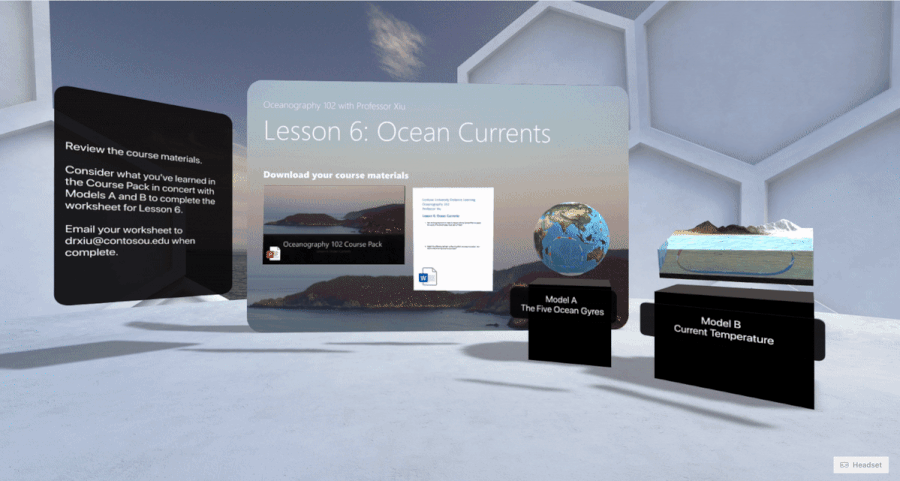
thumbnail image 1 of blog post titled 


							What's New in Microsoft Teams | Microsoft Ignite 2021

SharePoint spaces 

SharePoint spaces is a very powerful new tool for 3D interactions. SharePoint spaces enables you to make immersive and engaging mixed reality experiences for 3D content, models and 360° imagery.

Office 365: What’s new?

The updates for Office 365 keep coming and coming, Microsoft is not sitting still! I am very excited for the following new features. Note that some of these features are already live, being rolled out or still being developed.

Microsoft Viva

Microsoft Viva is an employee experience platform, helping you create a work environment that puts people first, driving better business results.

It consists of Topics, Connections, Learning and Insights which are (partly) modules based on Microsoft Project Cortex technology. It brings together people, knowledge, e-learning using Microsoft Teams and SharePoint. And it also brings a Viva Insights app into Teams, utilizing data from Workplace Analytics.

Teams: Virtual Breakout Rooms

The virtual break out rooms are here! The meeting owner can create break out rooms to be used by the meeting participants for smaller group discussion. Participants can be assigned to a room and call them back to the larger group when the breakout is complete.

Teams: End-of-meeting notification

Microsoft Teams will notify the meeting participant when there is 5 minutes left in the scheduled meeting time. This will help users to be on time for the next meeting or shorting meetings that might drag on for too long.

Teams: Attendee Dashboard

Download the attendance list with a simple button.

Teams: Spotlight

It’s now easier to see if you are in the spotlight and to remove yourself from the spotlight.

SharePoint: 250GB file size support

The new upload limit for large files is now 250 GB for Teams, SharePoint, and OneDrive

SharePoint: Image Lightbox

Users can click on an image web part while in view mode, to see a larger version of the image.

Office 365: Lists

Lists in Office 365 is a powerful tool and it integrates perfectly in Teams or your personal OneDrive. You can use one of the list templates provide by Microsoft or create your own. The best way to use Lists is with Teams, then you can work together in real time with conversation and lists side by side. Track what matters most to your team using rules, reminders, and comments.

The bonus is that you can also create a Power App directly from the list. Now you can really use the list anywhere and anytime. The Power App can also be connected to the Team for easy access.

Lists in Teams

  • Add a Tab in Teams and select the List and click on save.
  • Create a new list.
  • You can use a template or create a blank list.
  • Click on the Work progress tracker template and click on Use template.
  • Fill in the name and description.
  • You have now create the List in Teams.

List with Power App in Teams

Its very easy to create a Power App based on a list. This Power App can also be added to Teams to be as productive as possible.

  • Navigate and open the Work progress tracker list.
  • Open the list in SharePoint, this is the SharePoint site that is connected to the Team.
  • Click on Power Apps and Create an app.
  • Note that you can also create a Power Automate Flow for the list.
  • Fill in the name of the Power App and click on Create.
  • The app will be created, this process takes a few moments.
  • If required, you can change the Power App.
  • In this example I don’t change the Power App.
  • Navigate to the Team and add a Tab.
  • Find the Power App and click on Save.
  • You can now use the Power App in Teams.

Lists in OneDrive

  1. Open Lists and click on New.
  2. Select a template or create a blank list.

3. Select the Work progress tracker and click on Use template.
4. Fill in the name and description.
5. The Save to location for your OneDrive is My lists.

Power Automate: Start a Flow from a column change

With Microsoft Power Automate we can now create flows that start based on specific columns being updated in SharePoint!  This is a feature I have been waiting on for years! The action is called Get changes for an item or a file. The action returns a boolean for each field, whether it was just changed or not. Based on this boolean you know if a field was changed.

Creating the flow

  • Create a SharePoint list, I created the following project list.
  • Enable versioning on the list.
  • Create a flow and use the trigger When an item or a file is modified.
  • Select your site and list.
  • Add the action Get changes for an item or a file (properties only).
  • Fill in the site address, library name and the ID of the item that was triggered.
  • The field Since is used to get the changes we need to make a comparison. If you use 1.0 you will compare the current item version with version 1.0. But we want the latest changes so we use the following expression.
sub(int(triggerOutputs()?['body/{VersionNumber}']),1)
  • I want to send an email when the end date of a project changes.
  • Add the action Conditions to check if the end date was changed.
  • Add the dynamic content Has Column Changed: End date.
    This returns a boolean value.
  • Put the required actions in the If yes section after the condition.
    In my example I am sending an email.
  • Add the action Send an email (V2) and fill in as follows.