SharePoint Custom Grouping with XSLT

For SharePoint solution where the look and feel or clean code is very important we often create custom header.xslt ContentQueryMain.xslt and ItemStyle.xstl files. The files are almost completely empty to provide us with maximal control. This also means we need to recreate functionality that normally works by default. A good example is the ability to group the results.

Solution
1. Create the custom XSLT files and link the files to the Content Query Web Part.
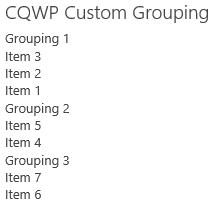
2. The following code is a complete example of a custom Content Query Main XSLT file. This code generates grouping.

<xsl:stylesheet
    version="1.0"
    exclude-result-prefixes="x xsl cmswrt cbq" 
    xmlns:x="http://www.w3.org/2001/XMLSchema"
    xmlns:xsl="http://www.w3.org/1999/XSL/Transform"
    xmlns:cmswrt="http://schemas.microsoft.com/WebPart/v3/Publishing/runtime"
    xmlns:cbq="urn:schemas-microsoft-com:ContentByQueryWebPart">
    <xsl:output method="xml" indent="no" media-type="text/html" omit-xml-declaration="yes"/>

  <xsl:key name="Grouping" match="Row" use="@GroupingColumn" />

  <xsl:template match="/">
 <xsl:for-each select="/dsQueryResponse/Rows/Row[generate-id(.)=generate-id(key('Grouping',@GroupingColumn))]/@GroupingColumn">
  <xsl:sort />
        <xsl:value-of select="."/>
        <xsl:for-each select="key('Grouping', .)">
         <br /><xsl:value-of select="@Title" />
         </xsl:for-each>
        <br/>
      </xsl:for-each>     
    </xsl:template>
</xsl:stylesheet>

3. Change the XSLT where needed

Result
CQWP Custom Grouping

Show Pictures with Slimbox in SharePoint

Pictures are an important part of a SharePoint site, it enriched the otherwise plain look and feel. With a little extra effort we can integrate Slimbox to show the pictures in a very slick and modern way.

Solution

1. Download Slimbox2 and jQuery, in this example I used jQuery 1.8.3 uncompressed.
2. Save the files in the Style Library of SharePoint. Note that not all the Slimbox files are required to be stored in SharePoint.
3. Include the jQuery javascript, the Slimbox javascript and the Slimbox CSS to the page, page-layout or the master page.

<script type="text/javascript" src="js/jquery.js"></script>
<script type="text/javascript" src="js/slimbox2.js"></script>
<link rel="stylesheet" href="css/slimbox2-rtl.css" type="text/css" media="screen" />

5. Create a picture library and save a couple of pictures to the library. The picture library will provide the necessary thumbnails without any extra effort.
6. Add a CQWP to a page and query the pictures.
7. Create a XSLT that shows the small thumbnails of the pictures, for example in a banner view.

Slimbox Result 1

8. I created two variables for the default SharePoint Thumbnails, Thumbnail_w and Thumnbail_t. And used the following code to show the small thumbnail with a Slimbox link to the bigger thumbnail.

<a href="{$Thumbnail_w}" rel="lightbox" title="{@Title}">
   <img src="{$Thumbnail_t}" alt="alt" class="PhotoAppThumbnail" />
</a>

9. Also note that the title field is added to the Slimbox link, the title will be displayed on the Slimbox overlay.

Result

Slimbox Result 1

SharePoint Designer: Clearing the cache

SharePoint Designer sometimes is out of sync with SharePoint. SharePoint Designer will incorrectly show items as checked out (or checked in) and refuses to be update with the actual status. In some cases the following error will be shown when trying to check out/in an item.

“Cannot perform this operation. The file is no longer checked out or has been deleted.”

Solution
The solution to this problem is to clear the cache of SharePoint Designer.

1. If opened close SharePoint Designer
2. Open the folder %APPDATA%MicrosoftWeb Server ExtensionsCache
3. Delete the contents
4. Open the folder %USERPROFILE%AppDataLocalMicrosoftWebsiteCache
5. Delete the contents
6. Problem solved.

SharePoint Default value for multi line column

By default SharePoint gives you the option to set the default column value for a lot of different type of columns. Unfortunately is this option is not available for the multi line column.
But with jQuery and a bit of JavaScript we can! This solution has been create in cooperation with Peter Heibrink.

Solution
1. Download the latest version of jQuery or the compressed jQuery
2. Save the Default Rich Text JavaScript to a JS file

<!-- 	TODO: Set reference to the jQuery.-->
<script type="text/javascript" src="[/...../jquery-1.10.2.min.js]"></script>
<!-- 	TODO: Set the varibale for the fieldname with the display name of the milti line column
	TODO: Set the HTML for the default value-->

<script type="text/javascript">
	jQuery(document).ready(function() {
		var fieldName="Body";
		var defaultText = "<b>Default value</b><br />This is the default rich text value...";
		if(jQuery('nobr:contains(' + fieldName + ')').closest('tr').find('input[id$="TextField_spSave"]').val() == "") {
			jQuery('nobr:contains(' + fieldName + ')').closest('tr').find('input[id$="TextField_spSave"]').val(defaultText);
		}
	});
</script>

3. Save jQuery and Default Rich Text JavaScript somewhere on SharePoint
4. Navigate to the SharePoint list where the multi line column needs a default value
5. Open the advanced library settings and set Launch forms in dialog to No.
DialogYesNo
6. Open the New item page for the list and edit the New item page
7. Add a content editor web part to the page with a Content link to the Default Rich Text JavaScript
ContentLink
8. Save the changed and add a new item!

Result
defaultRichValue

SharePoint 2013 Group by content type

Just like SharePoint 2010 it is not possible with SharePoint 2013 to create a view with a ‘group by’ or ‘sort’ for the content type column with the help of the the user interface. Fortunately we can create the ‘group by’ content type view with the help of SharePoint Designer and a bit of code. Sorting the view on content type is not possible with this solution. When using this solution be aware of the following downside. When the view is modified through code, you should no longer edit the view through the user interface. When you edit the view through the user interface the code will be removed automatically.

Solution
1. Create through the user interface the view you need.
2. Set the Group By on the column Created.
3. Save the view.
4. Open the view with SharePoint designer in the advanced mode.
5. Find the following code.

<GroupBy Collapse="TRUE" GroupLimit="30"><FieldRef Name="Created"/></GroupBy>

6. Change Created into ContentType
8. Save the changes.

Result
???????????

Inhoudstype is dutch for Contenttype. 

SharePoint 2013 Promoted Results aka Best Bets

With SharePoint 2013 the term Best Bets is no longer used, the new term is Promoted Results. The concept of the feature is the same, an administrator can serve (promoted) results based on specific search phrases enter by a user. The promoted result will appear on the top of the search results, this is a powerful way to promoted search results within SharePoint 2013. Specific results can be brought forward to the users attention with minimal effect and without changing any difficult ranking mechanic or index.

Solution

1. Open SharePoint 2013 Central Administrator.
2. Open the Managed Service Applications and click on the Search Service Application.
3. Click on Query Rules.
QueryRules
4. Select the context (source), in this example I used the Local SharePoint Results (System).
QueryRulesSource
5. Click on New Query Rule.
NewQueryRule
6. Enter a Rule name.
RuleName
7. Specify the exact phrases for the promoted result, use a ; to separate multiple phrases.
8. In this example I will make a promoted link to a image library.
ResultPhrase
9. Click on Add Promoted Result.
AddPromotedResult
10. Enter the Title and the Description of the Promoted Result.
11. Specify the URL that will be linked to the promoted result.
PromotedResultConfig
12. Save all the changes.
13. The promoted result is created and ready for use.

Result

Custom Promoted Result