Power Pages: Prefill fields with data form the user profile

Microsoft Power Platform provides powerful tools for creating web portals, and Power Pages is one of them. In this blog post, we’ll explore how to enhance the user experience by pre-filling order forms on your portal using custom fields. Specifically, we’ll focus on pre-populating the order form with data from the user’s profile page.

Imagine you have a Power Pages website with an order form. Users need to fill out details such as their city and country and other relevant information. To streamline this process, we’ll leverage custom fields you’ve added to the user’s profile page. When a user accesses the order form, we’ll automatically populate these fields based on their profile information.

Adding fields to the Profile

  • Add the required fields to the Contact and Order table in Dataverse
  • For example, a text field called City and a lookup field called Country.
  • Add the fields to the form Profile Web Form, which is the default form used in the Power Pages profile page.
  • Open the Power Pages website to see if the changes are visible and fill them.

JavaScript to prefile the columns on a order

  • Open the Portal Management of your Power Pages website.
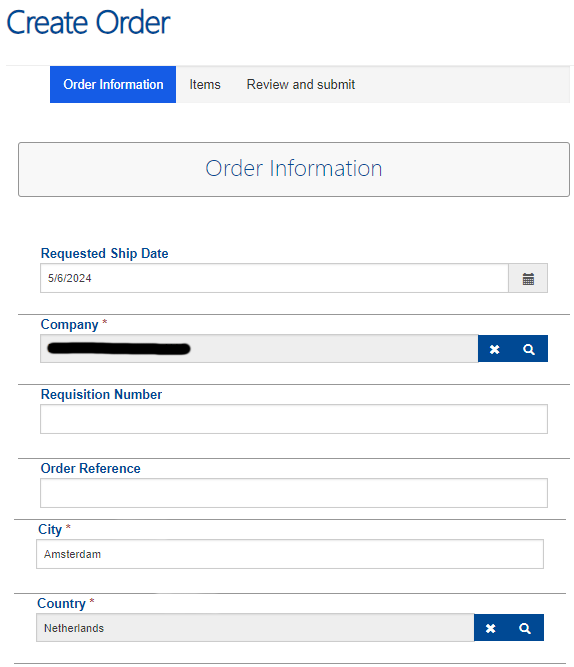
  • Open the element where you need to prefill the fields. In my case it’s the Order Information Web Form Step that is part of the Create Order Web form.
  • On the tab Form Options (this can be different per element) and navigate down to the Custom JavaScript input box.
  • Add the following code and change the following if needed.
$(document).ready(function() {

    //Get the profile county ID and Name data
    var CountryGUID = "{{ user.abc_country.id }}";
    var CountryName = "{{ user.abc_country.name }}";    
  
    //Get the City from the users profile (contact table)
    var City = "{{ user.abc_city }}";
  
    //set the text input element city with the profile field City
    document.getElementById("city").value = City;

    //set the lookup input element with the profile field Country
    //Set the name of the lookup field
    $("#abc_country_name").attr("value",CountryName);
    //Set the GUID of the lookup field
    $("#abc_country").attr("value", CountryGUID);
    //Set the logical name of the lookup table
    $("#abc_country_entityname").attr("value","abc_country");
});
  • Open the page in a web browser and use the web developers tools (f12) to find the id of the city field.
  • Update the document.get ElementById if required.
  • Do the same thing for the #abc_country_name, #abc_country and #abc_country_entityname.
  • Update the $(“”).attr where required.
  • If you are using different field names make sure to update the field names or add them to JavaScript.
  • {{ user.[fieldname] }} will return the value of that field.
  • {{ user.[fieldname].id }} will return the id of the selected value of a lookup field.
  • {{ user.[fieldname].name }} will return the name of the selected value of a lookup fields.
  • Save the changes and your fields will now be filled automatically.

Power Pages: Tracking clicks and downloads

Knowing how your external users are using you Power Pages is very important. Especially if you are sharing import documents through the Power Pages. In this blog post, we will show you how to set up a Power Page with a script that monitors the downloads and stores this data in Dataverse. By leveraging this functionality, you can gain valuable insights into user behaviour, track file downloads, and make data-driven decisions.

This solution was created together with my colleague Rik de Koning who speaks regularly at Power Platform events.

Power Pages configuration

Before we can save data to the Dataverse with a JavaScript we need to configure the Power Pages to allow the web api access. You need to configure the first 2 settings for each Dataverse table where data needs to be stored.

  • Open the Portal Management of your Power Pages.
  • Go to Site Settings
  • Here you need to add three settings.
  • The first setting is to enable the web api on your Dataverse table.
    • Name: Webapi/[table logical name]/enabled
    • Website: Select the website
    • Value: true
  • The second setting is to allow the web api to access the fields
    • Name: Webapi/[table logical name]/fields
    • Website: Select the website
    • Value: cre9b_userid,cre9b_document,cre9b_username,cre9b_dateandtime
  • The third setting is to allow for errors to be displayed.
    • Name: Webapi/error/innererror
    • Website: Select the website
    • Value: true

The JavaScript

In our example we created a button that both downloads a document (note with an attached file) and creates a new record in a Dataverse table. The api call to create the record is added as a onclick event on the button, while the href is linked to the actual document. The JavaScript itself needs to be added on the content page linked to the Information page. If you have another use case please look at the details of the Portal Web API on Learn Microsoft.

  • Open the Portal Management and open the Web Pages
  • Open the Information page where the JavaScript needs to be added.
  • Open the related Content page.
  • First you will need to add the Wrapper AJAX function, this will give you the function safeAjax to use the web api.
(function(webapi, $){
    function safeAjax(ajaxOptions) {
        var deferredAjax = $.Deferred();

        shell.getTokenDeferred().done(function (token) {
            // add headers for AJAX
            if (!ajaxOptions.headers) {
                $.extend(ajaxOptions, {
                    headers: {
                        "__RequestVerificationToken": token
                    }
                }); 
            } else {
                ajaxOptions.headers["__RequestVerificationToken"] = token;
            }
            $.ajax(ajaxOptions)
                .done(function(data, textStatus, jqXHR) {
                    validateLoginSession(data, textStatus, jqXHR, deferredAjax.resolve);
                }).fail(deferredAjax.reject); //AJAX
        }).fail(function () {
            deferredAjax.rejectWith(this, arguments); // on token failure pass the token AJAX and args
        });

        return deferredAjax.promise();	
    }
    webapi.safeAjax = safeAjax;
})(window.webapi = window.webapi || {}, jQuery);
  • You can now add a function to the script that gathers the required information and send that to the safeAjax funtion. The safeAjax function then executes the api call.
function openfile(url) {
	var nowDateTime = new Date();
	var username = "{{ user.fullname }}";
	var contactid = "{{user.contactid}}";

    webapi.safeAjax({
		type: "POST",
		url: "/_api/[tablename]",
		contentType: "application/json",
		data: JSON.stringify({
			"cre9b_userid": contactid,
			"cre9b_document": url,
			"cre9b_username": username,
			"cre9b_dateandtime": nowDateTime
			
		}),
		success: function (res, status, xhr) {
      //print id of newly created table record
			console.log("entityID: "+ xhr.getResponseHeader("entityid"))
		}
	});
}
  • You can use the {{ user.[column] }} to get data out of the contacts table.
  • url is not a default options, I created a variable in a different part of the JavaScript.

For everybody that is interested in how we added the buttons I have added that code as well. With a JavaScript we created a button for each file (note) by changing the URL column into a button.

$('.entitylist').on("loaded", function () {
    // this will get the index of the corresponding table header
    var columnindex = $('th:contains("URL")').index();
    // this will loop through each table row below the corresponding table header
    $('tr').each(function () {
        var column = $('td', this).eq(columnindex);
        if (column.text().includes("https://")) {
            // this will find all a attributes based on the document links link
            const documentLinks = document.querySelectorAll(`[href="${column.text()}"]`)
            documentLinks.forEach(documentLink => {
                // this will set the className and the text of the link accordingly
                documentLink.className = "btnViewDocument"
                documentLink.target = "_blank"
                documentLink.text = "View"
                documentLink.onclick = function() { openfile(documentLink.href);};
            });
        }
    });
    // this will clear the name of the corresponding table header
    document.querySelector(`[aria-label*="URL"]`).innerHTML = ""
    document.querySelector(`[aria-label*="Created On"]`).innerHTML = "Shared On"
});

Retrieve Dataverse records with JavaScript

When validations or manipulations in a model-driven app are too complex for a business rule you can use JavaScript instead. With JavaScript you can use the Dynamics API to gather information and/or update records. JavaScript only runs on the interface; this means that the validation or manipulation only happen when a user is interacting with the model-driven app.

retrieveRecord

With retrieveRecord you can retrieve a records form a table if you know the ID.

Xrm.WebApi.retrieveRecord("account", "a8a19cdd-88df-e311-b8e5-6c3be5a8b200", "?$select=name,revenue")

Xrm.WebApi.retrieveRecord("TABLE", "ID", "?$select=COLUMN,COLUMN")

In this example a record from the table accounts is retrieved and the columns name and revenue are returned. If it was successful the results are displayed in the console, if an error occurred then the error message is displayed in the console.

Xrm.WebApi.retrieveRecord("account", "a8a19cdd-88df-e311-b8e5-6c3be5a8b200", "?$select=name,revenue").then(
    function success(result) {
        console.log("Retrieved values: Name: " + result.name + ", Revenue: " + result.revenue);
        // perform operations on record retrieval
    },
    function (error) {
        console.log(error.message);
        // handle error conditions
    }
);

retrieveMultipleRecords

With retrieveMultipleRecords you can retrieve multiple records from a table based on a filtering.

Xrm.WebApi.retrieveMultipleRecords("account", "?$select=name,primarycontactid&$filter=primarycontactid eq a0dbf27c-8efb-e511-80d2-00155db07c77")

Xrm.WebApi.retrieveMultipleRecords("[TABLE]", "?$select=[COLUMN],[COLUMN]&$filter=[COLUMN] eq ID")

In this example three records from the table accounts are retrieved and the columns name is returned. If it was successful the results are displayed in the console, if an error occurred then the error message is displayed in the console.

Xrm.WebApi.retrieveMultipleRecords("account", "?$select=name", 3).then(
    function success(result) {
        for (var i = 0; i < result.entities.length; i++) {
            console.log(result.entities[i]);
        }
        console.log("Next page link: " + result.nextLink);
        // perform additional operations on retrieved records
    },
    function (error) {
        console.log(error.message);
        // handle error conditions
    }
);

Expand query to get related records

With the $expand options we can retrieve related records of the record that was returned, this works for both retrieveRecord and retrieveMultipleRecords. Expand uses navigation columns (relationship/lookup) to retrieve the related records.

Xrm.WebApi.retrieveRecord("account", "a8a19cdd-88df-e311-b8e5-6c3be5a8b200", "?$select=name&$expand=primarycontactid($select=contactid,fullname)")
Xrm.WebApi.retrieveRecord("[TABLE]", "ID", "?$select=[COLUMN]&$expand=[NAVIGATION COLUMN]($select=[COLUMN],[COLUMN])")

Xrm.WebApi.retrieveMultipleRecords("account", "?$select=name&$top=3&$expand=primarycontactid($select=contactid,fullname)", 3)
Xrm.WebApi.retrieveMultipleRecords("[TABLE]", "?$select=[COLUMN]&$top=3&$expand=[NAVIGATION COLUMN]($select=[COLUMN],[COLUMN])", 3)

Asynchronous function to wait on the return

When using retrieveMultipleRecords you might need to use an asynchronous function. The function needs to wait on retrieveMultipleRecords to return the values before continuing with the function. You do this by making two async functions, one with the main logic and the second one which retrieves the records.

async function xseption(formContext) {
    var xseptions = await getXseptions(companyProfileId);
    //Do something with the return
}
async function getXseptions(guid) {
    var query = "?$select=rc_categorytypeid,rc_xseptionsid&$filter=_rc_related_companyprofile_value eq " + guid + "&$expand=rc_categorytypeid($select=rc_value)";
    var result = await Xrm.WebApi.retrieveMultipleRecords("rc_xseptions", query);

    return result;
}

SharePoint Online: Document dropdown navigation

An international customer needed a good looking and user friendly navigation solution for a large set of documents. Users search for documents related to the region and country they work in. So we created an easy and good looking navigation focused on the regions and countries. The navigation element is added to the 5 region views and on the country view, allowing the users to easily navigate between regions and countries. The user hovers over a regions and the related countries will be shown.

Solution

The solution consists of two main parts, the country view with filter and the navigation element. First I will explain how the country view works, followed by the navigation element.

Country view

The country view uses an query string (URL) filter that is added to the view page. This filter takes the value of the parameter Country out of the URL and filters the document based on this parameter.

  • Add the Query String (URL) Filter to the page.
  • Set the Query String Parameter Name to Country.
  • Configure the Web part connection to send filter values to the document library.
  • The documents will be filtered when you add the parameter with a value to the URL
    ?country=Denmark+(DK)
    

Navigation element

The navigation element consists of three parts, JavaScript, CSS and the HTML.

  • Store the JavaScript, CSS and the HTML file on SharePoint.
  • Add a Content Editor Web Part to the country view page.
  • Link the HTML file in the Content Link Setting
  • The HTML page show the structure of the navigation, the pictures, links etc.
  • The CSS file provided the looks.
  • The JavaScript is used to activate the hover.

JavaScript and CSS working together

JavaScript controls the hover function (mouseenter and mouseleave), the hover is active on all elements (div) with the class top.
Only div’s with a region picture have the class top set.

  • When the mouse enters the div, JS will add the class active to the div. 
  • When the mouse leaves the div, JS will remove the class active from to div.
$(document).on({
    mouseenter: function () {
        console.log('mouse-in');
        $(this).addClass('active');
    },

    mouseleave: function () {
        console.log('mouse-out');
        $('.top').removeClass('active');
    }
}, '.top');

When the class active is added the corresponding CSS is applied to the div, resulting in:

  • The dropdown (div with URLs) will be shown.
    • The div is hidden by default.
      display: none;
      
  • The overlay on the region div will be set to full.

.top.active .bottom-container { 
	display: block;
}

.active.top > a > .title {
	height:150px;
	top: 0;	
}


SharePoint JSLink: Custom field view on form

With JSLink you have the ability to quickly and easily change how a list views and forms are rendered. In this example I will explain how to change a field or fields located in the view, display, new or edit forms. The advantage of only changing the look and feel of specific fields is that all the default features and functions will remain functional. For example paging will still work and you will not need to create custom paging.

Solution

In this solution I will change the look and feel of the default % complete column.

  1. Create a custom SharePoint list called Progress Example.
  2. Add the default % complete column.
  3. Save the JSLink Percentage Complete to SharePoint.
  4. Link the JSLink to the form on new, edit, display and view web parts.
  5. The view and display form will be shown as a progress bar with the exact number shown.
  6. The edit en new forms will be shown as a progress bar that you change with the exact number shown.

Explanation

  1. The JSLink overrides the default rendering of the percentage complete (% complete) column.
  2. Each column and form that needs a different rendering needs to be linked to the new render function.
    You can link multiple forms to one function.
  3. In the following code the view and display column are linked to the same function called percentCompleteViewDisplayFiledTemplate.
  4. The edit and new form are linked to the function called percentCompleteEditFiledTemplate.
    (function  ()  
        // Create object that have the context information about the field that we want to change it's output render  
       var overrideNameField  =  {};  
       overrideNameField.Templates  =<  {};  
       overrideNameField.Templates.Fields  =  {  
            // Apply the new rendering for Priority field on List View 
            "PercentComplete": {    "View": percentCompleteViewDisplayFiledTemplate,
                                    "EditForm": percentCompleteEditFiledTemplate,
                                    "NewForm": percentCompleteEditFiledTemplate,
                                    "DisplayForm": percentCompleteViewDisplayFiledTemplate
            }
         };  
         SPClientTemplates.TemplateManager.RegisterTemplateOverrides(overrideNameField);
    })(); 
    
  5. In the functions you can rewrite how the column is rendered.
  6. The function percentCompleteEditFiledTemplate rewrites the rendition.
    // This function provides the rendering logic for New and Edit forms for percentage complete column
    function percentCompleteEditFiledTemplate(ctx) { 
     
      var formCtx = SPClientTemplates.Utility.GetFormContextForCurrentField(ctx); 
     
        // Register a callback just before submit. 
        formCtx.registerGetValueCallback(formCtx.fieldName, function () { 
            return document.getElementById('inpPercentComplete').value; 
        }); 
     
        return "<input type='range' id='inpPercentComplete' name='inpPercentComplete' min='0' max='100' oninput='outPercentComplete.value=inpPercentComplete.value' value='" + formCtx.fieldValue + "' /> <output name='outPercentComplete' for='inpPercentComplete' >" + formCtx.fieldValue + "</output>%"; 
    } 
    
  7. The result is an input slide bar instead of the default text box.

SharePoint JSLink: Paging

When you use JSLink not all default SharePoint list features will be generated automaticly, for example paging will not be available. When you require paging you need to code this yourself. In this example I will create an example list with no custom styling besides the custom paging.

Solution

  1. Create a custom list called Paging Example with a title field.
  2. If required changed the fields to be shown.
  3. Create a page and add the Paging Example web part to the page.
  4. Create the JSLink file called BasicPaging.js
  5. Link the JSLink to the web part to load the BasicPaging.js

Explanation

  1. The JSLink overrides the default Templates (Header, Item and Footer).
  2. The paging has been added to the Footer template.
  3. The following variables are used to get the first and last row and the previous and next hyperlinks.
    var firstRow = ctx.ListData.FirstRow;
    var lastRow = ctx.ListData.LastRow;
    var prev = ctx.ListData.PrevHref;
    var next = ctx.ListData.NextHref;
    
  4. The following code will render the paging are required and uses the default SharePoint classes and images.
    var footerHtml = "<div class='Paging'>";
    footerHtml += prev ? "<a class='ms-commandLink ms-promlink-button ms-promlink-button-enabled' href='" + prev + "'><span class='ms-promlink-button-image'><img class='ms-promlink-button-left' src='/_layouts/15/images/spcommon.png?rev=23' /></span></a>" : "";
    footerHtml += "<span class='ms-paging'><span class='First'>" + firstRow + "</span> - <span class='Last'>" + lastRow + "</span></span>";
    footerHtml += next ? "<a class='ms-commandLink ms-promlink-button ms-promlink-button-enabled' href='" + next + "'><span class='ms-promlink-button-image'><img class='ms-promlink-button-right' src='/_layouts/15/images/spcommon.png?rev=23'/></span></a>" : "";
    footerHtml += "</div>";
    footerHtml += "</div>";
    return footerHtml;