When you use JSLink not all default SharePoint list features will be generated automaticly, for example paging will not be available. When you require paging you need to code this yourself. In this example I will create an example list with no custom styling besides the custom paging.
Solution
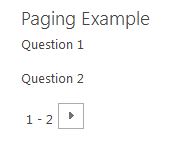
- Create a custom list called Paging Example with a title field.
- If required changed the fields to be shown.
- Create a page and add the Paging Example web part to the page.
- Create the JSLink file called BasicPaging.js
- Link the JSLink to the web part to load the BasicPaging.js
Explanation
- The JSLink overrides the default Templates (Header, Item and Footer).
- The paging has been added to the Footer template.
- The following variables are used to get the first and last row and the previous and next hyperlinks.
var firstRow = ctx.ListData.FirstRow;
var lastRow = ctx.ListData.LastRow;
var prev = ctx.ListData.PrevHref;
var next = ctx.ListData.NextHref;
- The following code will render the paging are required and uses the default SharePoint classes and images.
var footerHtml = "<div class='Paging'>";
footerHtml += prev ? "<a class='ms-commandLink ms-promlink-button ms-promlink-button-enabled' href='" + prev + "'><span class='ms-promlink-button-image'><img class='ms-promlink-button-left' src='/_layouts/15/images/spcommon.png?rev=23' /></span></a>" : "";
footerHtml += "<span class='ms-paging'><span class='First'>" + firstRow + "</span> - <span class='Last'>" + lastRow + "</span></span>";
footerHtml += next ? "<a class='ms-commandLink ms-promlink-button ms-promlink-button-enabled' href='" + next + "'><span class='ms-promlink-button-image'><img class='ms-promlink-button-right' src='/_layouts/15/images/spcommon.png?rev=23'/></span></a>" : "";
footerHtml += "</div>";
footerHtml += "</div>";
return footerHtml;
