Power Platform and Chat GPT

In today’s digital age, businesses are constantly looking for ways to streamline their processes and improve their customer experience. One way to do this is by leveraging the power of chatbots, which can quickly and efficiently answer customer inquiries. In this blog post, we will explore how to create a canvas app that uses Power Automate flow to ask ChatGPT API questions and display the response in the canvas app. By the end of this tutorial, you will have the tools and knowledge to build your own chatbot app that can answer your customers’ questions in real-time, enhancing their overall experience and increasing your operational efficiency. So, let’s get started!

Create a Chat GPT Api secret

  • Open the ChatGPT API site.
  • Login or create an account.
  • Click on Personal, followed by View API keys.
  • Click on Create new secret key and save the key in a password vault.

Creating the Power Automate Flow

  • Create a new Power Automate flow with the name Canvas app – Chat GPT.
  • Add as the trigger a PowerApps V2.
  • Add a text input with the name Question.
  • Add a HTTP action with the name Post to Chat GPT.
  • Set the Method to POST.
  • Set the URI to https://api.openai.com/v1/completions.
  • Set the header to Content-Type with value application/json.
  • Set a second header to Authorization with the value Bearer [API Secret].
  • Set the body to the following json code.
{
  "model": "text-davinci-003",
  "prompt": "triggerBody()['text']",
  "temperature": 0,
  "max_tokens": 4000
}
  • Add a Parse JSON action with the name Chat GPT Response.
  • Set the Content to Body (response of the HTTP call).
  • Set the following schema (update the schema is the response is different).
{
    "type": "object",
    "properties": {
        "id": {
            "type": "string"
        },
        "object": {
            "type": "string"
        },
        "created": {
            "type": "integer"
        },
        "model": {
            "type": "string"
        },
        "choices": {
            "type": "array",
            "items": {
                "type": "object",
                "properties": {
                    "text": {
                        "type": "string"
                    },
                    "index": {
                        "type": "integer"
                    },
                    "logprobs": {},
                    "finish_reason": {
                        "type": "string"
                    }
                },
                "required": [
                    "text",
                    "index",
                    "logprobs",
                    "finish_reason"
                ]
            }
        },
        "usage": {
            "type": "object",
            "properties": {
                "prompt_tokens": {
                    "type": "integer"
                },
                "completion_tokens": {
                    "type": "integer"
                },
                "total_tokens": {
                    "type": "integer"
                }
            }
        }
    }
}
  • Add the Respond to a PowerApp or Flow action.
  • Add a text output called ChatGPTRepsonse and add the response from Chat GPT with the following code.
first(body('HTTP_-_Post_to_Chat_GPT')?['choices'])?['text']
  • The overall Power Automate flow will look like this.

Creating the Canvas app

  • Open the Power Apps Studio and create a new canvas app.
  • Rename Screen1 to Home.
  • Add the Canvas app – Chat GPT Power Automate flow to the canvas app.
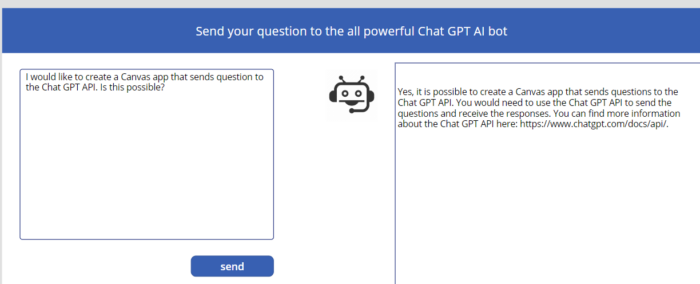
  • Add a Rectange Shape to the top of the canvas app with the name RectTitle.
  • Add a label over the RectTitle with the name lblChatGPT.
  • Set the Text to “Send your question to the all powerful Chat GPT AI bot”.
  • Add a label with the name lblGPTRepsonse.
  • Place the lblGPTRepsonse on the right side of the screen.
  • Add a text input with the name txtQuestion.
  • Place the txtQuestion on the left side of the screen.
  • Set the txtQuestion Default to “What is your question?”.
  • If you like add an Image with the name imgRobot and add an image of a robot in the Image property.
  • Place the imgRobot left and next to the lblGPTRepsonse.
  • Add a button with the name btnSendQuestion.
  • Set the following code on the Onselect of the btnSendQuestion.
    • This will save the response in the variable repsonsegpt.
    • Start the flow with the text provided in the textQuestion text input box.
Set(responsegpt, 'Canvasapp-ChatGPT'.Run(txtQuestion.Text).chatgptrespondse)

Retrieve Dataverse records with JavaScript

When validations or manipulations in a model-driven app are too complex for a business rule you can use JavaScript instead. With JavaScript you can use the Dynamics API to gather information and/or update records. JavaScript only runs on the interface; this means that the validation or manipulation only happen when a user is interacting with the model-driven app.

retrieveRecord

With retrieveRecord you can retrieve a records form a table if you know the ID.

Xrm.WebApi.retrieveRecord("account", "a8a19cdd-88df-e311-b8e5-6c3be5a8b200", "?$select=name,revenue")

Xrm.WebApi.retrieveRecord("TABLE", "ID", "?$select=COLUMN,COLUMN")

In this example a record from the table accounts is retrieved and the columns name and revenue are returned. If it was successful the results are displayed in the console, if an error occurred then the error message is displayed in the console.

Xrm.WebApi.retrieveRecord("account", "a8a19cdd-88df-e311-b8e5-6c3be5a8b200", "?$select=name,revenue").then(
    function success(result) {
        console.log("Retrieved values: Name: " + result.name + ", Revenue: " + result.revenue);
        // perform operations on record retrieval
    },
    function (error) {
        console.log(error.message);
        // handle error conditions
    }
);

retrieveMultipleRecords

With retrieveMultipleRecords you can retrieve multiple records from a table based on a filtering.

Xrm.WebApi.retrieveMultipleRecords("account", "?$select=name,primarycontactid&$filter=primarycontactid eq a0dbf27c-8efb-e511-80d2-00155db07c77")

Xrm.WebApi.retrieveMultipleRecords("[TABLE]", "?$select=[COLUMN],[COLUMN]&$filter=[COLUMN] eq ID")

In this example three records from the table accounts are retrieved and the columns name is returned. If it was successful the results are displayed in the console, if an error occurred then the error message is displayed in the console.

Xrm.WebApi.retrieveMultipleRecords("account", "?$select=name", 3).then(
    function success(result) {
        for (var i = 0; i < result.entities.length; i++) {
            console.log(result.entities[i]);
        }
        console.log("Next page link: " + result.nextLink);
        // perform additional operations on retrieved records
    },
    function (error) {
        console.log(error.message);
        // handle error conditions
    }
);

Expand query to get related records

With the $expand options we can retrieve related records of the record that was returned, this works for both retrieveRecord and retrieveMultipleRecords. Expand uses navigation columns (relationship/lookup) to retrieve the related records.

Xrm.WebApi.retrieveRecord("account", "a8a19cdd-88df-e311-b8e5-6c3be5a8b200", "?$select=name&$expand=primarycontactid($select=contactid,fullname)")
Xrm.WebApi.retrieveRecord("[TABLE]", "ID", "?$select=[COLUMN]&$expand=[NAVIGATION COLUMN]($select=[COLUMN],[COLUMN])")

Xrm.WebApi.retrieveMultipleRecords("account", "?$select=name&$top=3&$expand=primarycontactid($select=contactid,fullname)", 3)
Xrm.WebApi.retrieveMultipleRecords("[TABLE]", "?$select=[COLUMN]&$top=3&$expand=[NAVIGATION COLUMN]($select=[COLUMN],[COLUMN])", 3)

Asynchronous function to wait on the return

When using retrieveMultipleRecords you might need to use an asynchronous function. The function needs to wait on retrieveMultipleRecords to return the values before continuing with the function. You do this by making two async functions, one with the main logic and the second one which retrieves the records.

async function xseption(formContext) {
    var xseptions = await getXseptions(companyProfileId);
    //Do something with the return
}
async function getXseptions(guid) {
    var query = "?$select=rc_categorytypeid,rc_xseptionsid&$filter=_rc_related_companyprofile_value eq " + guid + "&$expand=rc_categorytypeid($select=rc_value)";
    var result = await Xrm.WebApi.retrieveMultipleRecords("rc_xseptions", query);

    return result;
}