Did you know that you can embed (add) a canvas app in a model-driven app? With the embedded canvas app, you can fully use the power of the canvas app inside a model-driven app. In my project I used it to provide the user with the capability to search an Oracle database and select a specific company.
It is very easy to add a canvas app, but I recommend to use it only when no other options are viable. The reason for this is that the embedded canvas app needs to be reconnected every time you transfer the solution form one environment to another.
Embed the canvas app
Create / add a canvas app in the same environment as the model-driven app.
Open the form of the entity where the canvas app needs to be embedded.
Click on +Component and select the Canvas app.
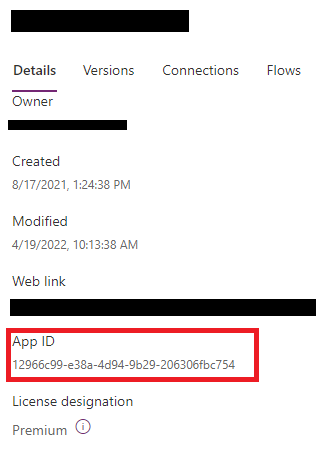
Fill in the App ID Static value with the unique ID of the canvas app and click on Done.
You can find the App ID by right clicking on an app and clicking on Details.
Solution deployments
The canvas app is now part of the model-driven app and needs to be in the same solution. When you transfer the solution from the development environment to the test environment, you will need to update the model-driven form manually. The reason for this is that the model-driven app is still connected to the canvas app on development. You will need to change the reference / GUID to the canvass app on production. And do not forget to share the canvas app with the users.
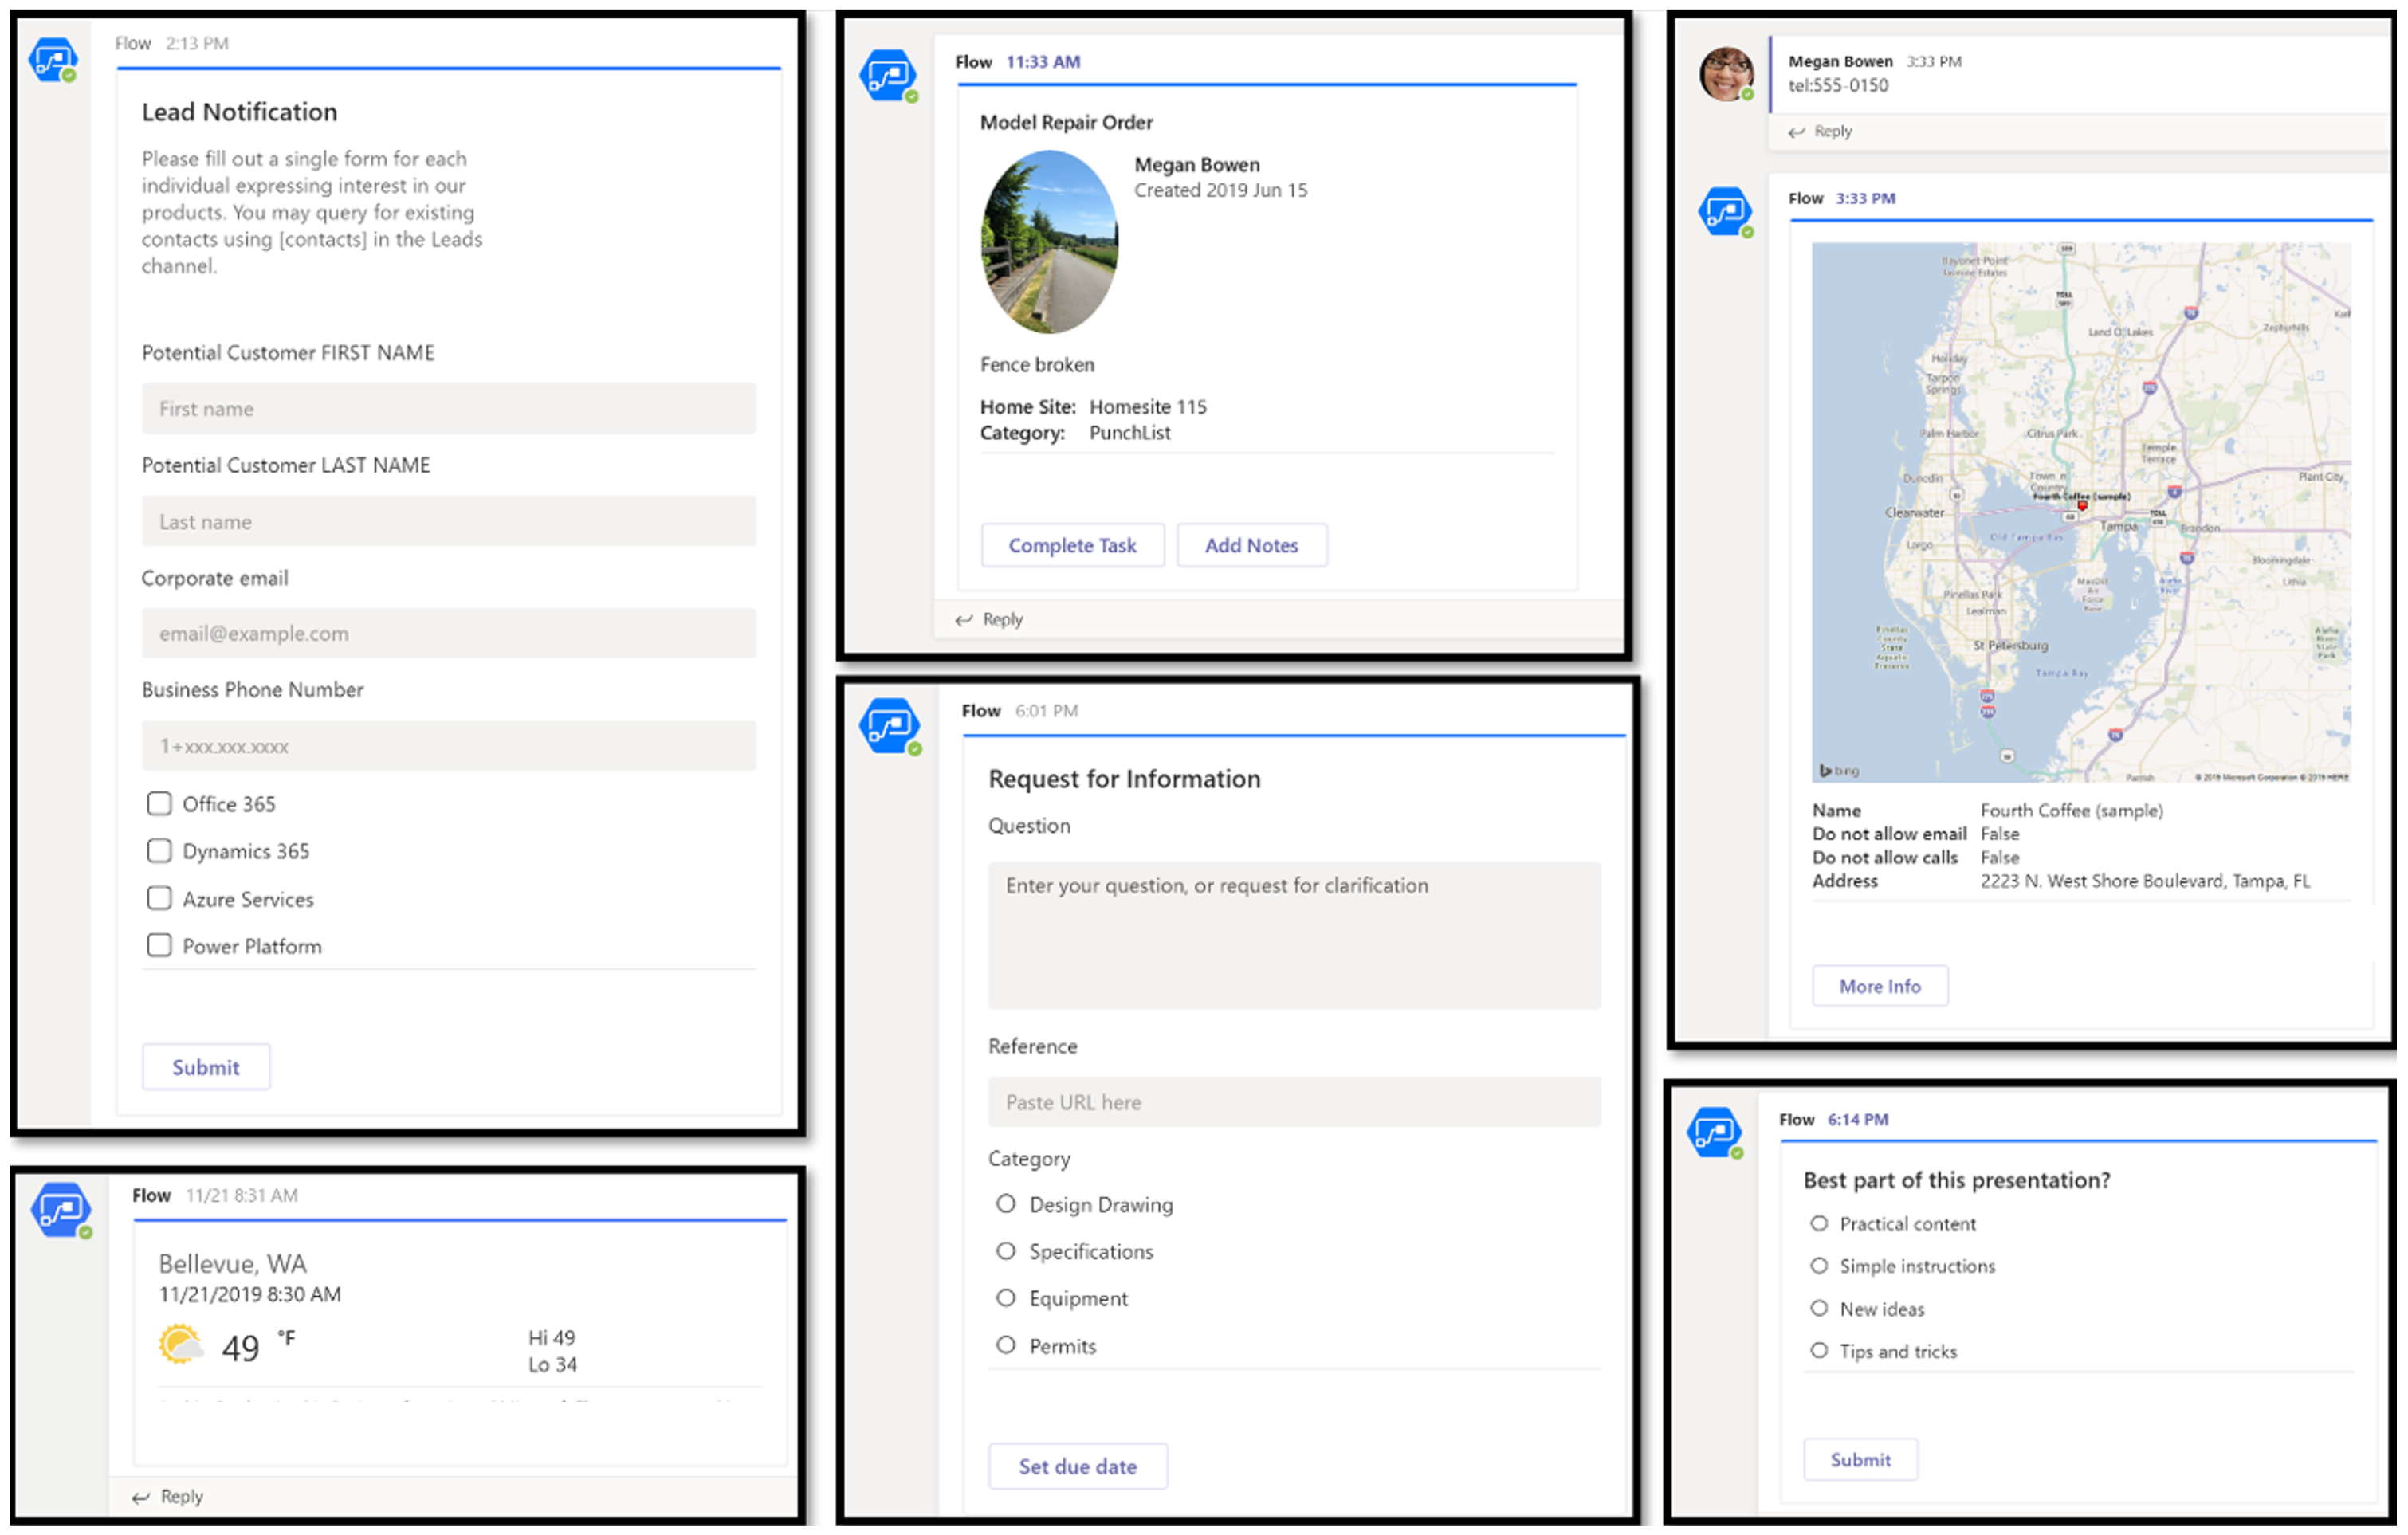
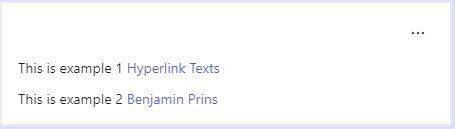
When sharing information or sending out a notification on teams I like to use the adaptive card feature. Adaptive Cards are the Teams method of sharing and displaying blocks of information in an easy-to-read manor without the complexity of customizing CSS or HTML to render them. With adaptive cards you can even create polls, show weather information, and create hyperlinks.
Creating a feedback form
Create a Power Automate flow with the required trigger.
Add the Post adaptive card in a chat or channel Teams action.
Select the Group chat (Channel or Group Chat) or provide the chat ID.
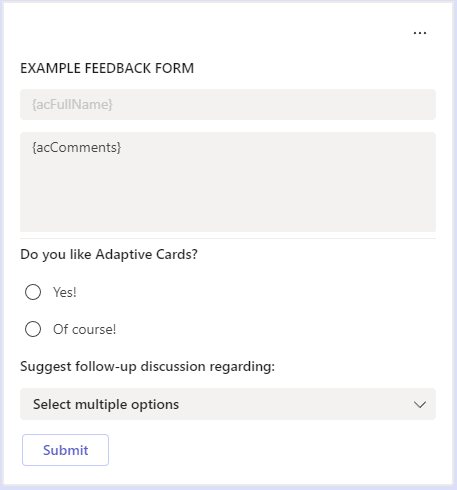
Add the following JSON code for an example feedback form with a title, single line, and multi-line text input fields and two types of choice list.
Power Automate has so many options and possibilities by clicking through the user interface. But it can do even more with the help of expressions. I think I use the following two experssion the most, empty() and first(). Thats why I wanted to share them with you.
Get the first returned value
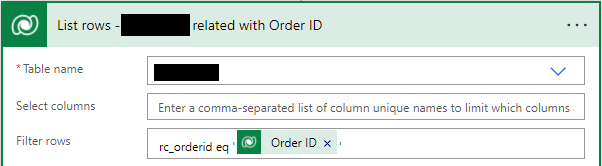
When looking for a record in the Dataverse, but the record id is unknown we use the action List Rows. This action always returns an array of values. This even happens when only one record is returned. If you try to use the returned value to for example update the found record, then Power Automate automatically generates an apply for each loop. This can be confusing when developing the flow, why would it loop through all the values when there is just one? With the first() expression we can prevent Power Automate to automatically generates an apply for each loop.
Add the Dataverse action list rows and configure it to find the unique record.
In my example I look for the unique record based on the unique order id.
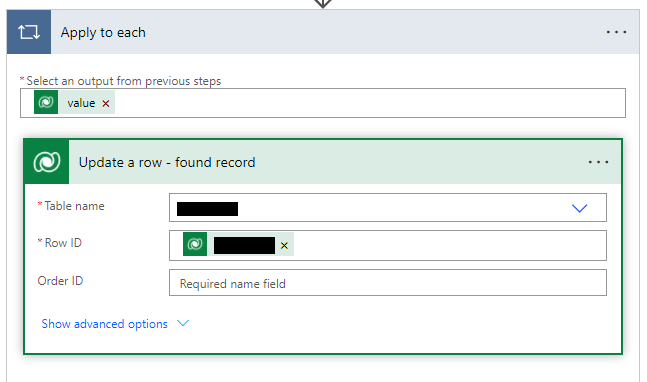
When trying to update the found record the following Apply for each will be automatically generated.
The creation of the Apply for each can be prevent by using the expression first().
Remove the Apply for each and the Update a row action.
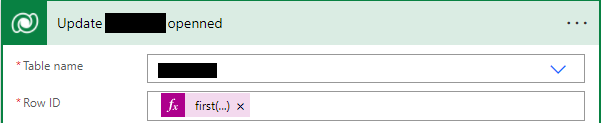
Add a new Update a row action and open the expression tab.
Add the expression first(body(‘Internal_name_of_the_list_row_action’)?[‘value’])?[‘internal_field_name’].
This expression returns the first specified field value from the value array in the returned body of the list row action.
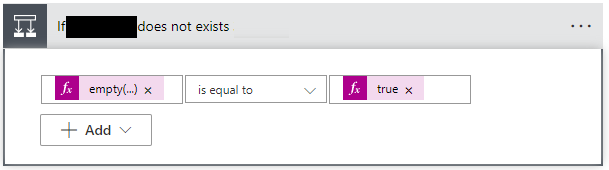
In my Cloud Flow I needed to check if a List rows action did not return a value. This is not an option in the drop down list, but it can be done using the empty expression.
Add the condition action.
Open the expression tab.
Add the expression empty(output(‘Internal_name_of_the_list_row_action’)?[‘body/value’]).
This checks if the returned body have any values, with other words checks if the value is empty.
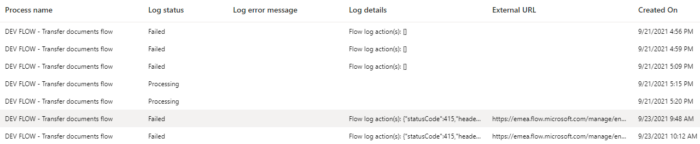
When managing multiple Power Automate Cloud Flows it can easily become a big task to figure out what went wrong and where. My client has more than 10 Cloud Flows that run multiple time per day or per hour. The solution is to create a log table (dataverse) or list (SharePoint) where all the runs are stored. The log table contains all the data an administrator needs to maintain the Cloud Flows. In my example I create a Dataverse table.
The Dataverse log table
In the log table we store the following data.
The Cloud Flow
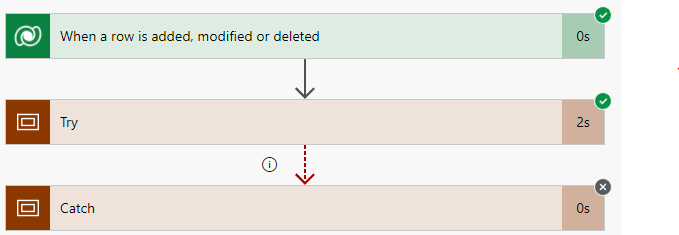
In every Cloud flow a try and catch scope is added. All the main actions are in the try scope, if one of these actions fails than the catch scope will be used.
Add a Scope with the name Try.
Add the action the Dataverse Add a new row action.
Select the log table by Table name.
Select the Log status Processing, I use Processing, Failed and Successful.
Add the Cloud Flow name to Process name.
Add the following code to the Environment field.
workflow()?['tags']?['environmentName']
Add the following code to External URL, use the code snippets for the fx code. This creates a link to the actual flow run.
workflow()?['tags']?['environmentName']
workflow()?['name']
workflow()?['run']?['name']
Set the Status Reason to Active.
Add the end of the try scope add the Dataverse Update a row action.
Select the log table by Table name.
Add the ID of the create log in the Row ID field.
Select Successful in the Log status field.
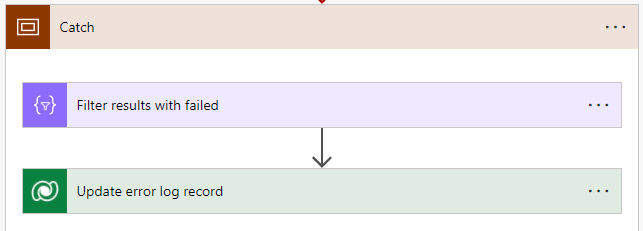
Add a Scope with the name catch.
Add the Filter Array action.
Add the result of the try scope in the From field.
result('Try')
Add the following filter Status is equal to Failed
item()?['status']
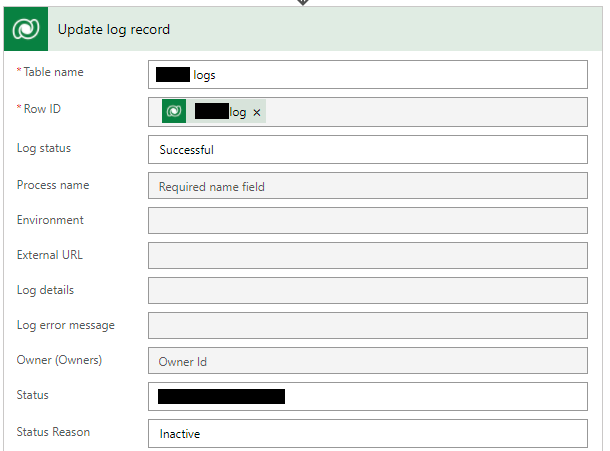
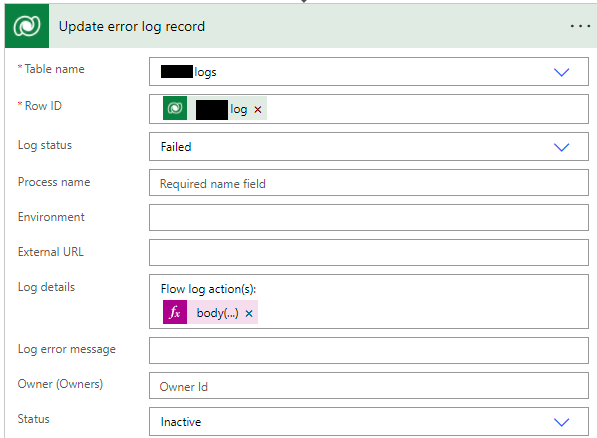
Add the Dataverse Update a row action.
Select the log table by Table name.
Add the ID of the create log in the Row ID field.
Select Failed in the Log status field.
Select Inactive in the Status field.
Add the following text to the Log details: Flow log action(s):
Add the following code to the Log details, to show the error message from the try scope.
Power Automate is one of my favorite tools from the Power Platform. It is extremely versatile and can be used to automate tasks between online services and automate processes ranging from simple to highly complex. In this post, I will share with you 3 advanced expressions I have used recently on my project. One part of the project is to convert XML data to data we can store in the dataverse.
Convert XML to JSON for easy access
For a project I needed to read multiple XML files with millions of rows and store data from the files into the dataverse. XML is harder to use in a Flow then JSON, so with a simple expression I transformed the XML to JSON.
Add a compose action with the name XML to JSON with the following code.
json(xml(variables('XML')))
Change the variable(‘XML’) to your XML content or store your XML content in that variable.
Add a parse json action set the Content to the output of the XML to JSON compose.
Add/create the JSON schema.
Using path in JSON
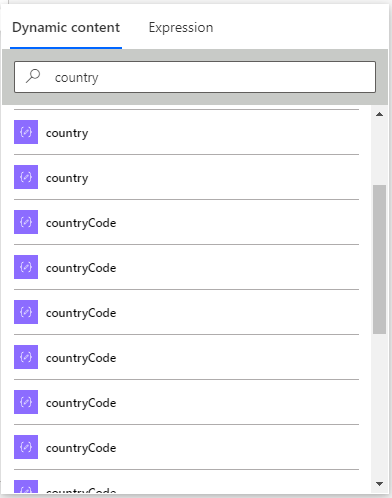
In most cases when you need to save data from JSON you can use the dynamic content to find it. But sometimes you are looking for a field name that is not unique. In my case I needed a field called country related to the company. But the country field was used multiple times for various blocks. You can select the correct country by using the path (location) of the field in an expression.
Select the JSON through the dynamic content.
Copy the code from the dynamic content to the Expression.
Add the path add the end of the code.
I added .company.country to select the country of the company.
body('Parse_JSON').company.country
Dataverse lookup field
Lookup fields in Dataverse are really useful, but when you select them through the dynamic content the value will be the id not the display value. If the data must be readable for users, you can use the following steps to select the display value.
Add a compose to the flow.
Select the lookup field in the Inputs through the dynamic content.
Copy the code from the dynamic content to the Expression.
Your output looks something like this.
outputs('company')?['body/rc_countrycode']}
Add the @OData.Community.Display.V1.FormattedValue’ after rc_countrycode (your field name will be different).
When working with an ATOP setup you might need to know in which environment the Power Automate flow is running. For my solution I needed to know the environment because each environment uses a different Gateway and database credentials. In this post, I will share with you how to find the environment GUID and name.
Creating the flow
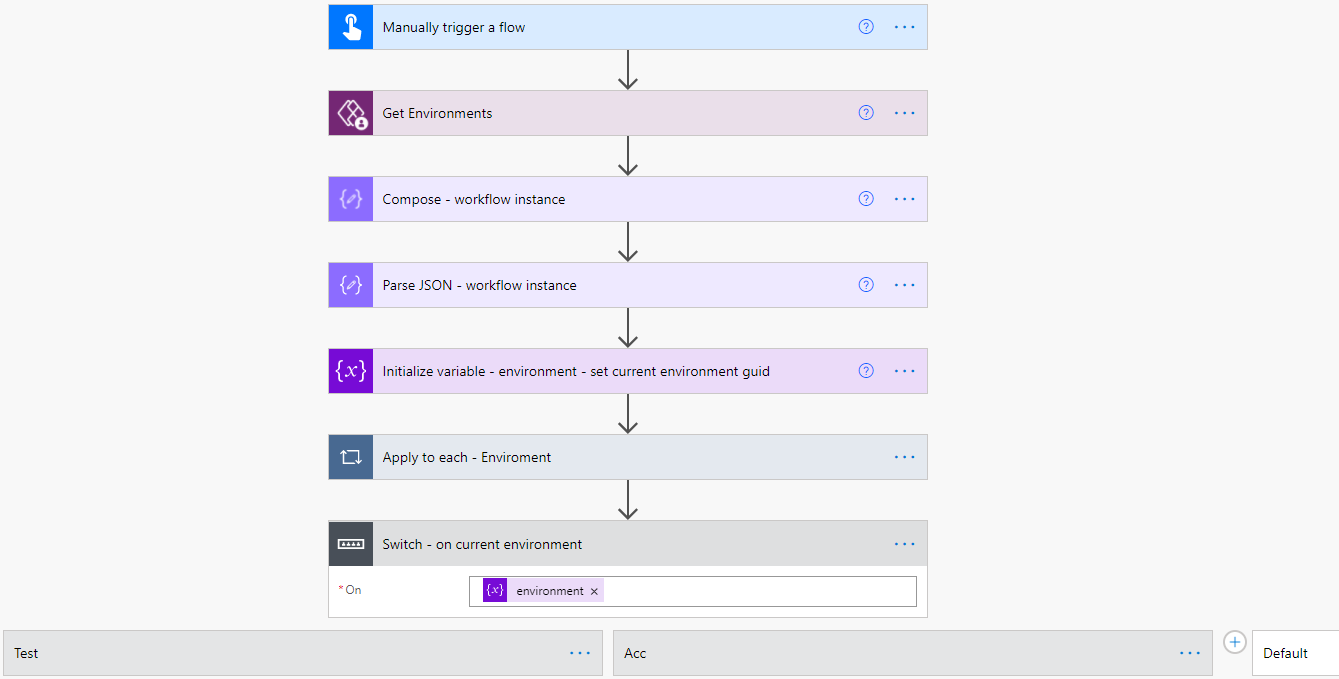
Create a flow and use the trigger Manually trigger a flow.
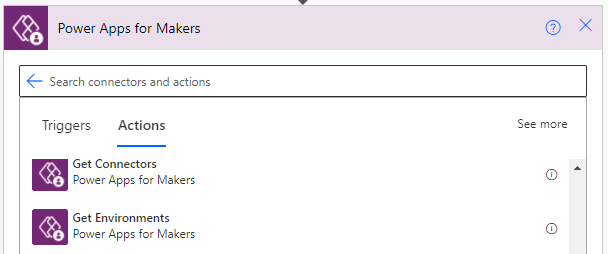
Add the action Get Environments under Power Apps for Makers
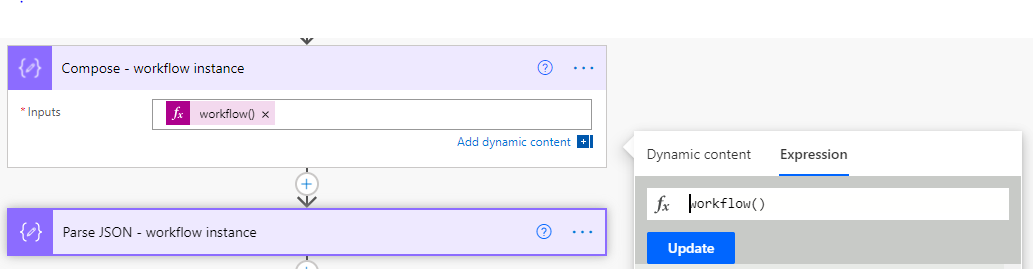
Add the Compose action and use the Workflow() expression, to get the current instance of the flow.
Parse the Output in a Parse JSON action.
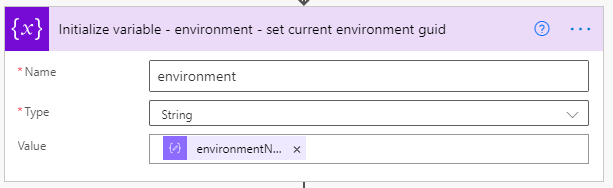
Initialize a variable with the name environment as a string.
The Value is the EnvironmentName form the Parse JSON output.
Now you have the GUID of the current Environment in the variable.
To find the name of the current environment we need to go through the results of the Get Environments action.
Add a Condition control action and check if the environment variable is equal to the name from the Get Environments actions.
This will automatically add an Apply to each, this is because the Get Environments action might return more than one environment.
Add a Set variable action in the If yes section and set the variable environment to displayName.
Now you have the Name of the current Environment in the variable.
The final step is to add a Switch control and switch based on the name of the current environment.
The flow will now look like this.
This website uses cookies to improve your experience. We'll assume you're ok with this, but you can opt-out if you wish.AcceptRead More
Privacy & Cookies Policy
Privacy Overview
This website uses cookies to improve your experience while you navigate through the website. Out of these, the cookies that are categorized as necessary are stored on your browser as they are essential for the working of basic functionalities of the website. We also use third-party cookies that help us analyze and understand how you use this website. These cookies will be stored in your browser only with your consent. You also have the option to opt-out of these cookies. But opting out of some of these cookies may affect your browsing experience.
Necessary cookies are absolutely essential for the website to function properly. This category only includes cookies that ensures basic functionalities and security features of the website. These cookies do not store any personal information.
Any cookies that may not be particularly necessary for the website to function and is used specifically to collect user personal data via analytics, ads, other embedded contents are termed as non-necessary cookies. It is mandatory to procure user consent prior to running these cookies on your website.