In today’s digital age, businesses are constantly looking for ways to streamline their processes and improve their customer experience. One way to do this is by leveraging the power of chatbots, which can quickly and efficiently answer customer inquiries. In this blog post, we will explore how to create a canvas app that uses Power Automate flow to ask ChatGPT API questions and display the response in the canvas app. By the end of this tutorial, you will have the tools and knowledge to build your own chatbot app that can answer your customers’ questions in real-time, enhancing their overall experience and increasing your operational efficiency. So, let’s get started!
Create a Chat GPT Api secret
- Open the ChatGPT API site.
- Login or create an account.
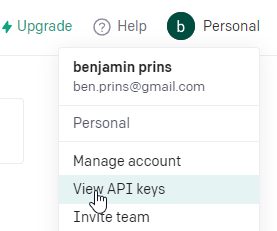
- Click on Personal, followed by View API keys.
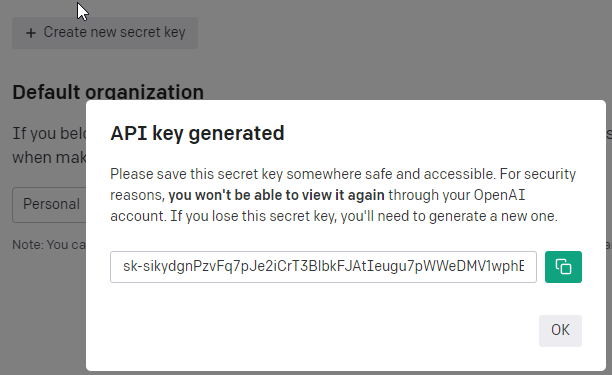
- Click on Create new secret key and save the key in a password vault.
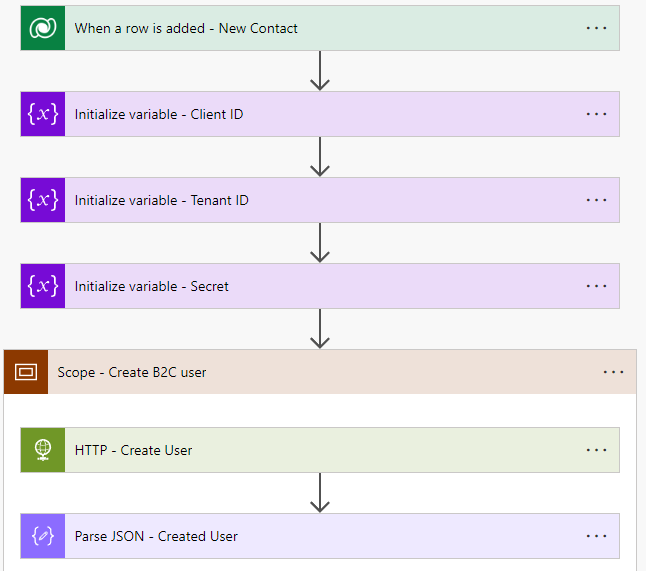
Creating the Power Automate Flow
- Create a new Power Automate flow with the name Canvas app – Chat GPT.
- Add as the trigger a PowerApps V2.
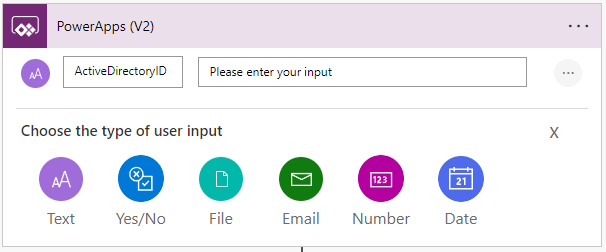
- Add a text input with the name Question.

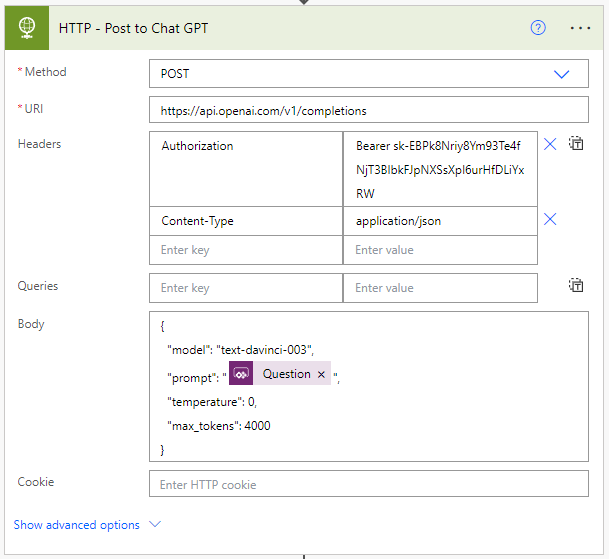
- Add a HTTP action with the name Post to Chat GPT.
- Set the Method to POST.
- Set the URI to https://api.openai.com/v1/completions.
- Set the header to Content-Type with value application/json.
- Set a second header to Authorization with the value Bearer [API Secret].
- Set the body to the following json code.
{
  "model": "text-davinci-003",
  "prompt": "triggerBody()['text']",
  "temperature": 0,
  "max_tokens": 4000
}
- Add a Parse JSON action with the name Chat GPT Response.
- Set the Content to Body (response of the HTTP call).
- Set the following schema (update the schema is the response is different).
{
    "type": "object",
    "properties": {
        "id": {
            "type": "string"
        },
        "object": {
            "type": "string"
        },
        "created": {
            "type": "integer"
        },
        "model": {
            "type": "string"
        },
        "choices": {
            "type": "array",
            "items": {
                "type": "object",
                "properties": {
                    "text": {
                        "type": "string"
                    },
                    "index": {
                        "type": "integer"
                    },
                    "logprobs": {},
                    "finish_reason": {
                        "type": "string"
                    }
                },
                "required": [
                    "text",
                    "index",
                    "logprobs",
                    "finish_reason"
                ]
            }
        },
        "usage": {
            "type": "object",
            "properties": {
                "prompt_tokens": {
                    "type": "integer"
                },
                "completion_tokens": {
                    "type": "integer"
                },
                "total_tokens": {
                    "type": "integer"
                }
            }
        }
    }
}
- Add the Respond to a PowerApp or Flow action.
- Add a text output called ChatGPTRepsonse and add the response from Chat GPT with the following code.
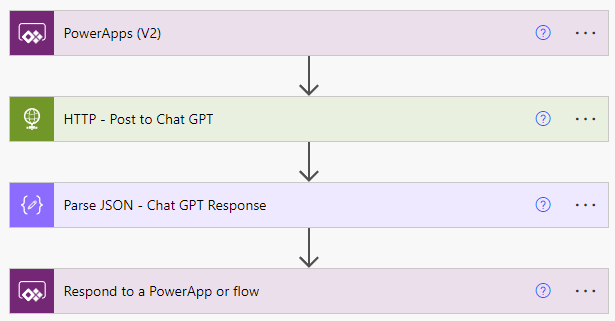
first(body('HTTP_-_Post_to_Chat_GPT')?['choices'])?['text']- The overall Power Automate flow will look like this.
Creating the Canvas app
- Open the Power Apps Studio and create a new canvas app.
- Rename Screen1 to Home.
- Add the Canvas app – Chat GPT Power Automate flow to the canvas app.

- Add a Rectange Shape to the top of the canvas app with the name RectTitle.
- Add a label over the RectTitle with the name lblChatGPT.
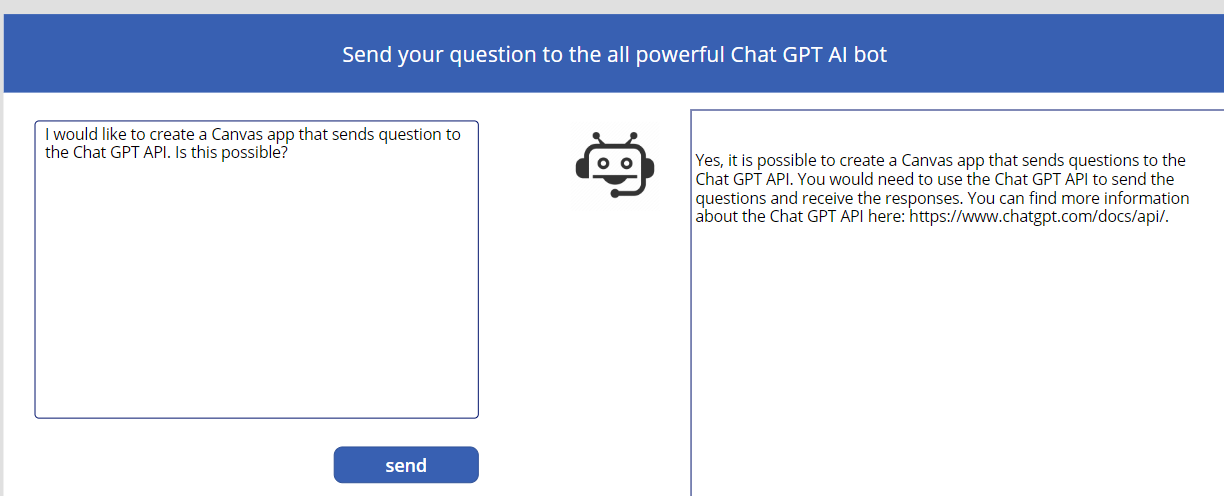
- Set the Text to “Send your question to the all powerful Chat GPT AI bot”.
- Add a label with the name lblGPTRepsonse.
- Place the lblGPTRepsonse on the right side of the screen.
- Add a text input with the name txtQuestion.
- Place the txtQuestion on the left side of the screen.
- Set the txtQuestion Default to “What is your question?”.
- If you like add an Image with the name imgRobot and add an image of a robot in the Image property.
- Place the imgRobot left and next to the lblGPTRepsonse.
- Add a button with the name btnSendQuestion.
- Set the following code on the Onselect of the btnSendQuestion.
- This will save the response in the variable repsonsegpt.
- Start the flow with the text provided in the textQuestion text input box.
Set(responsegpt, 'Canvasapp-ChatGPT'.Run(txtQuestion.Text).chatgptrespondse)